Click Online Self Service on the right-hand side of the screen.
Scroll down and click Faculty Self Service.
Click Grades Menu.
Click Final Grades Entry.
Choose the term that you want from the drop-down menu and click Submit.
Choose the course for which you want to enter final grades and click Submit.
You can set preferences to make the FLEX Final Grades Entry system easier for you to use. You can change the student list on the Grade Input Screen to display students by first name, last name or student number, and you can select the number of students that will be displayed on each screen.
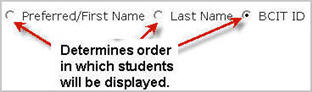
Click one of the three buttons that appears above the student list to select how you want to display the student list. Your choices are Preferred/First Name, Last Name or BCIT ID.
Browse the dropdown menu to select the number of students you would like to be listed on each screen. You can select between 5 and 40 students per screen in increments of 5 students.
If you have been using Banner Grade Book to record your marks throughout the course, your final grades will automatically be transferred to Final Grades Entry. You will only need to use Final Grades Entry to:
create any required failure reports
create any required attendance reports
input grades requiring a letter after them (e.g. %F, %A). Final Grades will leave these grades blank when it imports data from Banner Grade Book.
If you have not used the Grade Book, follow the procedure below to input your marks using Final Grades:
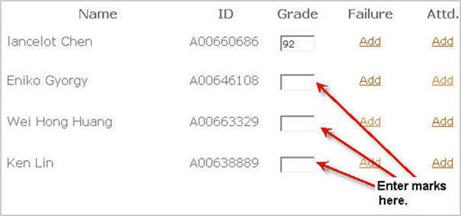
Find the student for whom you wish to enter grades, and click inside the box beside their name.
Type the final grade (i.e a valid grade as listed below). See detailed marks definitions for complete descriptions.
Whole number for a passing grade (usually 50) to 100. No decimals.
For failing grades, enter whole number followed by an “F”.
INC (incomplete).
A (aegrotat, student missed final exam due to illness).
S (satisfactory).
U (unsatisfactory).
AUD (audited course).
ATT (non-credit course, only attendance is required).
V (vanished, discontinued course without formal notification).
Continue until you have entered all the grades. There must be a grade entered for each student.
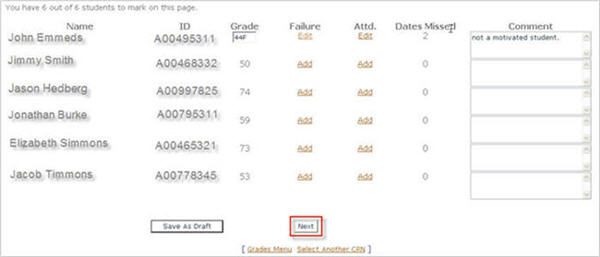
After you have input all your final grades, click the Save as Draft button to save your work.
A red asterisk beside a grade indicates that it has been entered in error. To see more details on the error, click the Next button and read the Review screen.
You can now proceed with creating any required attendance or failure reports.
If you wish to file reports as you enter your grades, remember to save your work prior to opening a failure or attendance report.
Note: If you open a failure report or an attendance report without saving your work, you may lose the grades you have inputted.
When you have entered all required grades, reports and comments, click the Next button to view a summary of your grades.
Clear any errors that appear (red asterisks).
Click the Send to Approver button to forward your grades to the approver.
Click OK in the pop-up window to refresh the screen. A confirmation is displayed showing that your grades have been forwarded.
Tip
You must have an appropriate grade for every student or else the system will not allow you to submit.
You can paste your grades directly into the FLEX Final Grades Entry system from an Excel spreadsheet. The procedure involves two main steps: setting up your Excel spreadsheet and pasting your grades into Final Grades Entry.
Step one: preparing the Excel spreadsheet
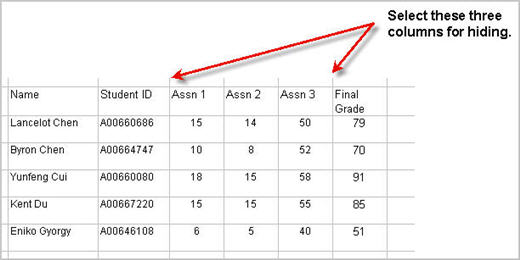
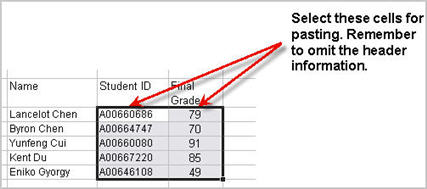
The Copy and Paste feature in Final Grades Entry will only accept paired entries of student ID numbers and grades. To format your data correctly, you need to arrange your spreadsheet so that you have the column of Student ID numbers directly beside the column of grades that you want to paste. The easiest way to do this is to delete the columns in between.
Follow these steps to prepare your Excel data for copying.
Locate the column of student ID numbers and the column of marks that you want to paste on your spreadsheet.
Select all of the columns in between the student IDs and the marks.
Right click with the mouse and select Delete. The intervening columns should disappear.
Select the column of student IDs and grades that you want to paste into Final Grades Entry.
Click Edit/Copy from the menu bar or press CTRL + C to copy the information.
Step two: pasting your marks into final grades
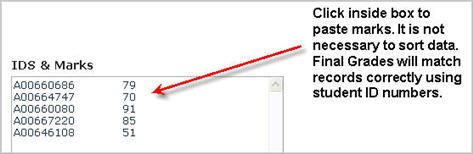
From the Grade Input Screen, Click the Copy and Paste button. A text box labeled IDs & Marks should appear.
Click inside the box and select Paste from your toolbar or press CTRL + V to paste the data you copied in step one.
Click the Save Marks button to enter the grades into Final Grades Entry or click the CLOSE button to abort the paste. When you have successfully pasted your marks into Final Grades Entry, you will be returned to the Grades Input Screen. If one or more of the grades or student IDs is invalid, you will be returned to the IDs & Marks dialogue box.
Note: You don’t need to sort your entries (i.e. by last name or Student ID). The system will find the match from sorted or unsorted entries.
Use the Failure Report to record your comments about students who have failed your course. According to BCIT policy, you must file a failure report for each of your students who have received a failing grade.
Caution!
Opening a failure report or an attendance report without saving your grades input may result in the loss of marks already entered. Before clicking to open a failure report or an attendance report, save your input by clicking the Save as Draft button on the bottom of the Input Grades screen.
Please remember to save your work often.
To add a failure report:
Click the ADD link under the Failure Column for the student you wish to submit a failure report for. The Failure Report Dialogue Box will open.
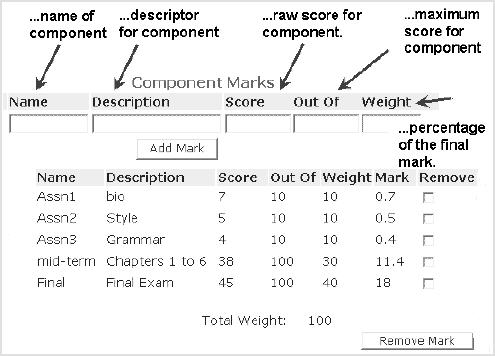
Input the Component Marks for the student as follows:
Enter the component name, description, score, maximum score and weight into the appropriate boxes.
When you have typed the information for the first component, click Add Mark to save it. A new line of component information will appear below the Add Mark button.
Type the remaining components into the same fields as before adding a new line each time. Continue until you have typed all the required component information.
If you need to remove a line of component information, check the box at the end of the line you wish to remove, and then click the Remove Mark button to delete that line.
Type any additional comments you wish to add into the comments box, and click Done to complete your failure report. You will be returned to the Grade Input Screen, and the link in the Failure Column should now say Edit instead of Add.
Once you have entered all required marks, comments and reports, click Next.
Review your input and check for errors, if there are no red asterisks, you can click Submit to send your marks to the approver.
Use the Attendance Report to record the dates and reasons that students were absent from class. This information is mandatory for some programs. Check with your program head or program assistant if you’re not sure whether you need to file one.
Click on the Add button under the Attd. column for the student you wish to submit an attendance report for. The attendance report dialogue box will open.
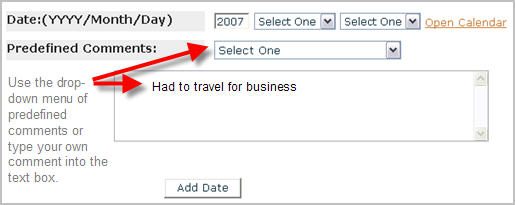
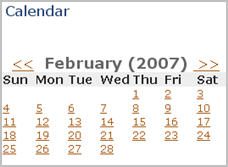
Record the date that the student was absent. Type the year into the box if it does not already appear, and use the drop-down menus for the month and day.Alternatively, you can pick the appropriate date from the pop-up calendar by clicking Open Calendar
Indicate the reason the student was absent. You can either use one of the predefined reasons from the drop-down menu or you can type your own into the text box.
Once you’ve recorded the reason for the absence, click the Add Date button to submit it. The date and reason for the absence will appear in a list below the Add Date button.
Continue to add dates for the selected student until you have accounted for all of the student’s absences.
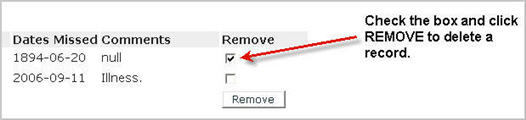
To delete a date of absence, check the box under the remove column and click the Remove button. If you need to delete all the dates of absence for the selected student, click Cancel All Dates.
When you’ve entered all of the absence dates for the selected student, click Done.
You will be returned to the Grade Input Screen and the link in the Attd. column will read Edit instead of Add.
If you have now entered all required marks, comments and reports, click Next to continue to the Review Screen.
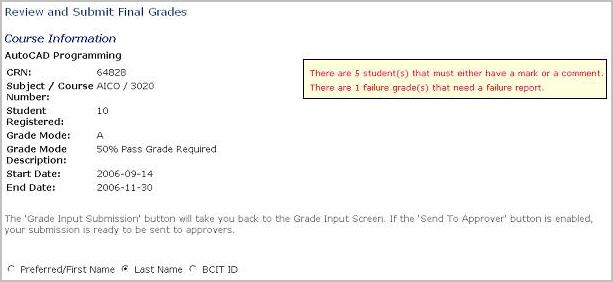
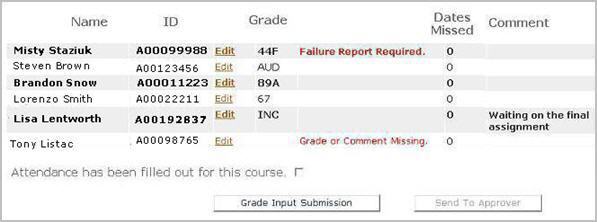
The purpose of this screen is to review the grades and reports that you have entered thus far, and deal with any missing or inaccurate information. The top section is comprised of the Course Information, similar to the Input Screen, with the right portion reserved for missing information or needed corrections.
The bottom portion has one listing for each student. If there are issues with that student, I.E. missing failure reports or blank grades, they can be seen on this page.
Beside each student number is the Edit link, which will open the grade data for each individual student. Here you will be able to make any additions/edits necessary for completing the grades submission portion.
Should you need to view the Grade Input Screen again, simply click the appropriate button on the left to be returned to the screen.
Note: As attendance is done on an exception basis, you will be asked to check the attendance box to ensure that attendance has been taken.
Once you have completed your edits, all the error messages (in red) will be gone. It is here that the “Send to Approver” button will be enabled (clickable). Click it and a confirmation screen will appear notifying you that your grades are now sent for approval.
You may now select another CRN to enter grades, or log out.


 Alternatively, you can pick the appropriate date from the pop-up calendar by clicking Open Calendar