One of the features of myBCIT for faculty is an online grade book. Through the Faculty Services page of myBCIT, you can access and enter grade book marks for the courses you are currently teaching. Only instructors have access to Faculty Services and the online grade book feature.
The online grade book allows you to enter all the components used in the calculation of your final grade. You also have the option of allowing your students to view their grade and grade statistics for the course. The grade book also automatically calculates the students’ final grade.
- Using Banner Gradebook results in a comprehensive understanding of a student’s course performance, as each gradable component has a record. This ensures that component scores are readily available for reporting purposes, and proves helpful if a student requests a marks review.
- Simplifies the creation of Failure Reports – It takes the same amount of time to create a Gradebook for your course as it does to create just one Failure Report.
- Reduces disruption if another instructor has to take over the course.
- Eliminates the need for maintaining student marks in Excel spreadsheets. The initial time investment in implementing this system can yield substantial time savings when it comes to grading exams and calculating final grades.
The first time you use the grade book, you will need to set up all the components for the course. All component marks can then be entered and viewed in myBCIT. When all component marks are entered, the final mark is automatically calculated and sent to academic history. Students can then view their marks via the web.
From the Online Self Service, click on Faculty Self Service.
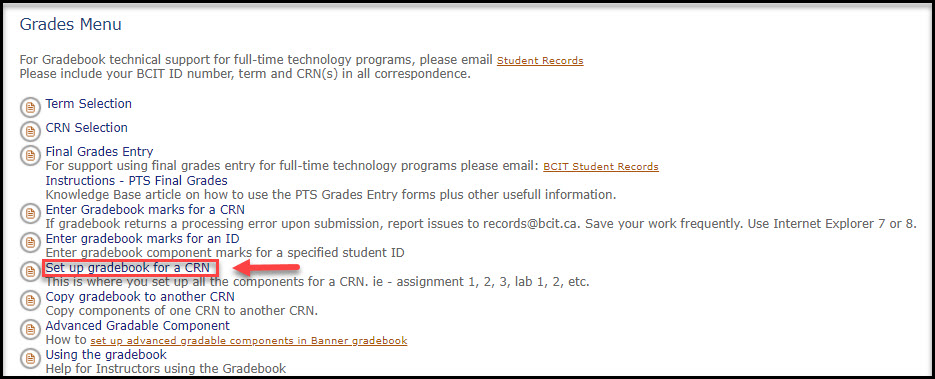
Click on Grades Menu, and then click on Set Up Gradebook for a CRN.
From the drop down menu select the term for which you want to create Gradable Components. Click the Submit Term button to submit term.
From the drop down menu, select the CRN for the course for which you want to create Gradable Components. Only the courses you are timetabled against show on the drop down menu. (If you are teaching a course which is not displayed, contact the timetabling office at timetable@bcit.ca.) Click the Submit CRN button to submit the CRN.
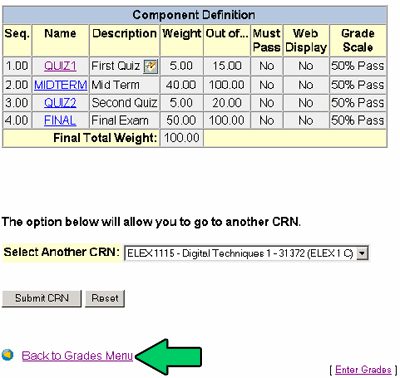
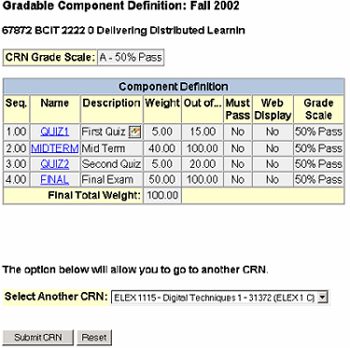
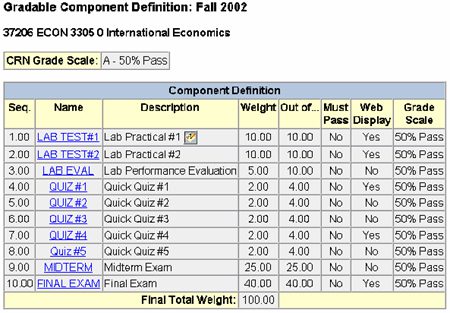
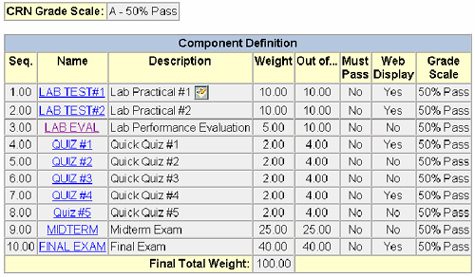
The Gradable Component Definition screen is displayed
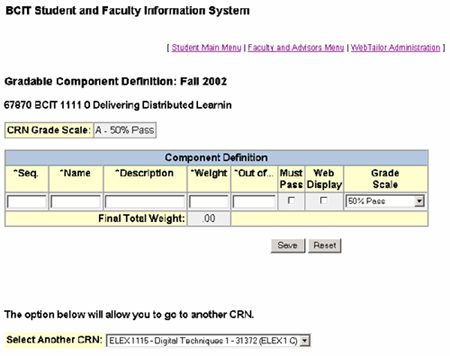
To define each gradable component:
- Enter the name of the component – the Name text box should be a unique name that will be used to identify a gradable component. This gradable component name could be e.g. Quiz1, or assignment1, or mid term or final exam. Tab over to next text box.
- Enter the Sequence number – the value you type inside the Seq text box will determine the order in which the components will be displayed to the student in the Grade Detail Display in Web for Students . This should represent the chronological order in which the components are assigned to the student. E.g. start with 1. Tab over to next text box.
- Enter a description of the component – a description that would be meaningful to the student. E.g. if you entered quiz1 in the name box, you could enter first quiz in the Description text box.
- Enter the course weight of the component- the raw weight for the gradable component. This value will be used to define the weight that the mark for this component will have in the calculation of the final grade. E.g. “5.00 for QUIZ1 means that the first quiz counts for 5% of the final mark for the course. Weighting must add up to 100%.
- Enter the raw score total for the gradable component – the Out of text box is the total attainable marks for the component. The value in this field is used to determine the percentage for the component. E.g. if quiz1 is worth 15 marks, type in 15. The grade book will calculate the percentage marks.
Note: If a gradable component is out of a value other than 100, be sure to enter the marks for it as raw scores, not as percentages.
6. Indicate whether the student must pass this component to pass the course – under Must Pass , click the check box if the student must pass this component to pass the course.
7. Indicate whether the student can see their mark for this component on the web – under Web Display , click the check box if the student can view this grade on the web.
8. From the drop down menu, select the grade scale for this component. E.g. 50% pass means that every grade under 50% will have an ‘F’ beside it – 49F; No F Grades means that no grade will have an F beside it – 49. Whether or not the F displays has no bearing on the final calculation.
9. Click on the Save button.
Repeat steps 1-9 to enter the reset of your gradable components for this course.
When you have entered all the gradable components and your weighting totals 100, you can either select another CRN from the drop down box, or click Back to Grades Menu to copy the components you just set up to another CRN (rather than entering each CRN from scratch again).
You also have the option of adding a longer description to the component. Click on the Component Name box
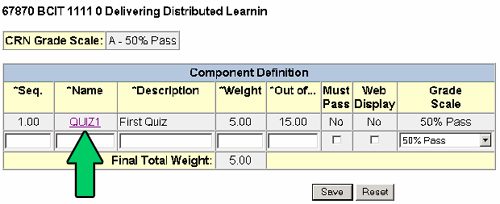
The update Gradable Component page is displayed
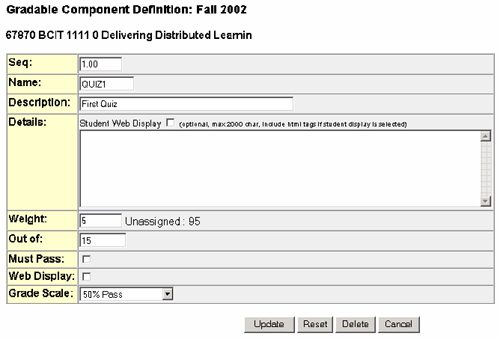
In the Details box, you can enter a description up to 2000 characters. If you click in the Student Web Display , this description will show as an icon on the web page. Clicking on the icon will display the description. An example of what you may want to put in this description could be “quiz involves chapters 1-4 in the text”.
Once you have made your changes, click the Update button.
If you want to copy the components you have just set up to another CRN:
Click Back to Grades Menu
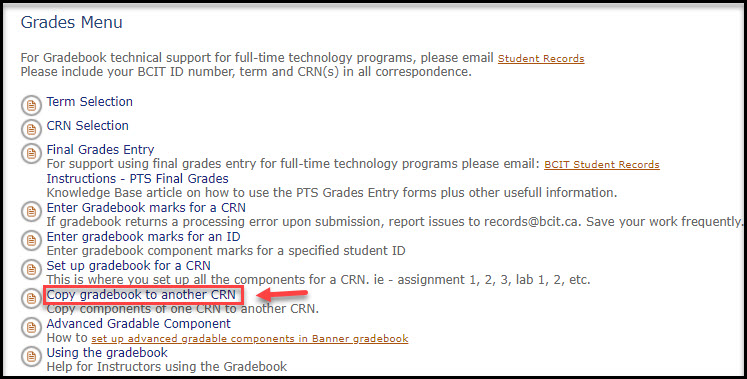
Click Copy gradebook to another CRN.
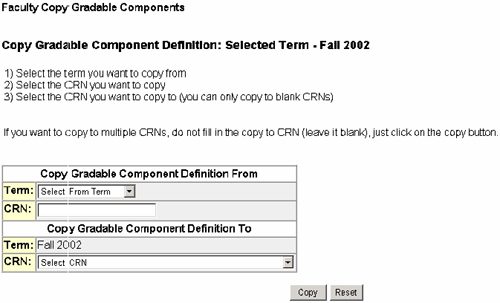
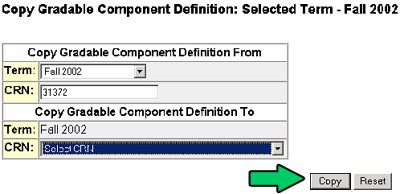
- Select the term you want to copy from e.g. 200430
- Type in the CRN you want to copy e.g. the CRN you just entered components for
- The ‘Copy Gradable Component Definition To’ term is defaulted from the term you chose from the ‘select term’ drop down box on the grades main menu.
- Select the ‘Copy Gradable Component Definition To’ CRN from the drop down box. This box only displays the CRNs you are teaching and have not set up gradable components for.
- Click Copy button
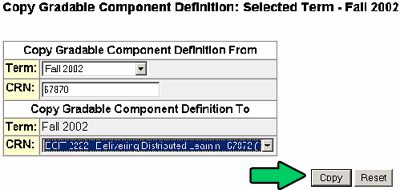
The following screen will display indicating the the gradable components have been copied.
Follow steps 1 – 3 from the previous list.
- Leave the ‘Copy Gradable Component Definition To’ CRN as the default (select CRN)
- Click the Copy button
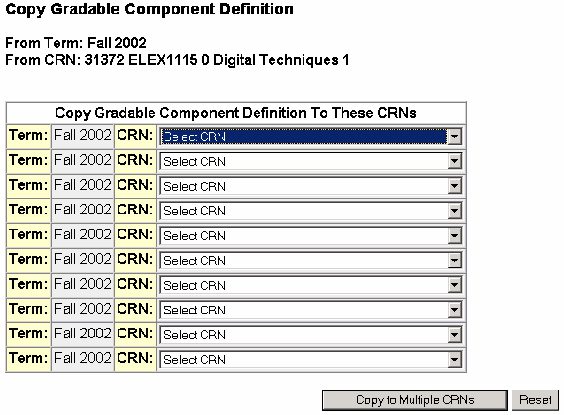
The following screen is displayed allowing you to choose any CRN that does not already have components defined.
Select the CRNs you want to copy components into, then click the Copy to Multiple CRNs button.
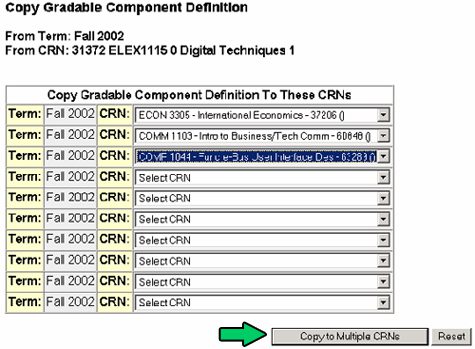
The following screen will display indicating the the gradable components have been copied
Once you have setup your components, you can enter grades for these components. If you have grades to enter immediately, click on the Enter Grades button
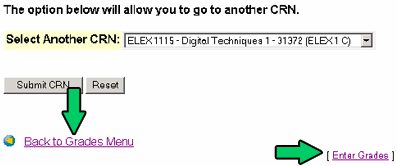
You can also click on the Back to Grades Menu button.
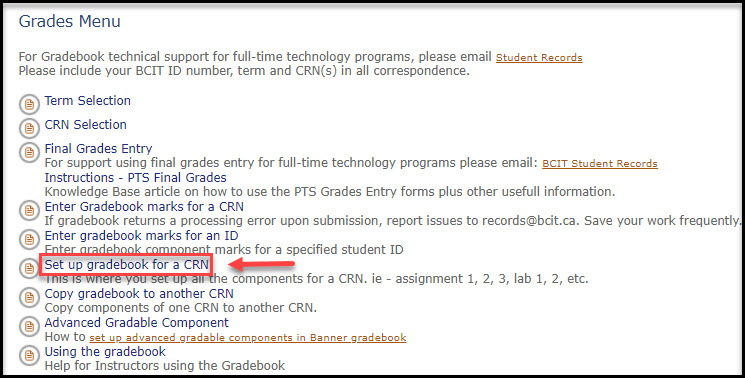
Click on Set up gradebook for a CRN.
From the drop down menu select the term for which you want to update Gradable Components. Click the Submit Term button to submit term.
From the drop down menu, select the CRN for the course for which you want to update Gradable Components. Only the courses you are timetabled against show on the drop down menu. (If you are teaching a course which is not displayed, contact the timetabling office at xxxx.) Click the Submit CRN button to submit the CRN.
Note: the following restrictions apply to updates to existing component definitions. If Web Display is turned on, students can view grades as soon as they are entered.
- Final grades are calculated automatically after you enter marks in the last component.
- You can revise any Gradable Component until you have entered the marks in the last component.
- You cannot change grades after they are rolled to history. To change grades after they are rolled to history, fill out a mark change form and submit it to Student Records.
- Component definitions cannot be removed if a final grade has been entered for any student in the class
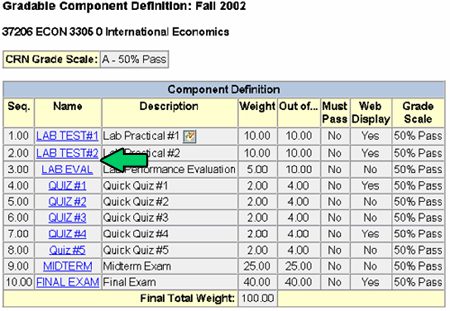
Click on the Component Name field for the one you want to change.
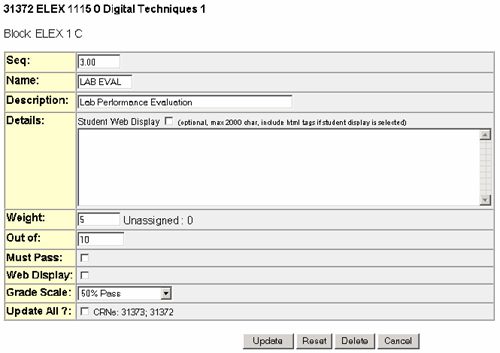
You have the ability to change or delete any of the attributes you originally set up. After a change, click the Update button, and if you want to delete the attribute, click the Delete button. If you have an option to Update All , clicking in the box allows you to make the same changes to all the crns (listed on the line) at the same time. E.g. if you clicked on Web Display and then clicked on Update All , all the listed crns will have the Web Display turned on.
Warning: Updates to any field (except the Description and Web Display) in this block will result in the recalculation of grades for all students in the class. This can be done as long as the grades have not been rolled to academic history. This is also true for inserted or deleted component records.
From the Grades Menu , click on Electronic Gradebook by Component
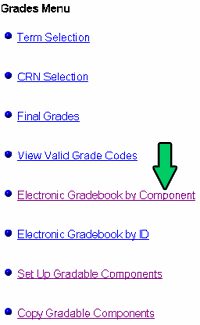
From the drop down menu select the term for which you want to enter Gradable Component marks. Click the Submit Term button to submit term.
From the drop down menu, select the CRN for the course for which you want to enter marks. Only the courses you are timetabled against show on the drop down menu. (If you are teaching a course which is not displayed, contact the timetabling office at timetabl@bcit.ca.) Click the Submit CRN button to submit the CRN.
The electronic gradebook for the crn is displayed.
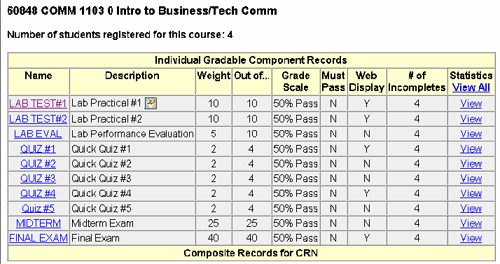
Note: You also have the option of entering grades in a single step using data from an Excel spread sheet. For information on how to paste marks from Excel, see copy and paste marks into the Gradebook from an Excel spread sheet
Click on the component name you want to enter marks into
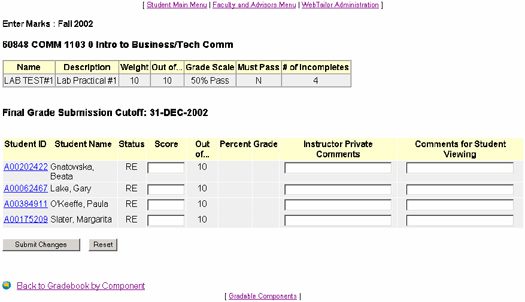
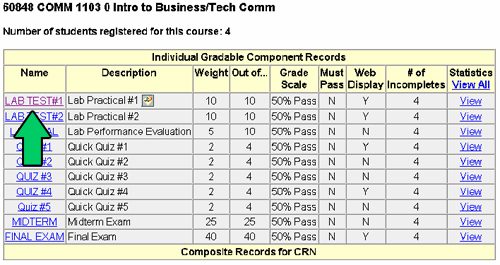
Beside each student, enter their component mark. Notations made under Instructor Private Comments are not viewed anywhere else except on cognos reports. Notations under Comments for Student Viewing are only available to the student if Display on Web is clicked on when you set up components.
Once all the grades have been entered, click the Submit Changes button.
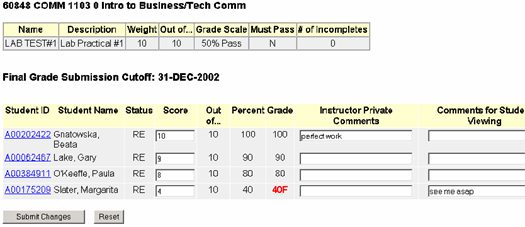
Notice that any failing grade is displayed in red. The grade is also displayed as 40F as the grade scale chosen was ’50 % Pass ‘.
Continue to enter grades by either the Next CRN button at the top or choose another CRN from the drop down list at the bottom.
You also have the ability to view statistics for each crn. When you are viewing individual component records, click the View button.
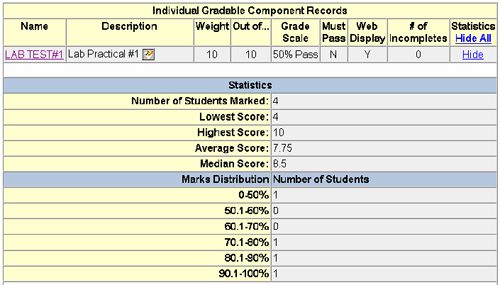
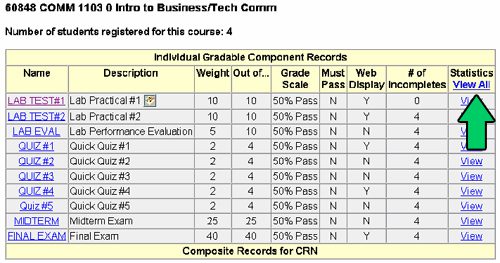
The procedure for copying and pasting marks into the Gradebook from an Excel spreadsheet involves two main steps: setting up your Excel spreadsheet and pasting your marks into the Gradebook.
Step one: preparing the Excel spreadsheet
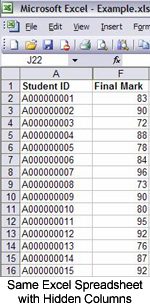
The Copy and Paste feature will only accept paired entries of Student ID numbers and marks. To format your data correctly, you need to arrange your spreadsheet so that you have the column of Student ID numbers directly beside the column of marks that you want to paste. The easiest way to do this is to hide any columns in between. Follow these steps to prepare your Excel data for copying.
- Locate the column of Student ID numbers and the column of marks that you want to paste on your spreadsheet
- Select all of the columns in between the Student IDs and the marks. (See Special Notes below for best results when copying and pasting.)
- Click FORMAT / COLUMNS / HIDE from the menu bar or right click with the mouse and select HIDE. The intervening columns should disappear.
- Select the Student IDs and marks that you want to paste into the Gradebook.
- Click EDIT / Copy from the menu bar or press CONTROL C to copy the information.

- Set the Excel cells containing the marks to two decimal places prior to copying.
- Be sure to omit any column heading information and extra characters or spaces in the Student ID and marks fields.
- You don’t need to sort your entries (i.e. by last name or Student ID). The system will find the match from sorted or unsorted entries.
Step two: pasting your marks into the grade book
- From the GRADES MENU click the link to ENTER GRADEBOOK MARKS FOR A CRN.
- Choose the course (CRN) you wish to enter marks for and click SUBMIT.
- Choose the component you wish to enter marks for by clicking on the component name in the description column.
- Find the link to “copy and paste” from Excel near the top of screen. You can click either the COPY AND PASTE or the HERE link to open a window for pasting.

- Click inside the Gradebook Scores box and paste (CONTROL V) to insert the Excel data.Note: You should still have the Excel data on your clip board from the copy procedure in step one. If no data is pasted, repeat the copy procedure from step one and try pasting again.
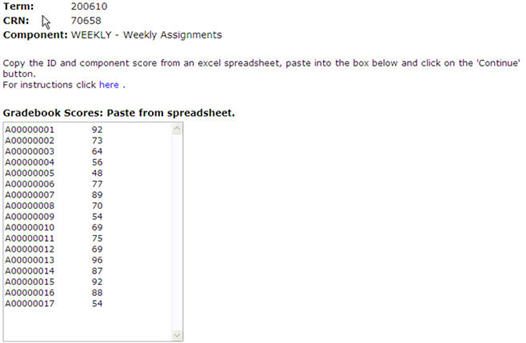
- Click CONTINUE once the EXcel data has been pasted into the Grade Scores box.
- Check that the number of students and marks match the number of records you are pasting. (See the Error Messages section for additional information.
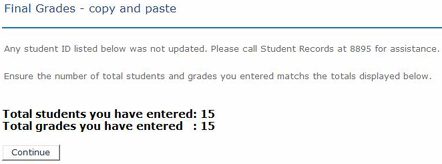
- Click CONTINUE.
- The pasted marks will have a red “T” beside them to indicate that they are temporary.

- Click SUBMIT to save these grades.
A message appears to indicate the marks were successfully submitted. (See the Error Messages section for additional information)
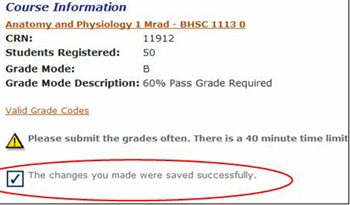
If an invalid mark was entered (such as a mark below the Pass Grade Required), a red asterisk (*) will appear next to the invalid mark. You will need to change the invalid mark and click SUBMIT in order save your changes.
| Error Message | Description | Resolution |
|---|---|---|
| “Axxxxxxxx is not a registered student in this section.” | This message appears after clicking Continue in Step 8 above.
This student may be registered in this course but not in this particular CRN. |
If student is not in this section (CRN), simply make note of the ID and continue with the procedure to submit the other marks. Repeat the process for the student IDs that you missed ensuring that the appropriate CRN is selected.
Ensure that the student ID was entered into your spreadsheet properly. If not, enter the correct student ID and repeat the copy and paste procedure. |
| “A xxxxxxxx is not a valid BCIT ID.” | This message appears after clicking CONTINUE in Step 8 above. The error message appears because there is an extra space in the ID. | Remove the extra space (or other special characters) from the ID and repeat the steps to copy and paste. |
| “Incorrectly formatted data at row x.” | This message appears after clicking CONTINUE in Step 8 above.
The error message appears because there is a blank line (extra row in the spreadsheet) inserted between two rows of data. |
Remove the extra line/row from spreadsheet and repeat the steps to copy and paste. |
| “An invalid grade was entered, please check your work and submit again. Your last changes were not saved. Please review the grades indicated by a red asterisk (*).” | This message appears after clicking SUBMIT in Step 10 above.
The error message appears because the grade entered is not a valid grade. |
Correct the invalid mark by typing over it with a valid mark (i.e. typing the letter ‘F’ after the mark to indicate failure).
Click SUBMIT to post the valid mark. |
 Hint
Hint
- Turn all ‘Web Display’ off at the beginning of the term. After you enter the marks for a component, you can control when the students see their marks. E.g. if you give an exam in three different CRNs on different days, you can turn the marks onto ‘web display’ only after all the marks have been entered.
More information about Banner
-
Frequently Asked Questions about the Employee Dashboard in myBCIT
-
Hiring process in Banner – EHire instructions using NWIHIRE / NWAHIRE
-
Managing Mailing Lists and Subscribers in Public Website WordPress
-
Navigating Through PeopleAdmin as a Selection Committee Member
-
Reviewing historical Competition hires prior to July 31, 2019 in Banner