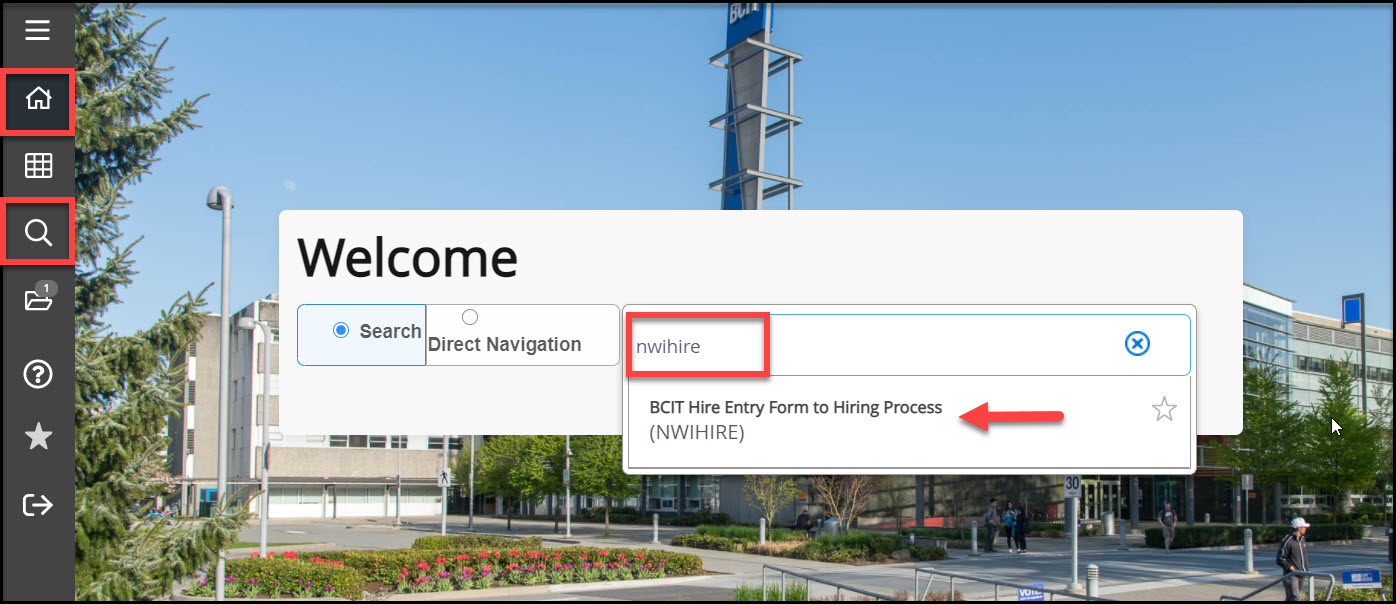
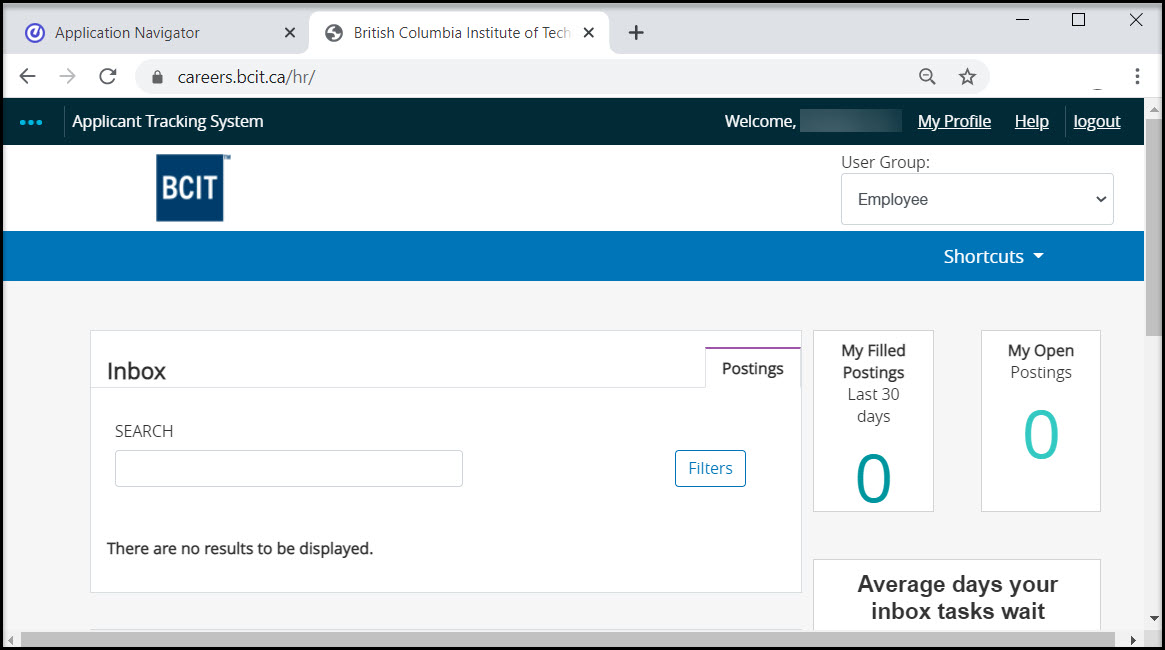
The following document provides instructional steps to the hiring processes for Auxiliaries, Extensions or Preferred Candidates through the NWIHIRE (Hiring Process) page in Banner, which will also navigate you to the NWAHIRE (Hiring Form) page. Instructions will also be provided on how to navigate to the PeopleAdmin system.
Note: NWIHIRE is used for any Hires that do NOT require a competition number (where job is not posted).
Using the NWIHIRE (Hiring Process) and NWAHIRE (Hiring Form) pages in Banner
| Banner E-Hire | PeopleAdmin |
|---|---|
| Request an Auxiliary | Create and approve competitions |
| Extend an Auxiliary or Temporary Contract | Manage the Applicant Portal and application process |
| Hire without a posting (Preferred Candidate) | Selection Committee activities |
| Approve requests related to the above transactions | Hire a candidate |
There are 2 ways to access the NWIHIRE page in Banner.
Note: All Users are assigned access to specific Banner security classes according to the needs of their specific role at BCIT. If you require access to the Banner hiring pages, this access will need to be requested through the submission of an IT ticket that is approved by your department manager.
Method 1
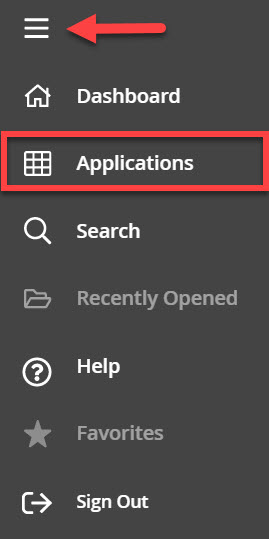
- Click the toggle icon to open up the menu panel.
- Click Applications.
- Click Banner.
- Scroll down and click BCIT Hiring Menu (*HIRE).
- Click BCIT Hire Entry Form to Hiring Process (NWIHIRE).
Method 2
In the main page of NWIHIRE, there are four selections to choose from:
| Option | When to use |
|---|---|
| Request an Auxiliary | Use if you are requesting an Auxiliary. |
| Employee Extension | Use if you are extending an Employee who’s current job End Date is in the future. |
| Preferred Candidate | Use if you are hiring without a posting. |
| Create a Posting in PeopleAdmin | Use if a current opening requires a posting/competition. |
Auxiliaries provide support where employees are absent from the job due to sick leave, vacation, on training courses, assisting on projects, or coping with heavy workloads on any of the BCIT campuses.
- Select Request an Auxiliary.
- Position Number: Enter the Position Control Number (PCN).
Note: If uncertain of the code, click on the Search ellipses (•••) to view a list of position codes that you have been granted access to. You can also enter and fine-tune your search in the Criteria box. Click OK on selection.
FYI: Access is based on the default organization code set up by the Budget and Analysis office for each position control number. This is so originators (etc.) can see all of the Org Codes that a PCN will be charged to.
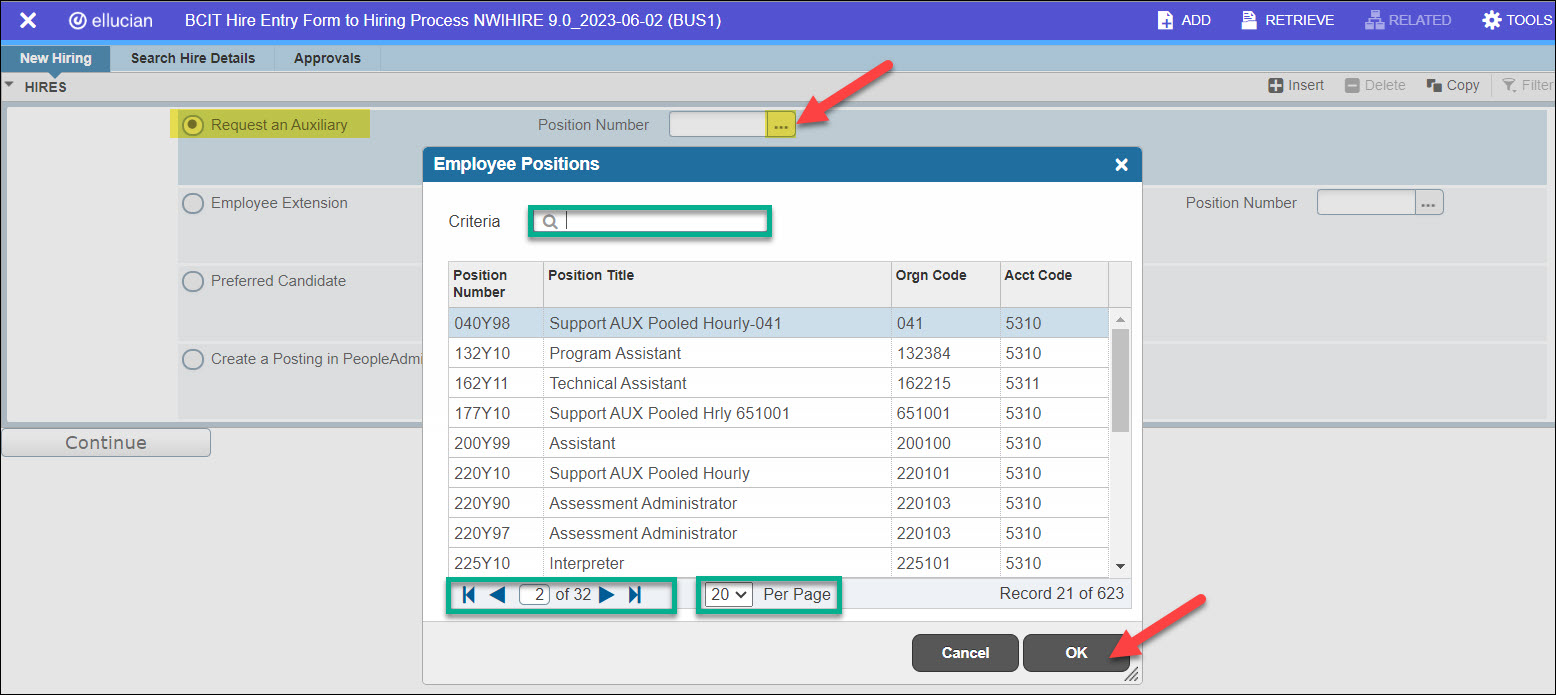
- Once the Position Number is in the field, click Continue.
 You will then be redirected to the NWAHIRE (BCIT Hiring Form) page.
 - Originator: Your ID will auto-populate.
- Preferred Candidate: Box defaults as blank for an Auxiliary placement.
- ID: Leave blank for an Auxiliary placement.
- Name: Defaults as Auxiliary.
Note: Although the name is defaulted to Auxiliary, it is open to changes. If the candidate is already known, the Originator can place an ID or name in. Please note that the system will not allow both the ID and Name field to be filled. It must be one or the other. - Reports To: Mandatory field – Enter ID number or click on the Search ellipses (•••) to locate the person this Hire will report to. The name will default once the ID number is entered.
- Reason for Hiring: Mandatory field – Enter text explanation for the Auxiliary placement.
- Click on the Next Section button on the bottom left of the page or <Alt+PageDown> to proceed to next section. You can also click your mouse into the cell of your next box.
- Reason: Click on the Search ellipses (•••) to select from existing description options, highlight the selection, and click OK.
- FTE: Mandatory field – Enter the FTE (Full-time Equivalent).
- Backfill/Replace ID: This field is mandatory if a backfill/replace reason is chosen – Enter ID number of person referenced in reason, or click on the Search ellipses (•••) to locate ID. The name will default once the ID number is entered.
- PCN: This field is mandatory if a backfill/replace reason is chosen – Click on the Search ellipses (•••) and the Position Number(s) + Position Title(s) + Orgn Code(s) of the person being backfilled will populate. Highlight on the correct selection, and click OK.
- In the FOAPAL section, the Fund, Orgn, Account, Program, Activity, Location and Percent codes will be defaulted.
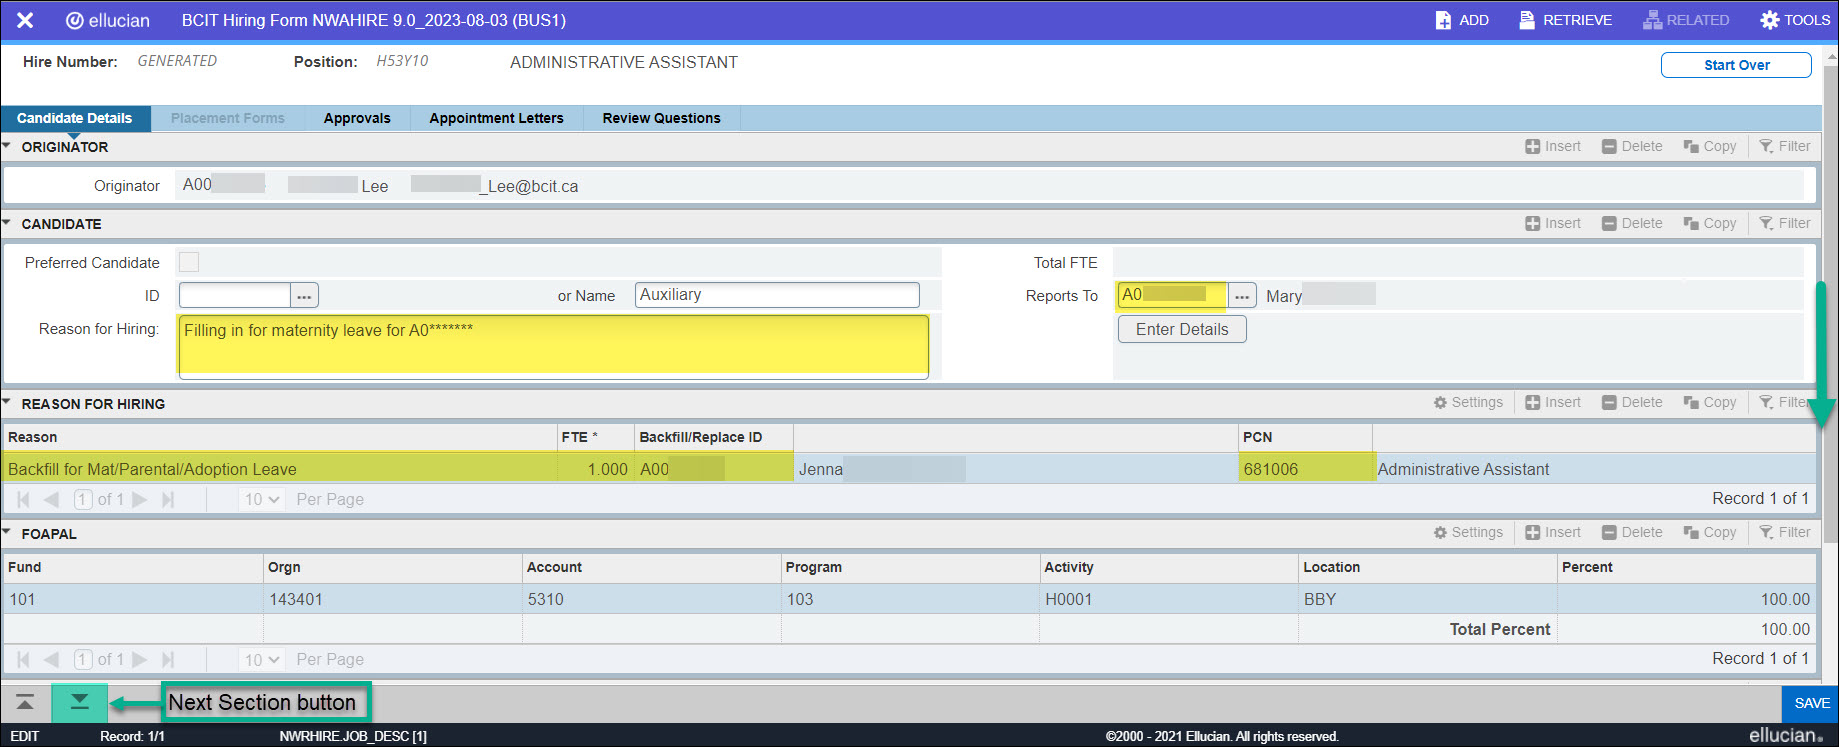 Scroll down the bar on the right to enter more information in additional sections.
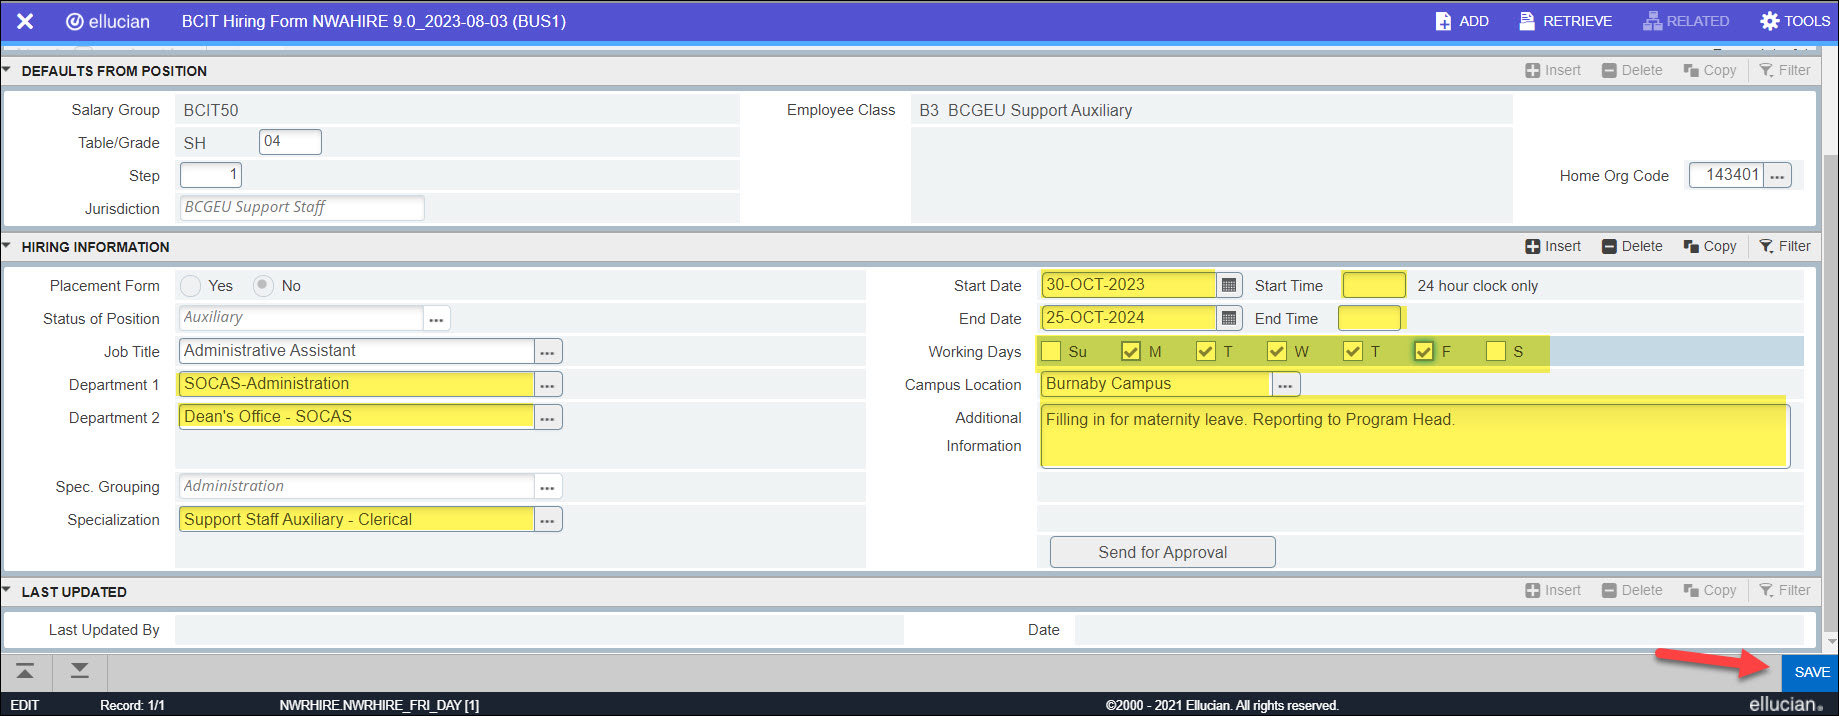
 - Step: Should default to 1. Do not change.
- Home Org Code: Defaults from the Position. Do not change.
- Placement Form: Defaults as No for an Auxiliary placement.
- Status of Position: Defaults as Auxiliary for an Auxiliary placement.
- Job Title: Defaults, and should match the position title indicated in the Header.
- Department 1: This is the high-level department or school. Click on the Search ellipses (•••) to select, and click OK.
- Department 2: This is the second-level of the Department 1 entered. Click on the Search ellipses (•••) to select, and click OK.
- Spec. Grouping: Defaults as Administration for an Auxiliary placement.
- Specialization: Click on the Search ellipses (•••) and select one of the following 4 options.
• Support Staff Auxiliary – CASP (Communication Access Service Providers) • Support Staff Auxiliary – Clerical • Support Staff Auxiliary – First Aid • Support Staff Auxiliary – Trades - Start Date: Enter start date of contract. You can also click on the Calendar icon at right to select date.
- End Date: Enter end date of contract. You can also click on the Calendar icon at right to select date.
- Start Time: This field is not mandatory – If required, enter the time the employee starts the work day. Use 24 hour clock.
Note: For any on-call or staggered shifts, leave blank. You can make clarification on shift hours under the Additional Information box. - End Time: This field is not mandatory – If required, enter the time the employee ends the work day. Use 24 hour clock.
Note: For any on-call or staggered shifts, leave blank. You can make clarification on shift hours under the Additional Information box. - Working Days: If applicable, enter the days of the week the employee will be working.
- Campus Location: Mandatory field – Click on the Search ellipses (•••) to select campus, and click OK.
- Additional Information: Enter any additional information.
EXAMPLE: Who and/or where the Auxiliary should report to.
Note: The information entered in this box will be translated to the Auxiliary appointment letter, and therefore should not contain any confidential information. - Click Save or <F10>
 NOTES:
• A message will pop up on the top-right corner confirming a successful save. • The new Hire Number will populate on the top-left corner. • At this point, it will indicate that you are in “Draft” status at the header bar, which means that you can go back in to that Hire Number to make any adjustments before sending for approval. • Your ID number and name will appear in the “Last Updated By” section at the bottom of the page. The date last updated will also display. 
- When Hire information is reviewed and ready, click on Send for Approval.
 An Approvers window will pop up to indicate the Approver(s) who will be sent an email.
Note: If the Hire is less than 6 months, an Approval 2 is not required. - You will have the opportunity to change one/both of the Approvers to someone else who is set up in the queue (eg. to account for vacation or other absences). Click on the Change Approver 1 or Change Approver 2 boxes, if applicable. Select the new person and click OK.
- Comments to Approvers: Add any additional comments to the email text that will be sent to the Approver(s).
- In the Approvers window, click Send.
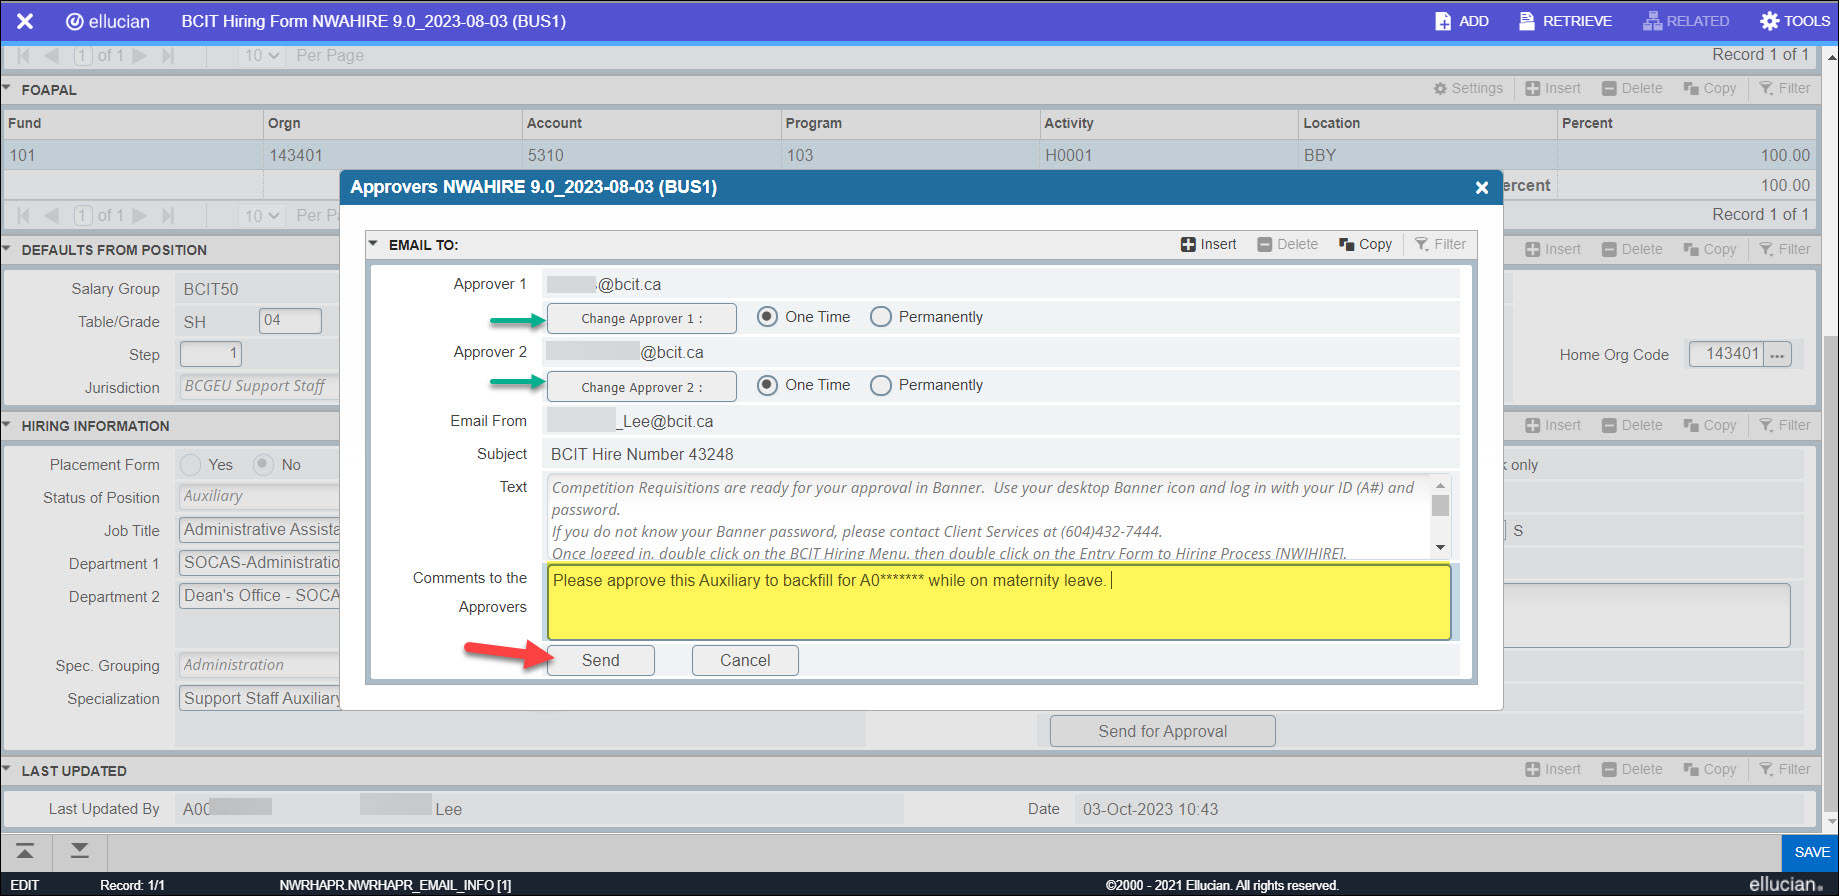 A message will pop up confirming that the Hire was sent successfully to the Approver(s). The status of this Hire will change to “Sent for Approval” at the header bar.
Approvals tab
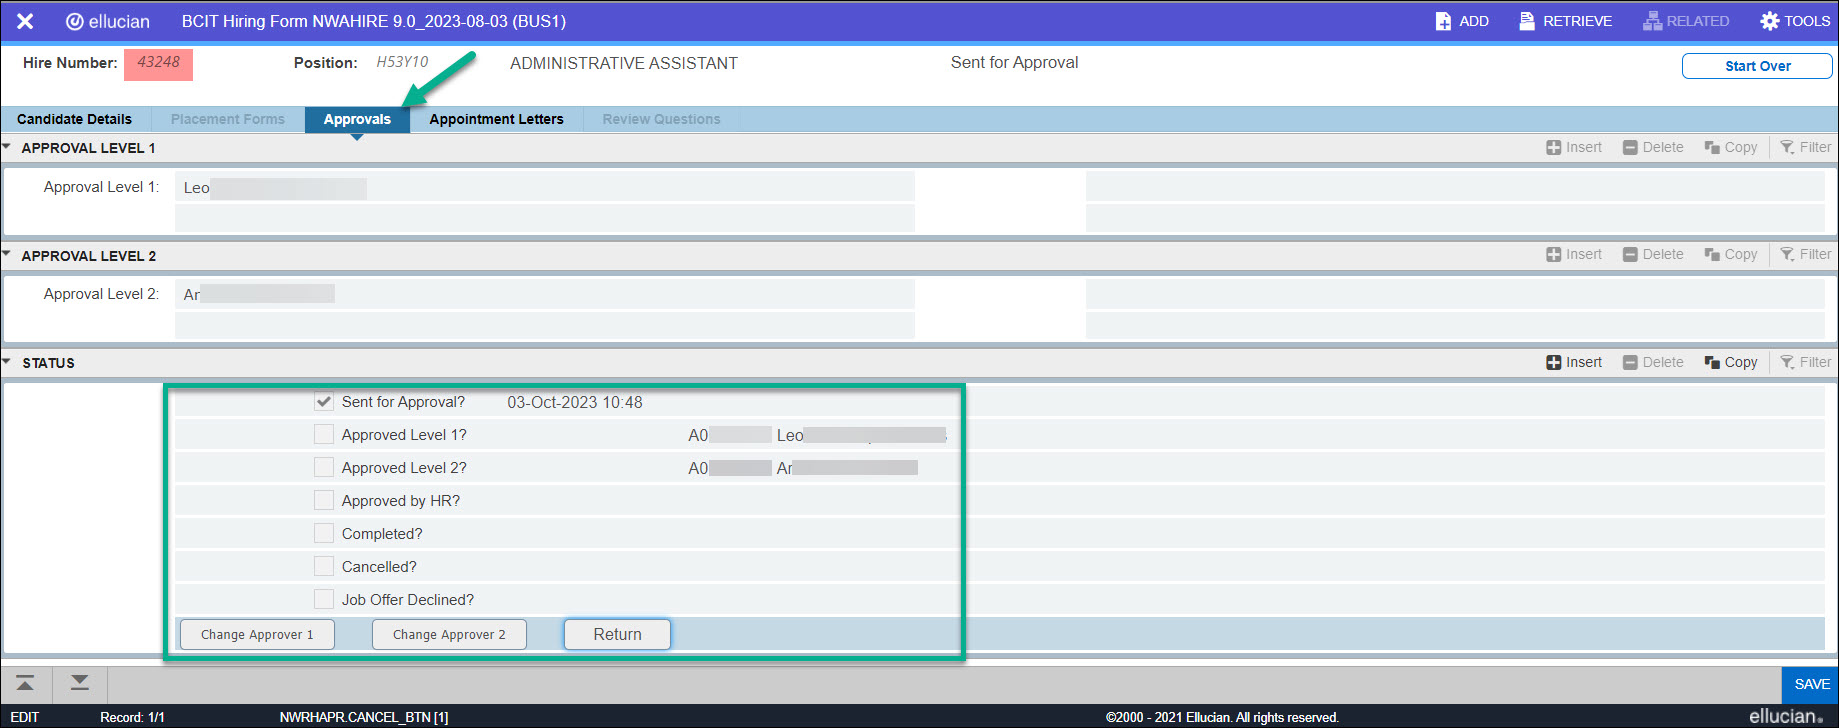
You can check on the status of the Approvals in this tab.
- Click on the Approvals tab.
- Hire Number: Should be displayed now.
- Approval Level 1: Will be displayed, according to the Approver Queue set up (actioned by HR Queue Administrators).
- Approval Level 2: (If applicable – Approval Level 2 is only required if appointment is over 6 months) Will be displayed, according to the Approver Queue set up (actioned by HR Queue Administrators).
To extend a current contract of an existing employee.
- Select Employee Extension.
- BCIT ID (Employee Number): Enter the ID number of the staff member with an active job. Hit <Tab>.
Note: If uncertain of the employee ID, click on the Search ellipses (•••) to filter and select. - Position Number: This number will default if there is only 1 active job that has an end date in the future.
Note: If there is no default, click on the Search ellipses (•••) to select from the employee’s Position Number/Title options, and click OK. - Click Continue.
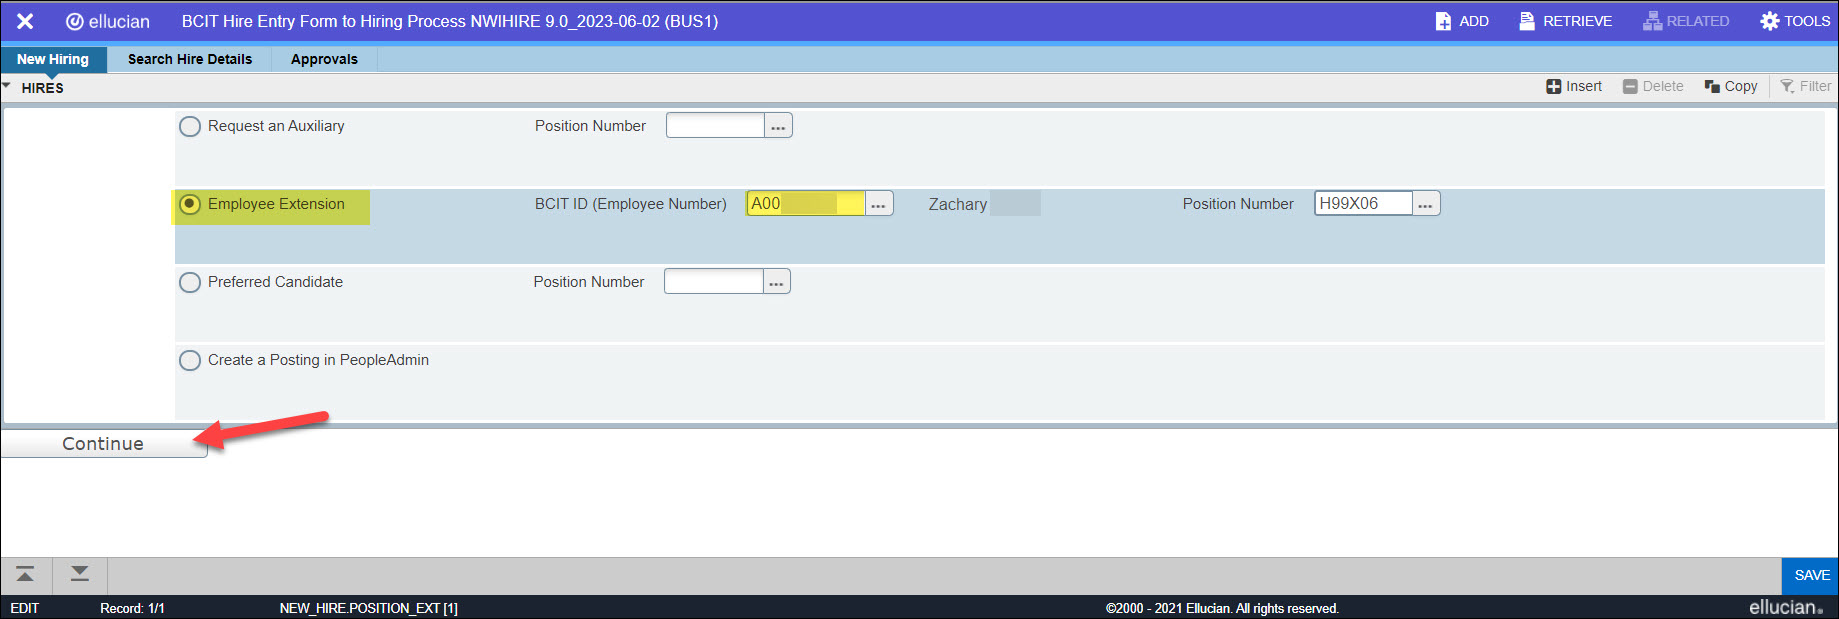 An informational message will pop up to confirm the extension from the previous job of the employee.
 - Click OK.
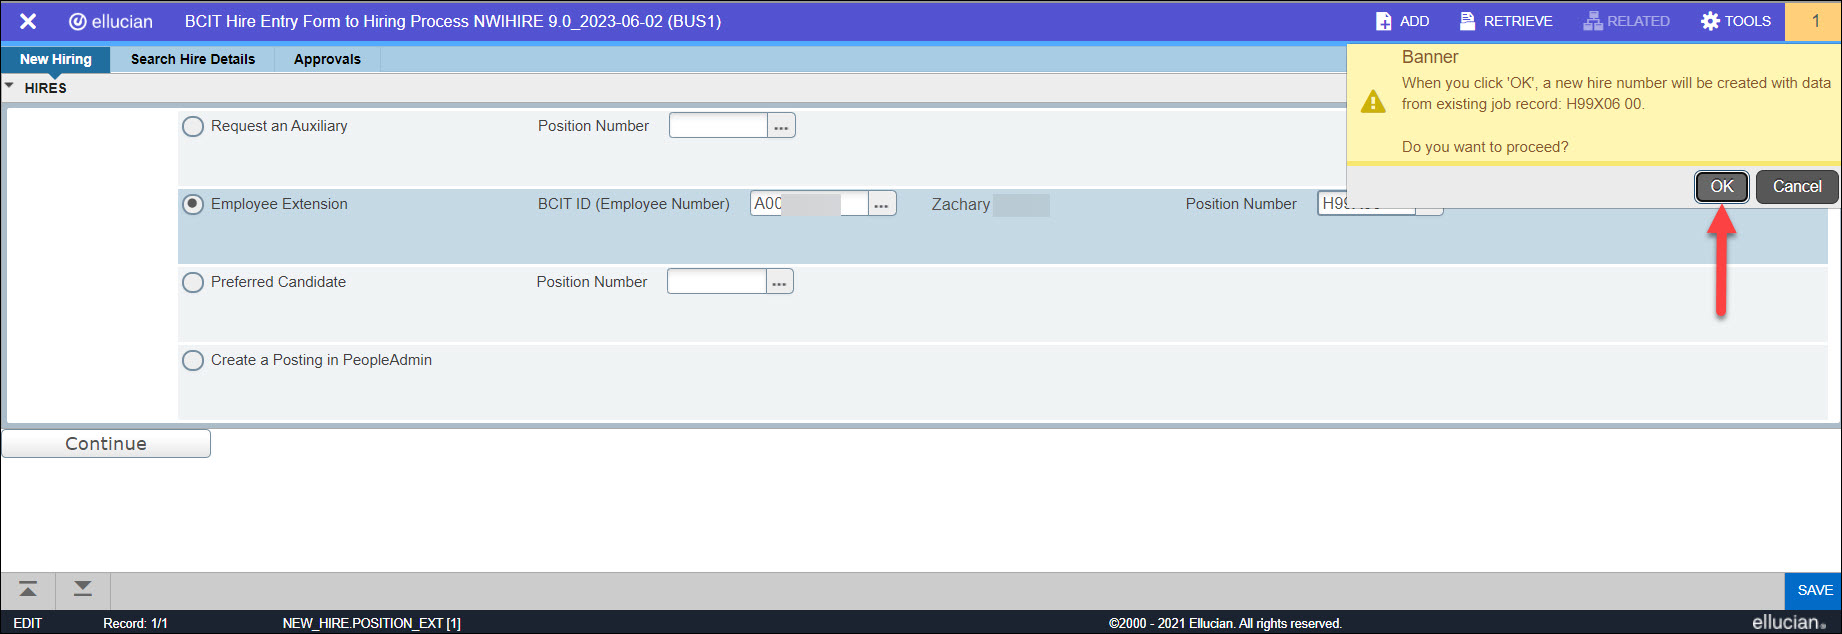 You will then be redirected to the NWAHIRE (BCIT Hiring Form) page.
 - Hire Number: A new number will be triggered by the system.
- Position: Defaulted from the previous page.
- Originator: Defaults your ID.
- Preferred Candidate: Leave box blank.
- ID: Defaults ID number of employee being extended.
- Reports to: Defaults from previous hiring info.
- Reason for Hiring: Enter text explanation for this extension. Please include the HR Case # from the Financial Approval Form in this section (if applicable).
- Click on the Next Section button on bottom-left corner of page or <Alt+PageDown> to proceed to next section. You can also click your mouse into the cell of your next box.
- Reason: Click on the Search ellipses (•••) to select from existing description options, highlight the selection, and click OK.
Note: If a backfill/replace reason is chosen, it is mandatory to enter the name/ID of the person being backfilled. - FTE: Mandatory field – Enter the FTE (Full-time Equivalent).
- Backfill/Replace ID: Only mandatory if employee is backfilling for someone.
- PCN: Only mandatory if employee is backfilling for someone.
- In the FOAPAL section, the Fund, Orgn, Account, Program, Activity, Location and Percent codes will be defaulted.

Scroll down the bar on the right to enter more information in additional sections. - Step: Defaults from current job they are being extended for.
- Home Org Code: Defaults from current job they are being extended for.
- Placement Form: Defaults as No for an Extension placement.
- Status of Position: Defaults from current job they are being extended for.
Note: If blank, click on the Search ellipses (•••) to select a Status. - Job Title: Defaults from current job they are being extended for.
- Department 1: Defaults from current job they are being extended for.
- Department 2: Defaults from current job they are being extended for.
- Spec. Grouping: Defaults from current job they are being extended for.
- Specialization: Defaults from current job they are being extended for.
- Start Date: Enter the next working date from previous job’s End Date. You can also click on the Calendar icon at right to select date.
- End Date: Enter end date of contract. You can also click on the Calendar icon at right to select date.
- Start Time: This field is not mandatory – If required, enter the time the employee starts the work day. Use 24 hour clock.
Note: For any on-call or staggered shifts, leave blank. You can make clarification on shift hours under the Additional Information box. - End Time: This field is not mandatory – If required, enter the time the employee ends the work day. Use 24 hour clock.
Note: For any on-call or staggered shifts, leave blank. You can make clarification on shift hours under the Additional Information box. - Working Days: If applicable, enter the days of the week the employee will be working.
- Campus Location: Defaults from current job they are being extended for.
- Additional Information: This text may default from the current job they are being extended for. You can also enter any additional information.
- Last Updated By: Defaults your ID.
- Click Save or <F10>
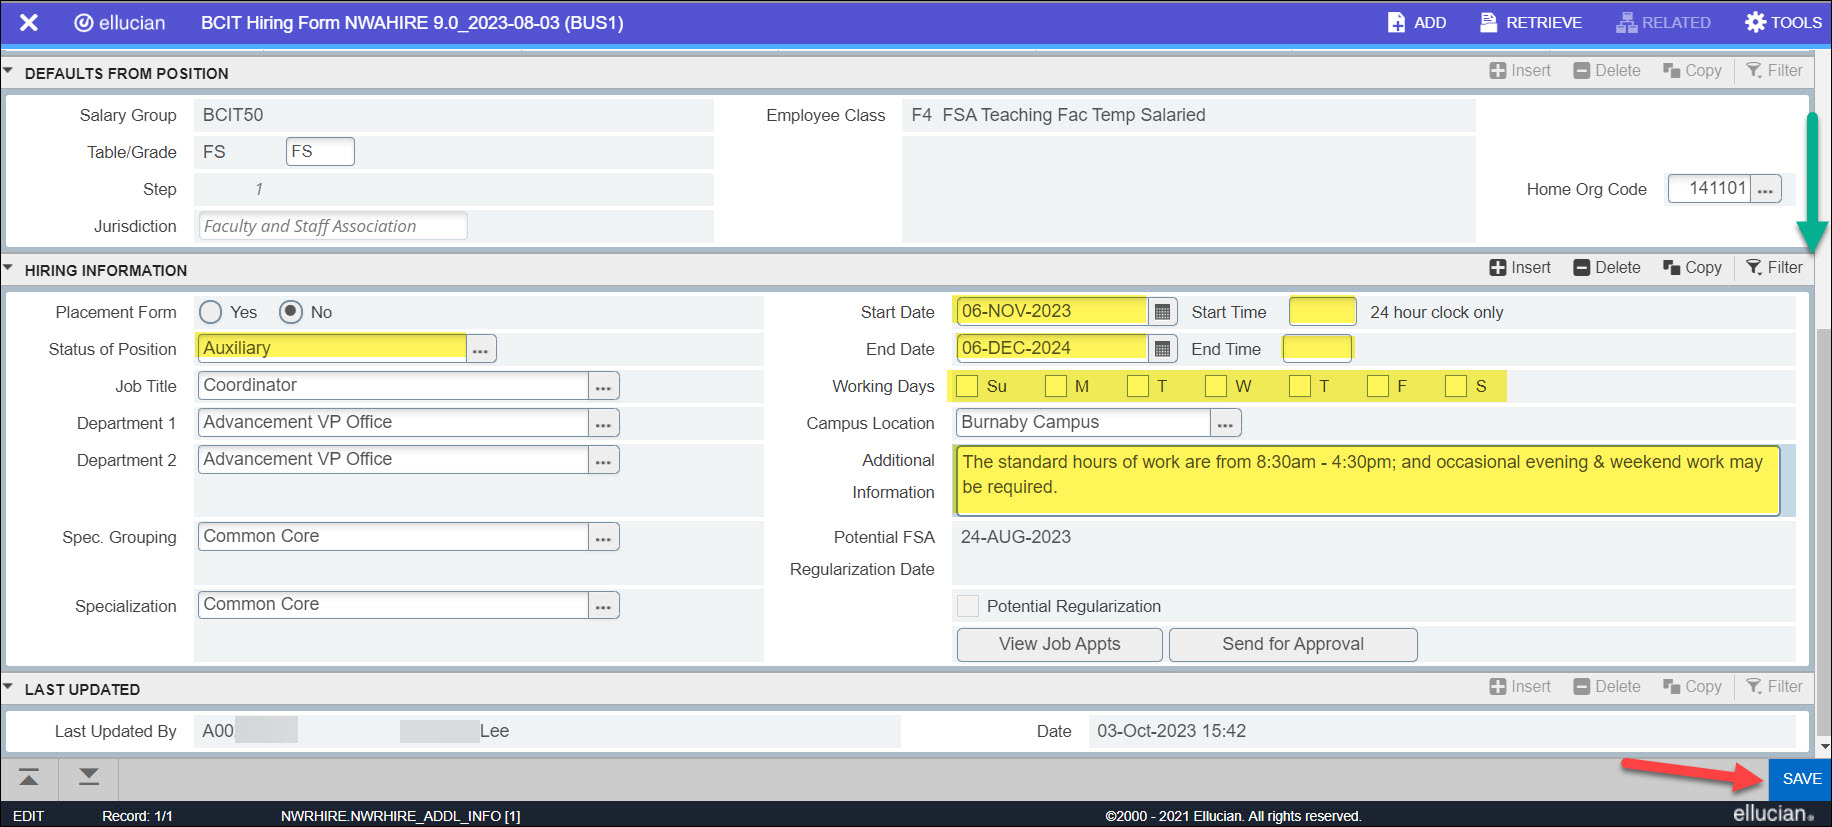 A message will pop up on the top-right corner confirming a successful save.
 Note: A warning message may pop up for FSA members. If not applicable, click OK.

- When you have confirmed all information is correct, click Send for Approval.
 Note: If hire is more than 6 months, you may receive an informational message. Click OK.
 An Approvers window will pop up to indicate the Approver(s) who will be sent an email.
Note: If the Hire is less than 6 months, an Approval 2 is not required. - You will have an opportunity to change one/both of the Approvers to someone else who is set up in the queue (eg. to account for vacation or other absences). Click on the Change Approver 1 or Change Approver 2 boxes, if applicable. Select the new person and click OK.
- Comments to Approvers: Add any additional comments to the email text that will be sent to the Approver(s).
- In the Approvers window, click Send.
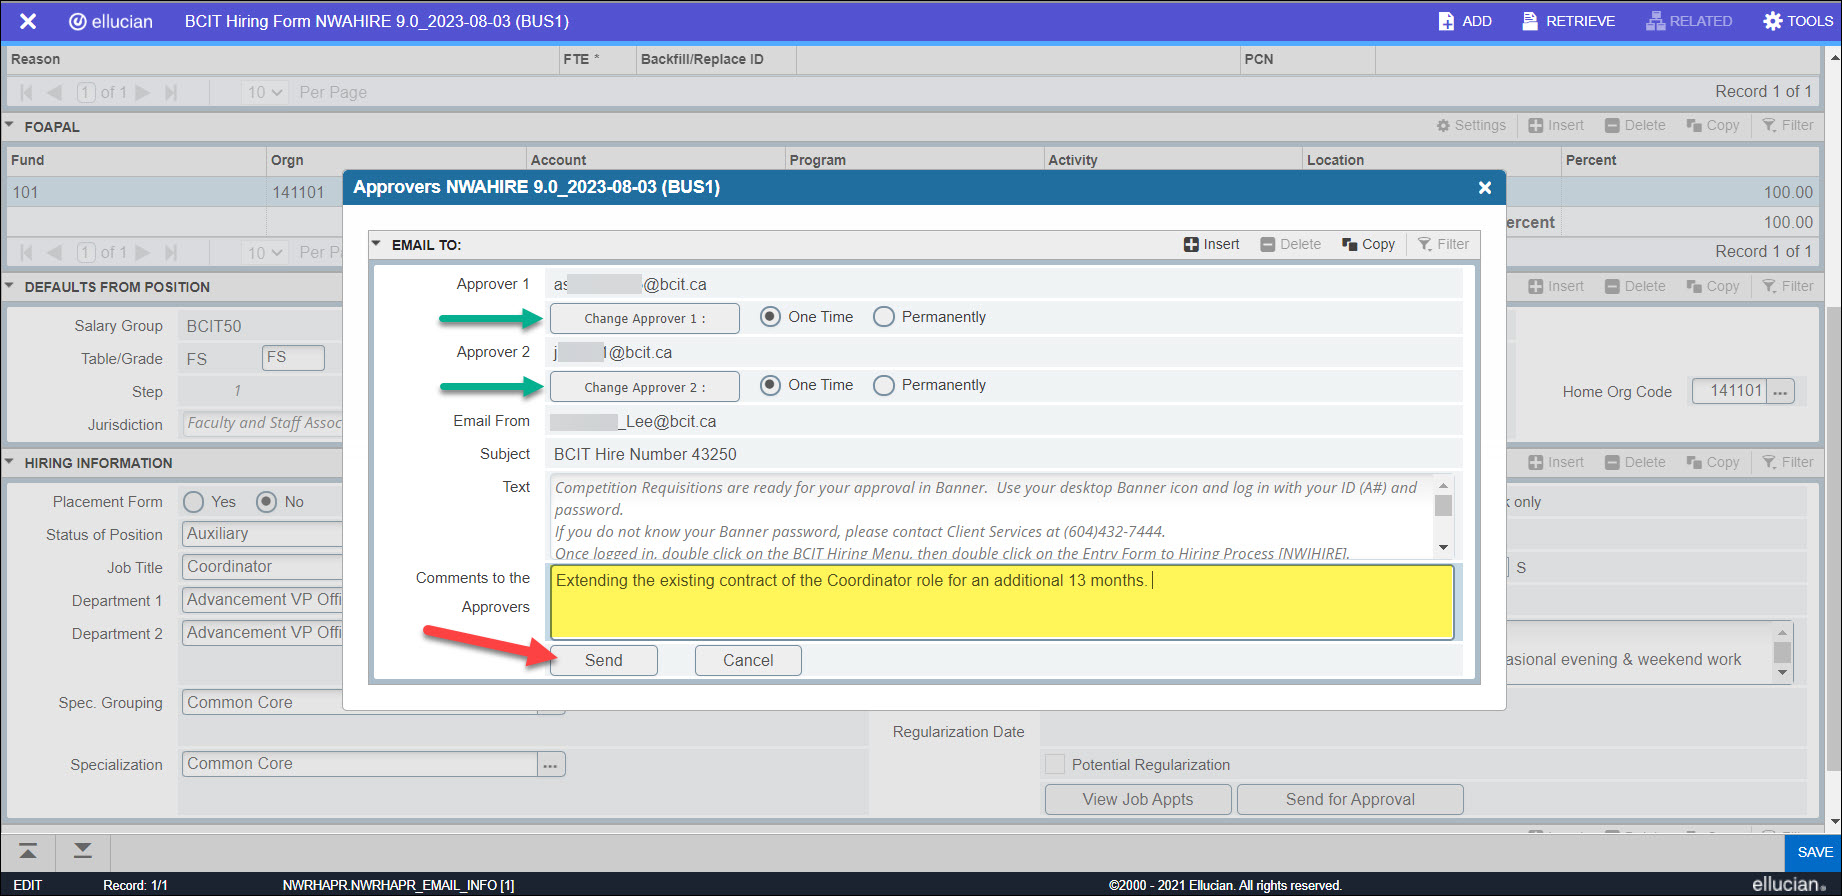 A message will pop up confirming that the Hire was sent successfully to Approver 1 (who must action first). The status of this Hire will change to “Sent for Approval” at the header bar.
For the definition of “Preferred Candidate”, please refer to the FSA Collective Agreement under ARTICLE 5 (5.2.1.3), (5.2.1.7), (5.2.3.3.1).
For BCGEU hires, please confer with your HR rep.
- Select Preferred Candidate.
- Position Number: Enter the Position Control Number (PCN).
Note: If uncertain of the code, click on the Search ellipses (•••) to view a list of position codes you have access to. You can also enter and fine-tune your search ion the Criteria box. Click OK on selection.
FYI: Any Position Control Numbers (PCN) with an “X” is a temporary position and anything with all numbers is a permanent position. For preferred candidates, it should be all temporary positions. Do NOT use any PCN’s that contain a “Y” (which is associated with Auxiliary Hires).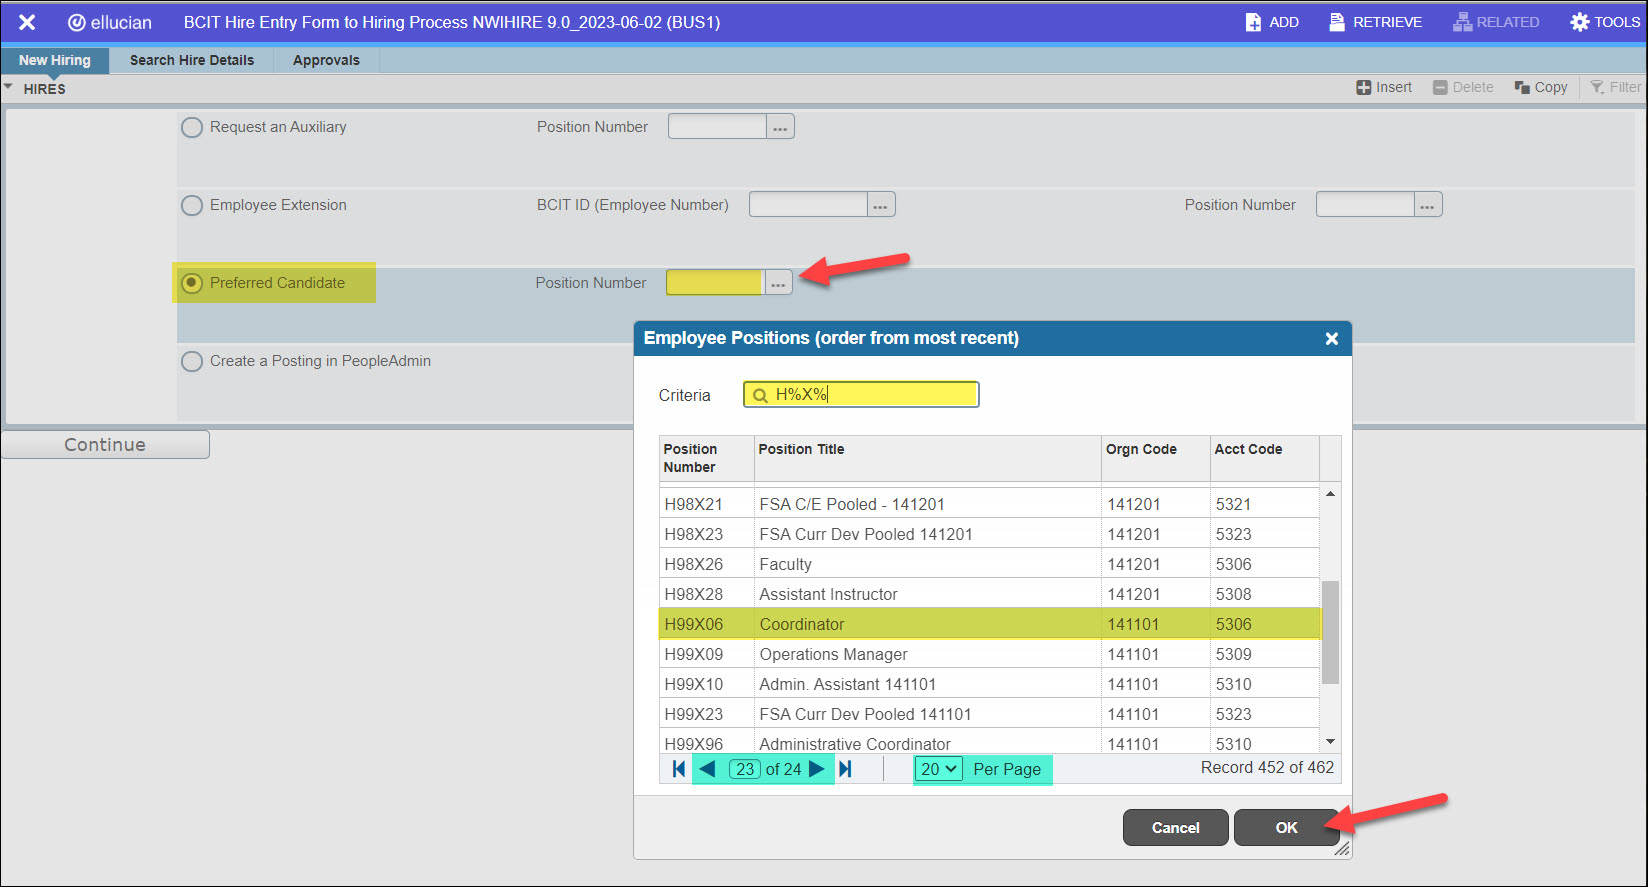
- Click Continue.
 You will then be redirected to the NWAHIRE (BCIT Hiring Form) page.
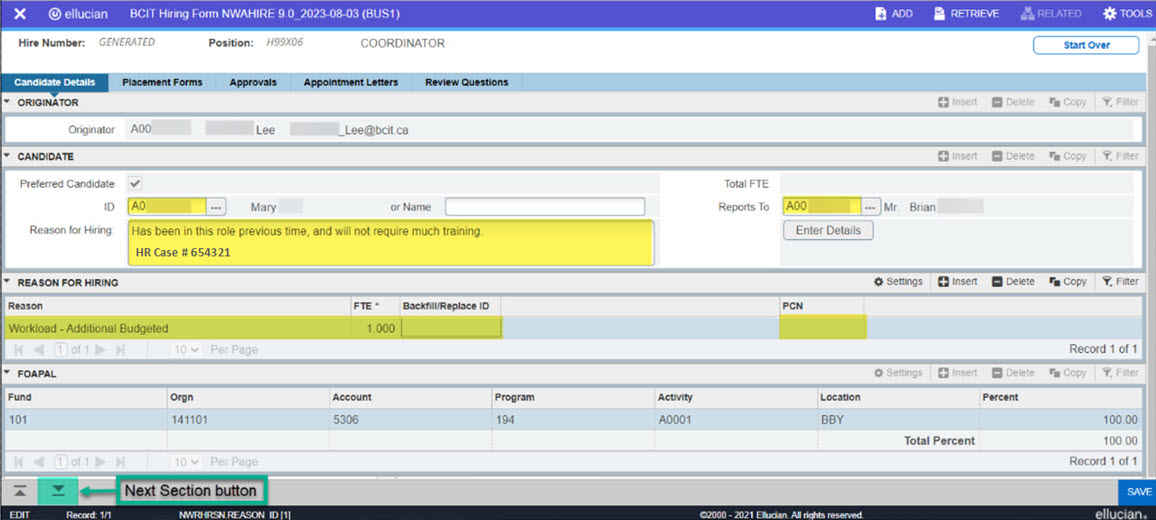
 - Originator: You ID will auto-populate.
- Preferred Candidate: The box will default as checked.
- ID: Enter the ID number of the employee.
Note: If uncertain of the ID number, click on the Search ellipses (•••) to filter and search. - Name: Enter only if you do not know the employee’s ID number.
- Reports To: Mandatory field – Enter ID number or click on the Search ellipses (•••) to locate the person this Hire will report to. The name will default once the ID number is entered.
- Reason for Hiring: Mandatory field – Enter text explanation for the placement. Please include the HR Case # from the Financial Approval Form in this section (if applicable).
- Click on the Next Section button on the bottom-left corner of the page or <Alt+PageDown> to proceed to next section. You can also click your mouse into the cell of your next box.
- Reason: Click on the Search ellipses (•••) to select from existing description options, highlight the selection, and click OK.
Note: If a backfill/replace reason is chosen, it is mandatory to enter the name/ID of the person being backfilled in the “Backfill/Replace ID” field. - FTE: Mandatory field – Enter the FTE (Full-time Equivalent).
- Backfill/Replace ID: This field is only mandatory if a backfill/replace reason is chosen – Enter the ID number of person being backfilled/replaced, or click on the Search ellipses (•••) to locate ID.
- PCN: This field is mandatory if a backfill/replace reason is chosen – Click on the Search ellipses (•••) and the Position Number(s) + Position Title(s) + Orgn Code(s) of the person being backfilled will populate. Highlight on the correct selection, and click OK.
- In the FOAPAL section, the Fund, Orgn, Account, Program, Activity, Location and Percent codes will be defaulted.
 Scroll down the bar on the right to enter more information in additional sections.
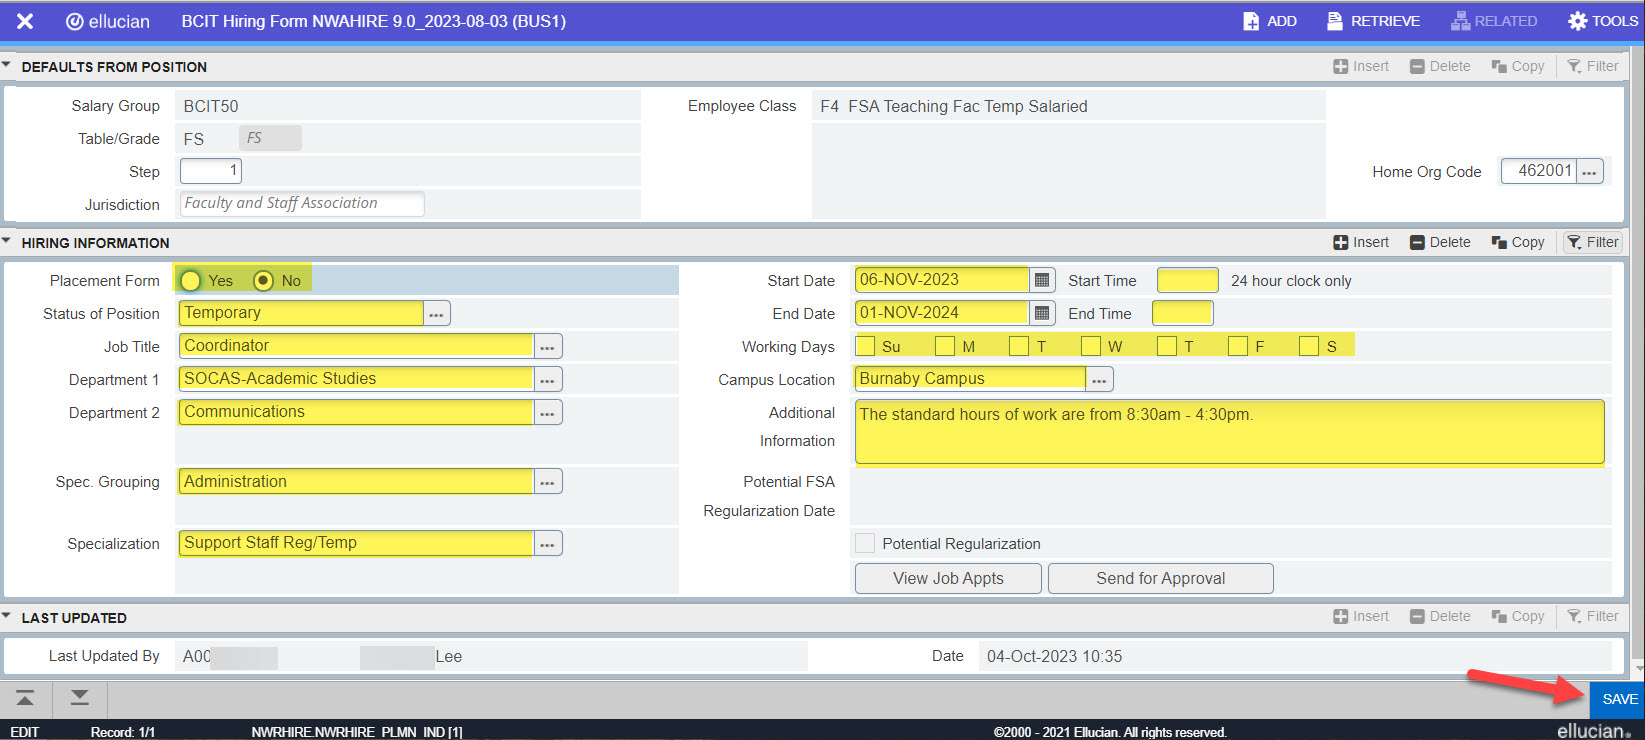
 - Step: Defaults to 1. HR will verify step.
- Home Org Code: Defaults from the Position. Do not change.
- Placement Form: Select No.
Note: Click Yes only if they are a brand new employee, or if they have had a gap in employment of 5 months or more. - Status of Position: Click on the Search ellipses (•••) to select from existing statuses, and click OK.
- Job Title: This title should match the position title populated in the header. Click on the Search ellipses (•••) to select, and click OK.
- Department 1: This is the high-level department or school. Click on the Search ellipses (•••) to select, and click OK.
- Department 2: This is the second-level of the Department 1 entered. Click on the Search ellipses (•••) to select, and click OK.
- Spec. Group: Click on the Search ellipses (•••) to select grouping, and click OK.
- Specialization: Click on the Search ellipses (•••) to select the selection description, and click OK.
- Start Date: Enter start date of contract. You can also click on the Calendar icon at right to select date.
- End Date: Enter end date of contract. You can also click on the Calendar icon at right to select date.
- Start Time: This field is not mandatory – If required, enter the time the employee starts the work day. Use 24 hour clock.
Note: For any on-call or staggered shifts, leave blank. You can make clarification on shift hours under the Additional Information box. - End Time: This field is not mandatory – If required, enter the time the employee ends the work day. Use 24 hour clock.
Note: For any on-call or staggered shifts, leave blank. You can make clarification on shift hours under the Additional Information box. - Working Days: If applicable, enter the days of the week the employee will be working.
- Campus Location: Mandatory field – Click on the Search ellipses (•••) to select campus, and click OK.
- Additional Information: Enter any additional information.
- Click Save or <F10>
 NOTES:
• A message will pop up on the top-right corner confirming a successful save. • The new Hire Number will populate on the top-left corner. • At this point, it will indicate that you are in “Draft” status at the header bar, which means that you can go back in to that Hire Number to make any adjustments before sending for approval. • Your ID number and name will appear in the “Last Updated By” section at the bottom of the page. The date last updated will also display. 
- When Hire information is reviewed and ready, click on Send for Approval.
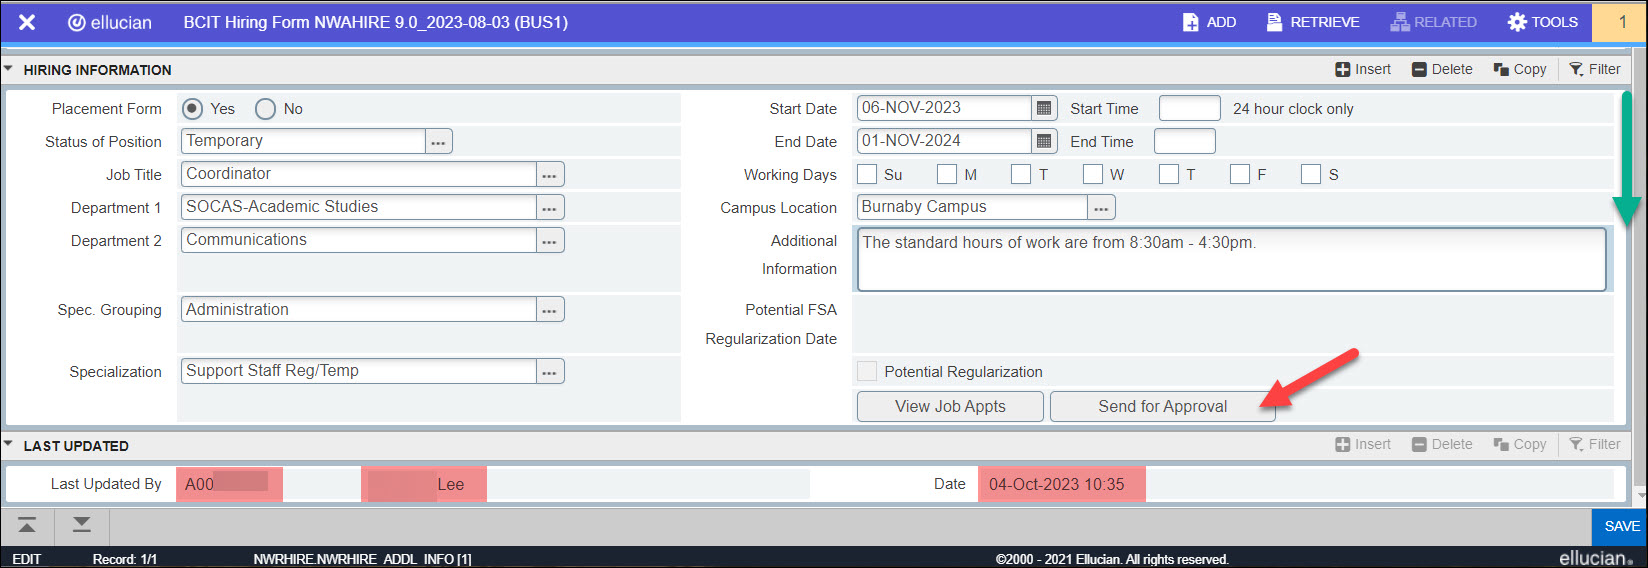 Note: If hire is more than 6 months, you may receive an informational message. Click OK.
An Approvers window will pop up to indicate the Approver(s) who will be sent an email.
Note: If the Hire is less than 6 months, an Approval 2 is not required. - You will have the opportunity to change one/both of the Approvers to someone else who is set up in the queue (eg. to account for vacation or other absences). Click on the Change Approver 1 or Change Approver 2 boxes, if applicable. Select the new person and click OK.
- Comments to Approvers: Add any additional comments to the email text that will be sent to the Approver(s).
- In the Approvers window, click Send.
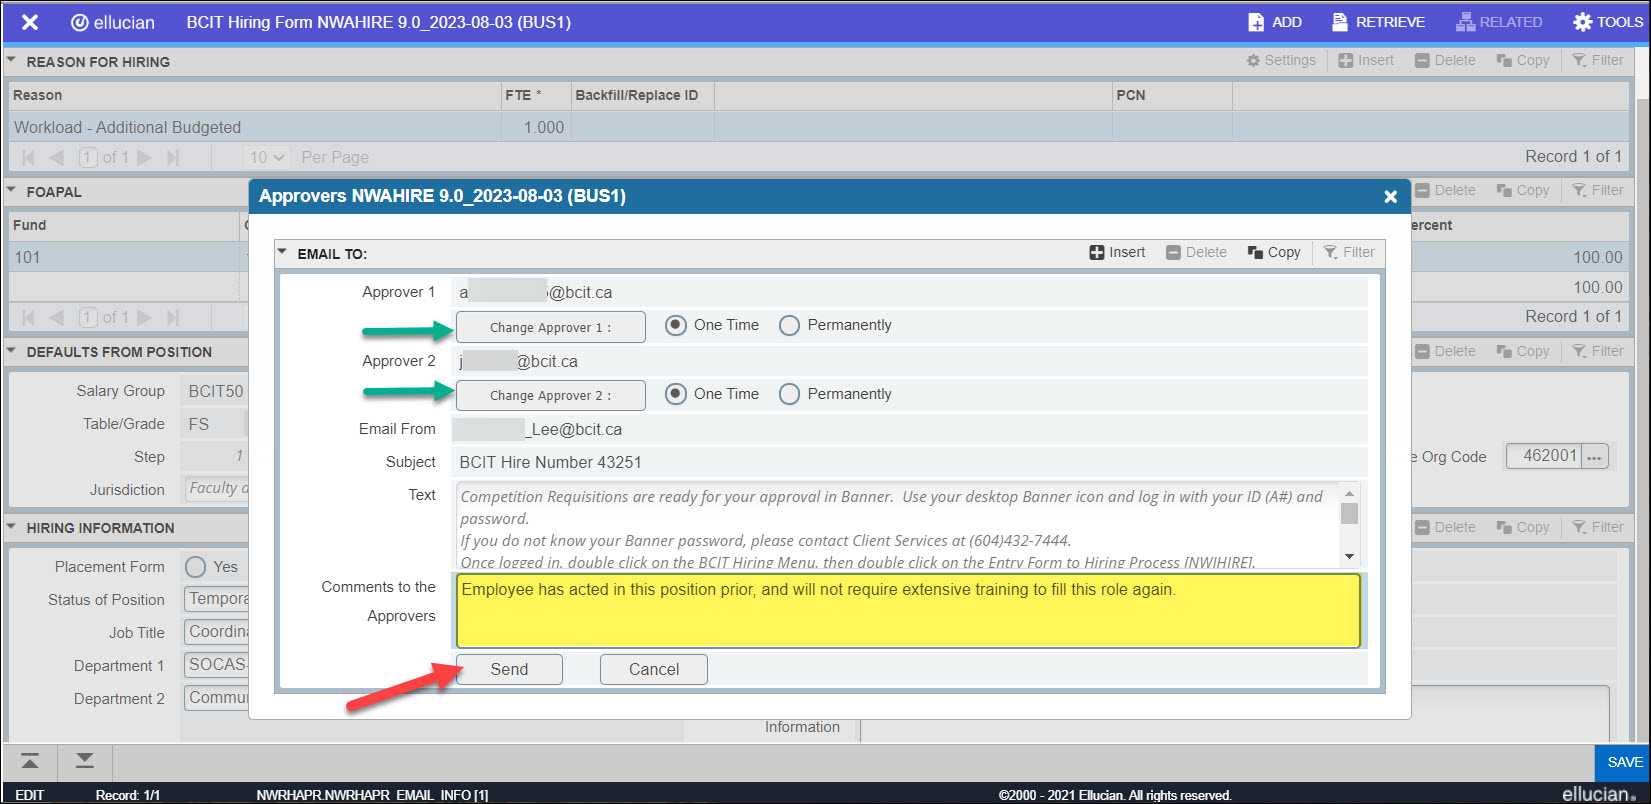 A message will pop up confirming that the Hire was sent successfully to Approver 1 (who must action first). The status of this Hire will change to “Sent for Approval” at the header bar.
To review details and statuses of Hires you submitted.
FYI: Access is based on the default organization code set up by the Budget and Analysis office for each position control number.
- In the NWIHIRE page, click on the Search Hire Details tab.
 The page will populate with Hires actioned by you:

- You can filter your search with different values.

- You can track the status of the Hires within the 4 columns at the right. A Y (Yes) or N (No) will indicate the status actioned on each Hire.
Dft Draft Dp Department Approved HR HR Approved C Completed 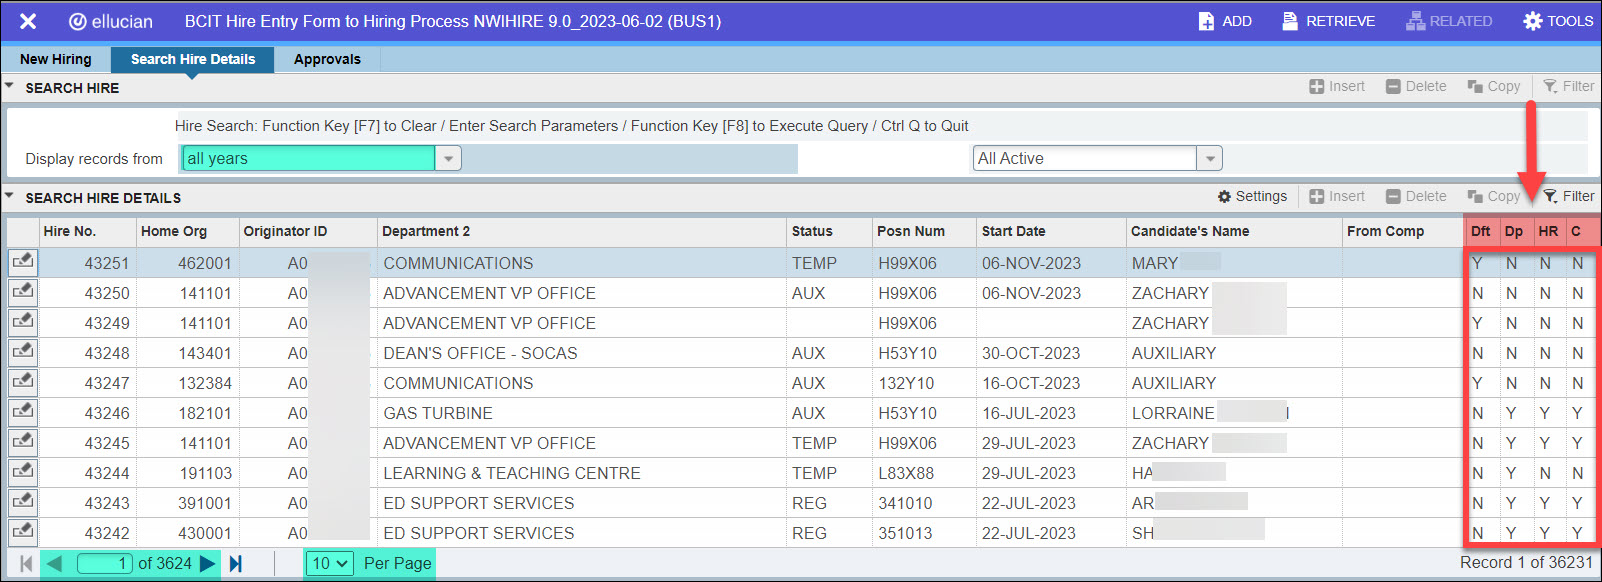
- To view details of a Hire, you can click on the icon at the left of the Hire. This will take you to the NWAHIRE page of that specific Hire to view more information.
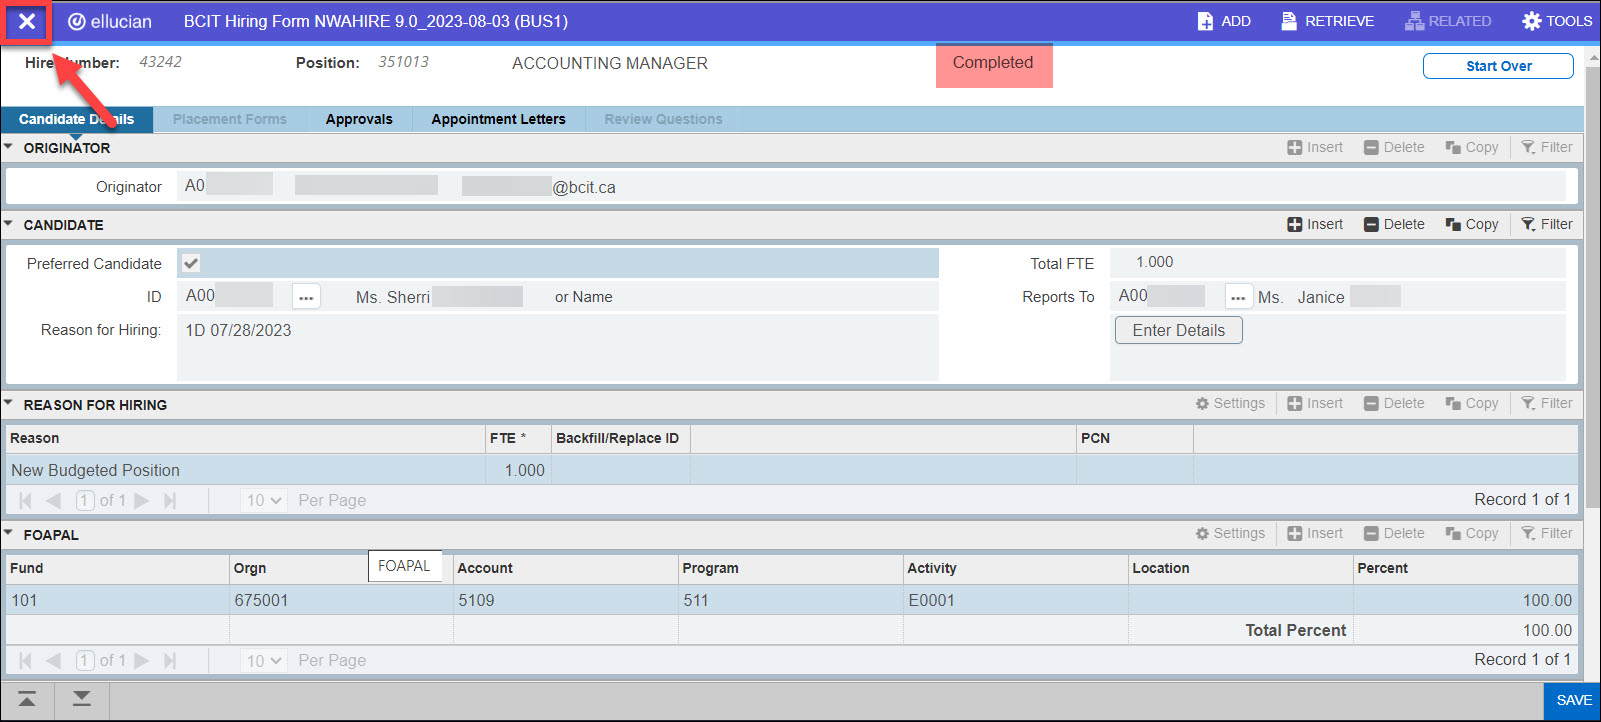
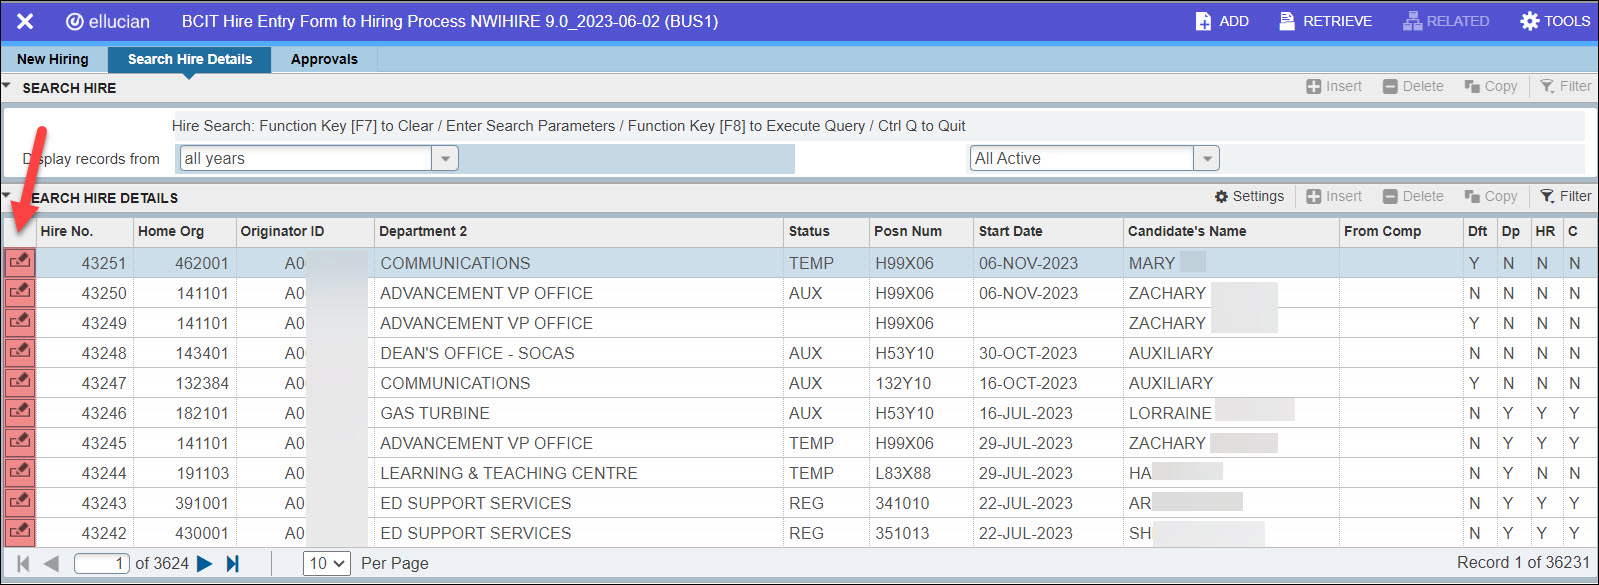 Note: If the department has approved the Hire, the message at the header will change from “Sent for Approval” to “Dept Approved“. Once HR submits their approval, the message at the header will change to “HR Approved“, and then “Completed” when everything is finalized.
 - When done, click on the Close (X) or <Ctrl+Q> to return to the NWIHIRE page.
All competitions that require a posting will be processed using the PeopleAdmin system.
More information about Banner
-
Frequently Asked Questions about the Employee Dashboard in myBCIT
-
Hiring process in Banner – EHire instructions using NWIHIRE / NWAHIRE
-
Managing Mailing Lists and Subscribers in Public Website WordPress
-
Navigating Through PeopleAdmin as a Selection Committee Member
-
Reviewing historical Competition hires prior to July 31, 2019 in Banner
