While Microsoft Teams has multiple functions for workplace collaboration and communication, a primary function is as a virtual meeting/video-conferencing tool.
BCIT has implemented Teams as a replacement for its previous videoconferencing tool. As well, the Learning Hub has implemented Class, which uses Teams for its videoconferencing capabilities while adding useful classroom management capabilities.
Accessing and participating in Teams meetings
You can join a scheduled Teams meeting either from the Teams app (recommended) or from Outlook.
Joining a meeting from the Teams app
In the Teams app:
- Click the Meet icon on the left-hand side.

- The next scheduled meeting or meetings in your Outlook calendar will be highlighted in the Up Next section at the top. Click the Join button next to the meeting you wish to join.
- Confirm that the video and audio options are as they should be in the meeting window.
- Click Join now.
Joining a Teams meeting from Outlook
In Outlook:
- Open the meeting in your Outlook calendar.
- Click (or CTRL-click if you are the meeting host and sent the original invite) the Click here to join the meeting link in the meeting description.
- The meeting will open directly in Teams. Confirm that the video and audio options are as they should be in the meeting window.
- Click Join now.
More information from Microsoft support:
By default, any participant in a meeting can share content, though the meeting organizer can change this to “only organizers and co-organizers” in the meeting settings when they set up the meeting, either in Teams or Outlook.
To share content, in a Teams meeting:
- Click the Share icon in the meeting toolbar at the top of the screen.
- [Optional] Click to turn on the Include computer sound toggle in order to share your audio.
- Click to select either a specific Screen to share (which will actively display whatever is visible in that screen even if you switch between windows or applications) or a specific Window (which will only display that window, even if it’s not active or even visible to you).
- Teams will automatically minimize the meeting window while you’re presenting. To maximize it again and see other participants, click the double-ended arrow at the top right of the minimized window.
More information from Microsoft support:
Teams has built-in automatic captioning capabilities that any participant can turn on whenever they need.
To turn on captions, in a Teams meeting:
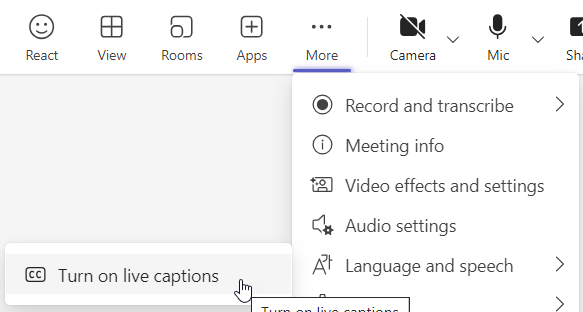
- Click the More icon in the meeting toolbar at the top of the screen.
- Click Language and speech, then Turn on live captions.
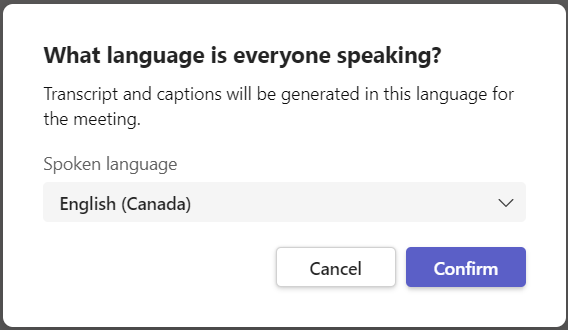
- Adjust the Spoken language setting (if necessary) and click the Confirm button.
As participants speak in the meeting, automatically generated captions of what they said will be displayed.
Note: Captions are not saved after the meeting. If you instead want access to a transcript of the meeting later, use the Record and transcription > Start transcription option instead of live captions.
Tips
To ensure that captions are as accurate as possible:
- Speak clearly, slowly, and directly into the mic. Avoid locations with significant background noise and use the best microphone available to you. Audio quality has the biggest impact on caption quality.
- Take turns speaking rather than talking over each other. Use the raise hand option to better organize meetings, as this notes which speaker is next in line to speak.
More information from Microsoft support:
When you join a meeting you have an opportunity to confirm your audio settings for that meeting. If you regularly connect and disconnect your laptop from devices such as headphones, speaker, external monitors with audio outputs, microphones, etc., it’s a good idea to quickly check that your settings are correct each time to avoid problems. You can also check them ahead of time.
Checking Teams audio settings before joining a meeting
In Teams:
- Click the three dots next to your profile picture at the top right, then click Settings.
- Navigate to Devices in the left menu.
- Use the drop-downs under audio settings to select your default audio devices from those available.
- Note: On occasion, Teams may perceive that a connected device has an ability it does not have in your setup. For example, Teams may show a connected microphone or monitor with a headphone jack as an available speaker option even though nothing is plugged into the headphone jack and the device therefore can’t actually play sound. In Windows, you can disable them as an output device while leaving them enabled as an input device (if appropriate). This will prevent them from being automatically selected by Teams in future meetings. To do so:
- Use the taskbar search to search for “sound settings”.
- Click the Manage sound devices link below the Output devices section.
- Click on the device in the list of Output devices and click the Disable button. The device will be added to a sub-list of disabled output devices (but remain available as an input device if appropriate).
- Note: On occasion, Teams may perceive that a connected device has an ability it does not have in your setup. For example, Teams may show a connected microphone or monitor with a headphone jack as an available speaker option even though nothing is plugged into the headphone jack and the device therefore can’t actually play sound. In Windows, you can disable them as an output device while leaving them enabled as an input device (if appropriate). This will prevent them from being automatically selected by Teams in future meetings. To do so:
- [Optional] By default, Teams is set to Automatically adjust mic sensitivity. If you know that you are likely to consistently connect from a noisy environment, or if you have been told that other meeting attendees are regularly hearing a lot of your background noise, you may wish to turn this setting off and change your Noise suppression setting from Auto to High.
- Click the Make a test call button and follow the instructions to test that you are able to both send and receive audio.
Checking Teams audio settings when you join a meeting
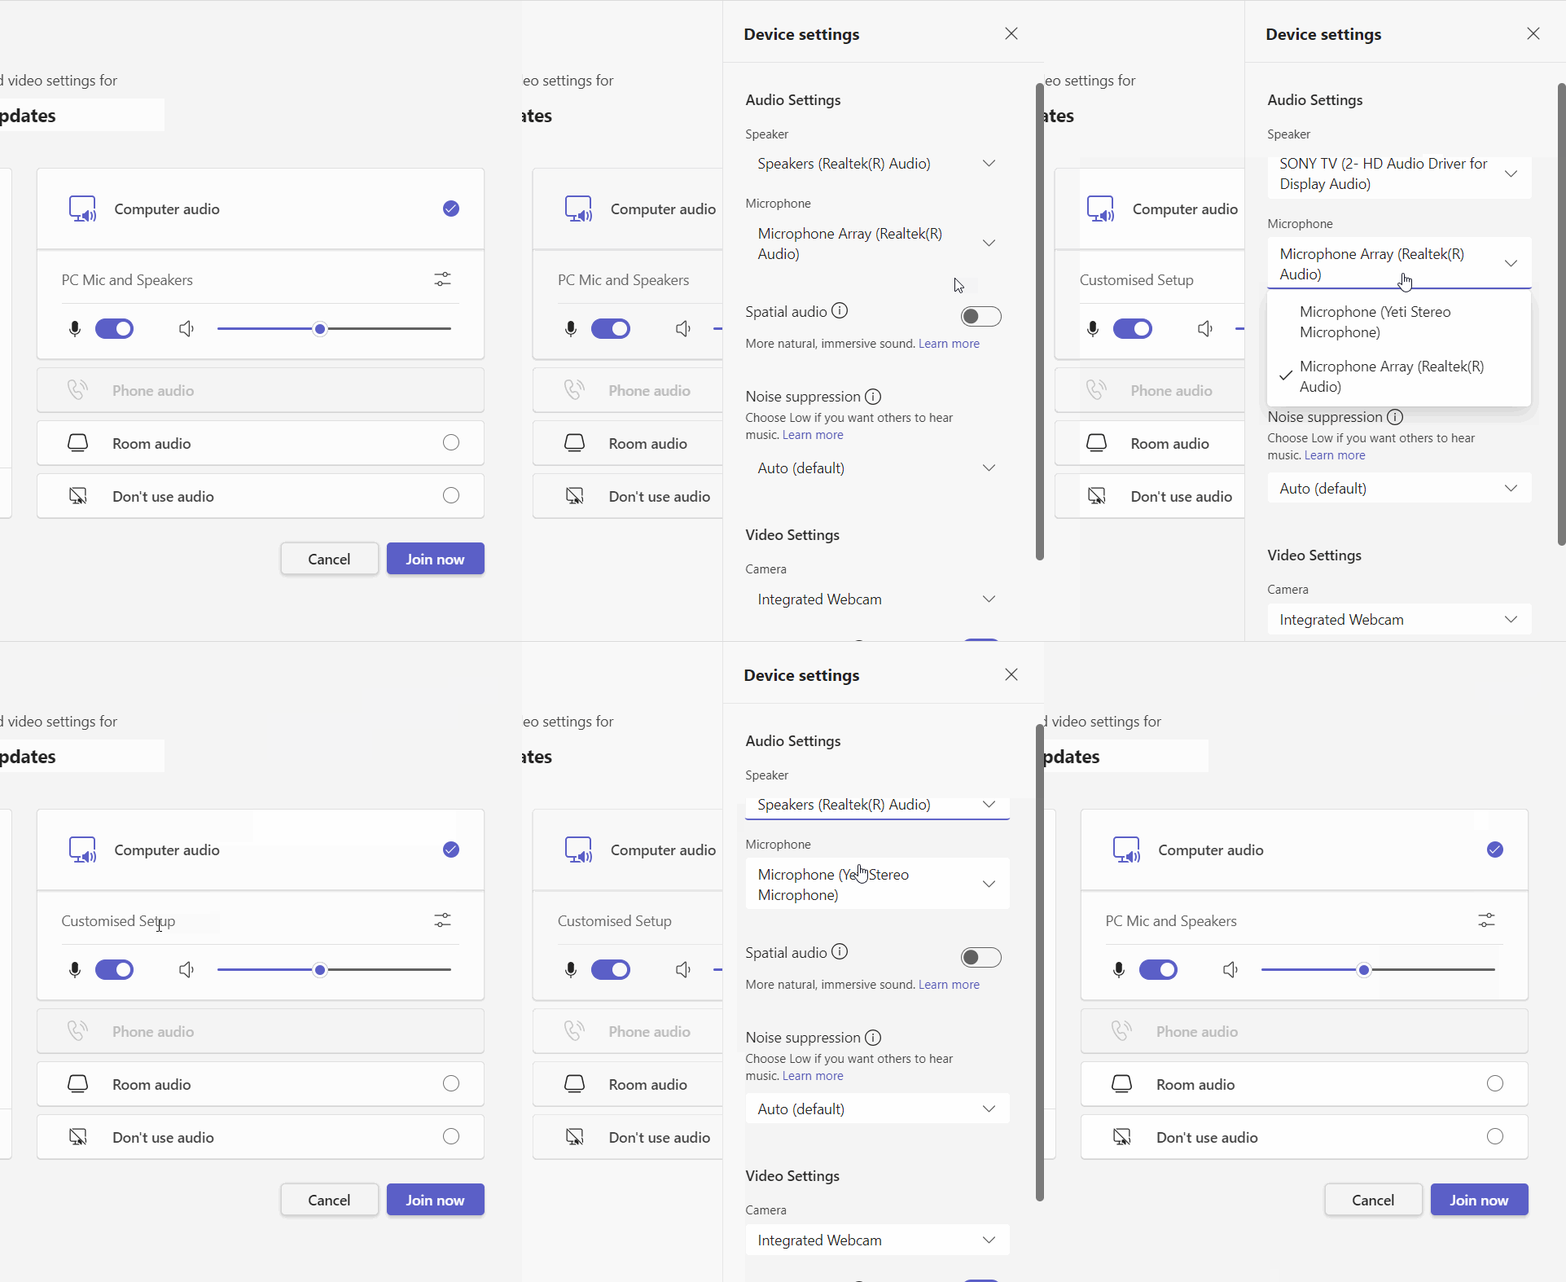
Whenever you join a Teams meeting you are given an opportunity to check your audio and video settings on the way. If you are using one device for both microphone and speakers, you will see that device listed. If you are using separate devices, you will see only that you have a “Customized Setup”, and you can hover your mouse over the settings icon on the right to see what devices have been selected, or click that icon modify your device setup.
Troubleshooting audio within a meeting
Sometimes, even if you set up and test your audio before or when joining a meeting, you may encounter a problem mid-meeting. Steps you can take if unable to send or receive audio:
- Check your Teams audio settings:
- Check your Mic icon to ensure that you’re not currently muted. Note: In Teams, any participant can mute another if background noise is being transmitted, so it’s possible that another participant may have muted you without you noticing.
- Click the down arrow next to the Mic icon in the meeting toolbar and check:
- that the correct devices are selected as speaker and microphone
- that the meeting volume isn’t set to zero
- Check your external audio devices:
- If your external device has its own integrated mute or volume functions, have they been activated without your noticing?
- Are your headphones/microphone/speakers plugged in/connected as intended? Try unplugging and replugging/disconnecting and reconnecting to see if that fixes the problem. Note: You may need to reselect your preferred audio devices after reconnecting.
- If your external device connects via bluetooth, is it connected to another device?
- If your external device needs power to function, does it have a low or dead battery?
- Check your computer settings:
- Is your computer audio level set too low or to zero?
- Is your preferred audio device not connected?
- If the device connects with a wire, use the search field in the taskbar to search for “sound settings” and check the list of connected input and output devices. If your preferred device is plugged in but not listed, click the Manage sound devices link to see the full list of connected devices, including those which have been disabled. If your preferred device is listed as disabled, re-enable it.
- If the device connects via bluetooth, use the search field in the taskbar to instead search for “bluetooth and other device settings” and check the list of available audio devices. If your preferred device is listed but only shows as “Paired” but not “Connected”, select it and click the Connect button. If you don’t see your preferred device in the list at all, Click the Add bluetooth or other device button and follow the steps to pair and connect your device.
- If none of the above appears to solve the problem, try disconnecting from the meeting, checking your audio settings and doing a test call as described above, then reconnecting.
More information from Microsoft support:
Scheduling Teams meetings
Note: If you are scheduling a Teams meeting to use for an online info session, please also check out the recommended meeting settings to use for that purpose.
You can schedule new meetings either in Outlook or from the Calendar tab in the Teams app. Both options allow you to add a title and description, use the Scheduling Assistant to find a time that works best for all participants, set up a recurring meeting series, and add a meeting room. Only by using Outlook can you easily schedule a meeting on behalf of another user.
To schedule a meeting, in your Outlook calendar:
- Click to select the open slot in your calendar when you want the meeting to occur.
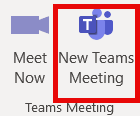
- Click the New Teams Meeting button in the ribbon.
- Click the Meeting menu item.
- Add a Title for the meeting.
- [If necessary] Adjust the time and date and recurrence options for the meeting.
- Add participants and a meeting room (if the meeting is a hybrid one). Use the Scheduling Assistant to find a time that works for everyone.
- Note: During the pilot period, teleconference meeting room equipment cannot be used for Teams meetings as it is still being updated and prepared for the full Teams launch.
- [Optional] Adjust settings for the Teams meeting by clicking Meeting Options and making any desired changes.
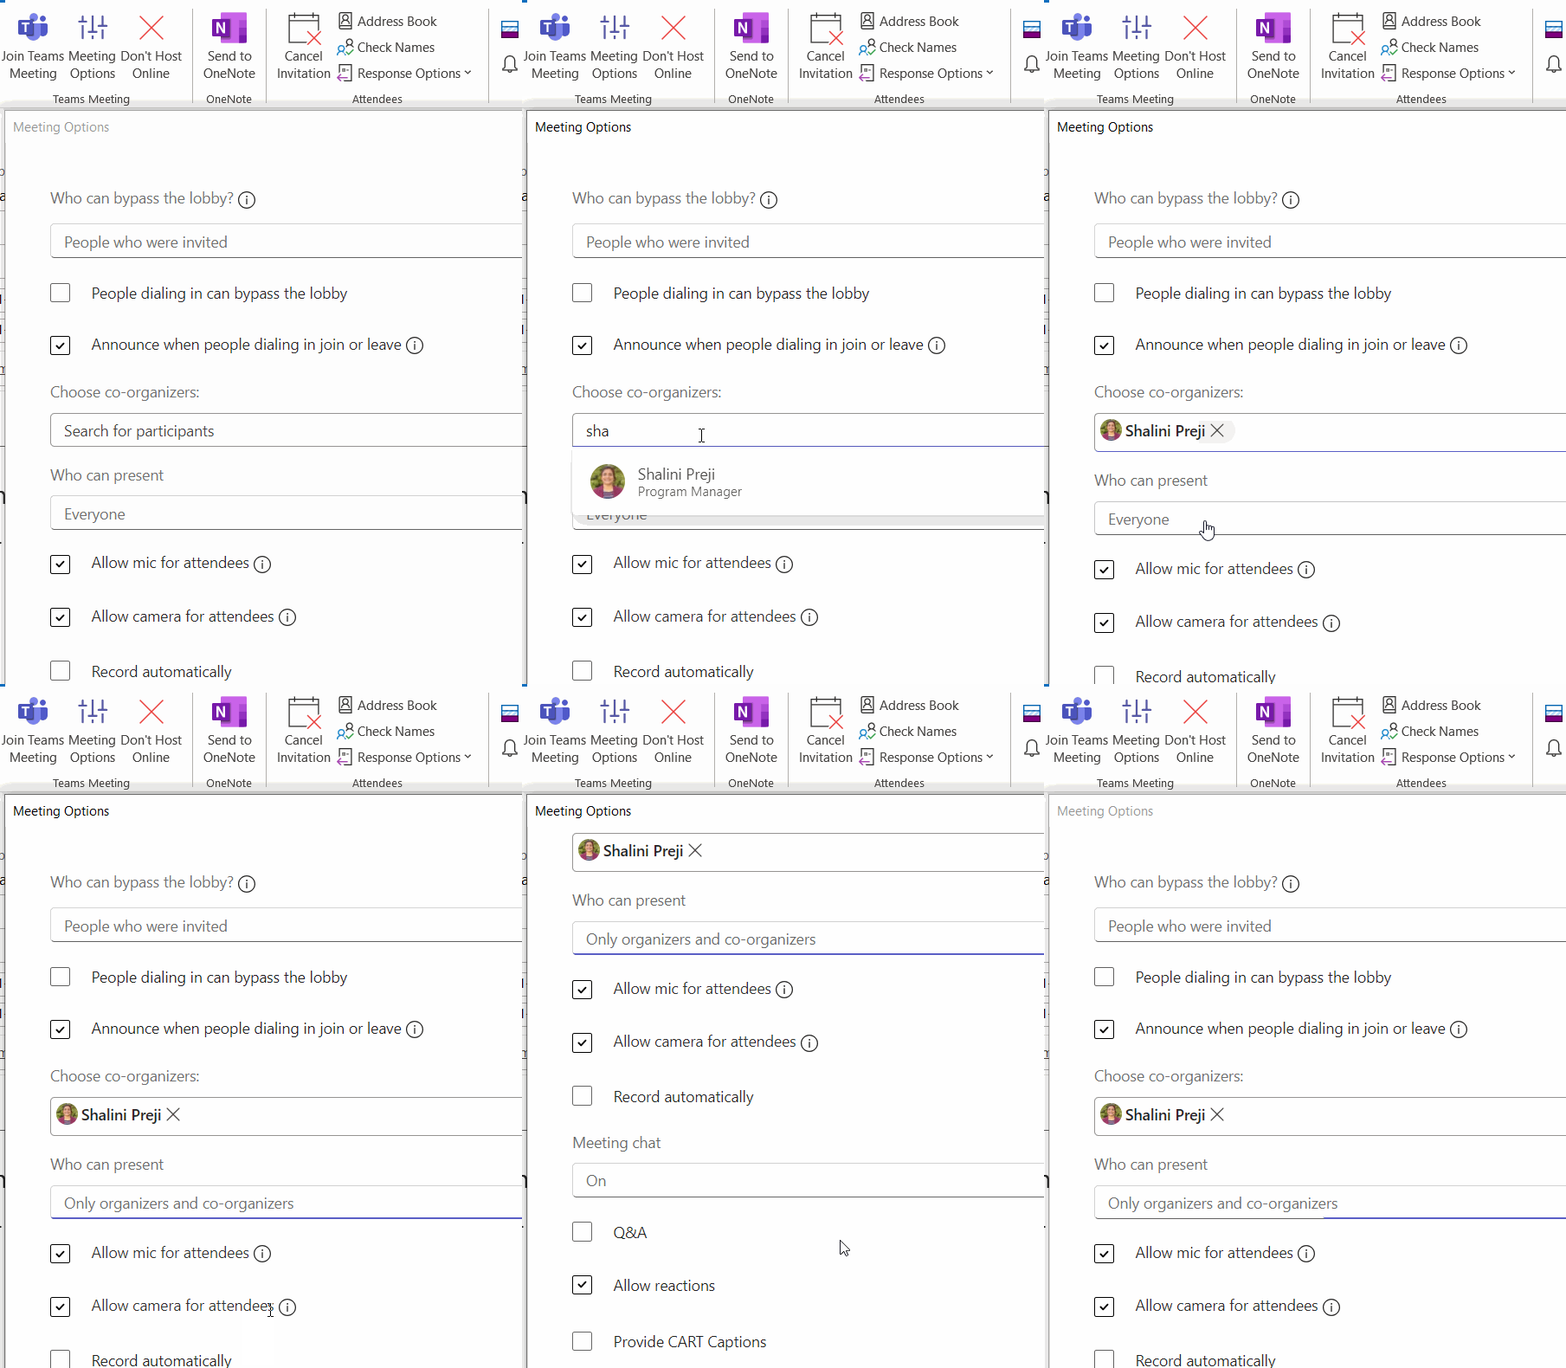
- Click the Send button to send the invite.
More information from Microsoft support:
If the other user has already delegated access to manage their calendar in Outlook, you will also have access to schedule Teams meetings on their behalf.
To begin, in Outlook:
- Navigate to the Outlook calendar view and ensure the other person’s calendar is visible in addition to your own.
- Start to create a new meeting invite in their calendar, just as you ordinarily would for an in-person meeting, then follow the steps to add a Teams meeting invite to it.
You can schedule new meetings either in Outlook or from the Calendar tab in the Teams app. Both options allow you to add a title and description, use the Scheduling Assistant to find a time that works best for all participants, set up a recurring meeting series, and add a meeting room. Only by scheduling a meeting from the Teams app can you associate a meeting with a specific channel in Teams and, optionally, automatically invite everyone associated with an associated channel to the meeting.
To schedule a meeting, in the Teams app:
- Click on the Calendar icon on the left.

- Click the open slot in your calendar when you want the meeting to start.
- Click the + New meeting button at the top right.
- Add a title for the meeting.
- [If necessary] Adjust the meeting time and date using the time and date fields or add a schedule for repeating meetings.
- Add attendees by typing their names into attendees field and selecting the correct individual when prompted. Each attendee’s availability will be immediately visible as you add them.
- [Optional] If the meeting is a hybrid meeting with both in person and virtual participants, you can add a meeting room by clicking the Add location field and navigating to the room you want to book. A room’s availability will be immediately visible when you add it.

- Note: During the pilot period, teleconference meeting room equipment cannot be used for Teams meetings as it is still being updated and prepared for the full Teams launch.
- [Optional] If there are conflicts at the current meeting time, you can use the Scheduling Assistant to find a time that works for everyone.
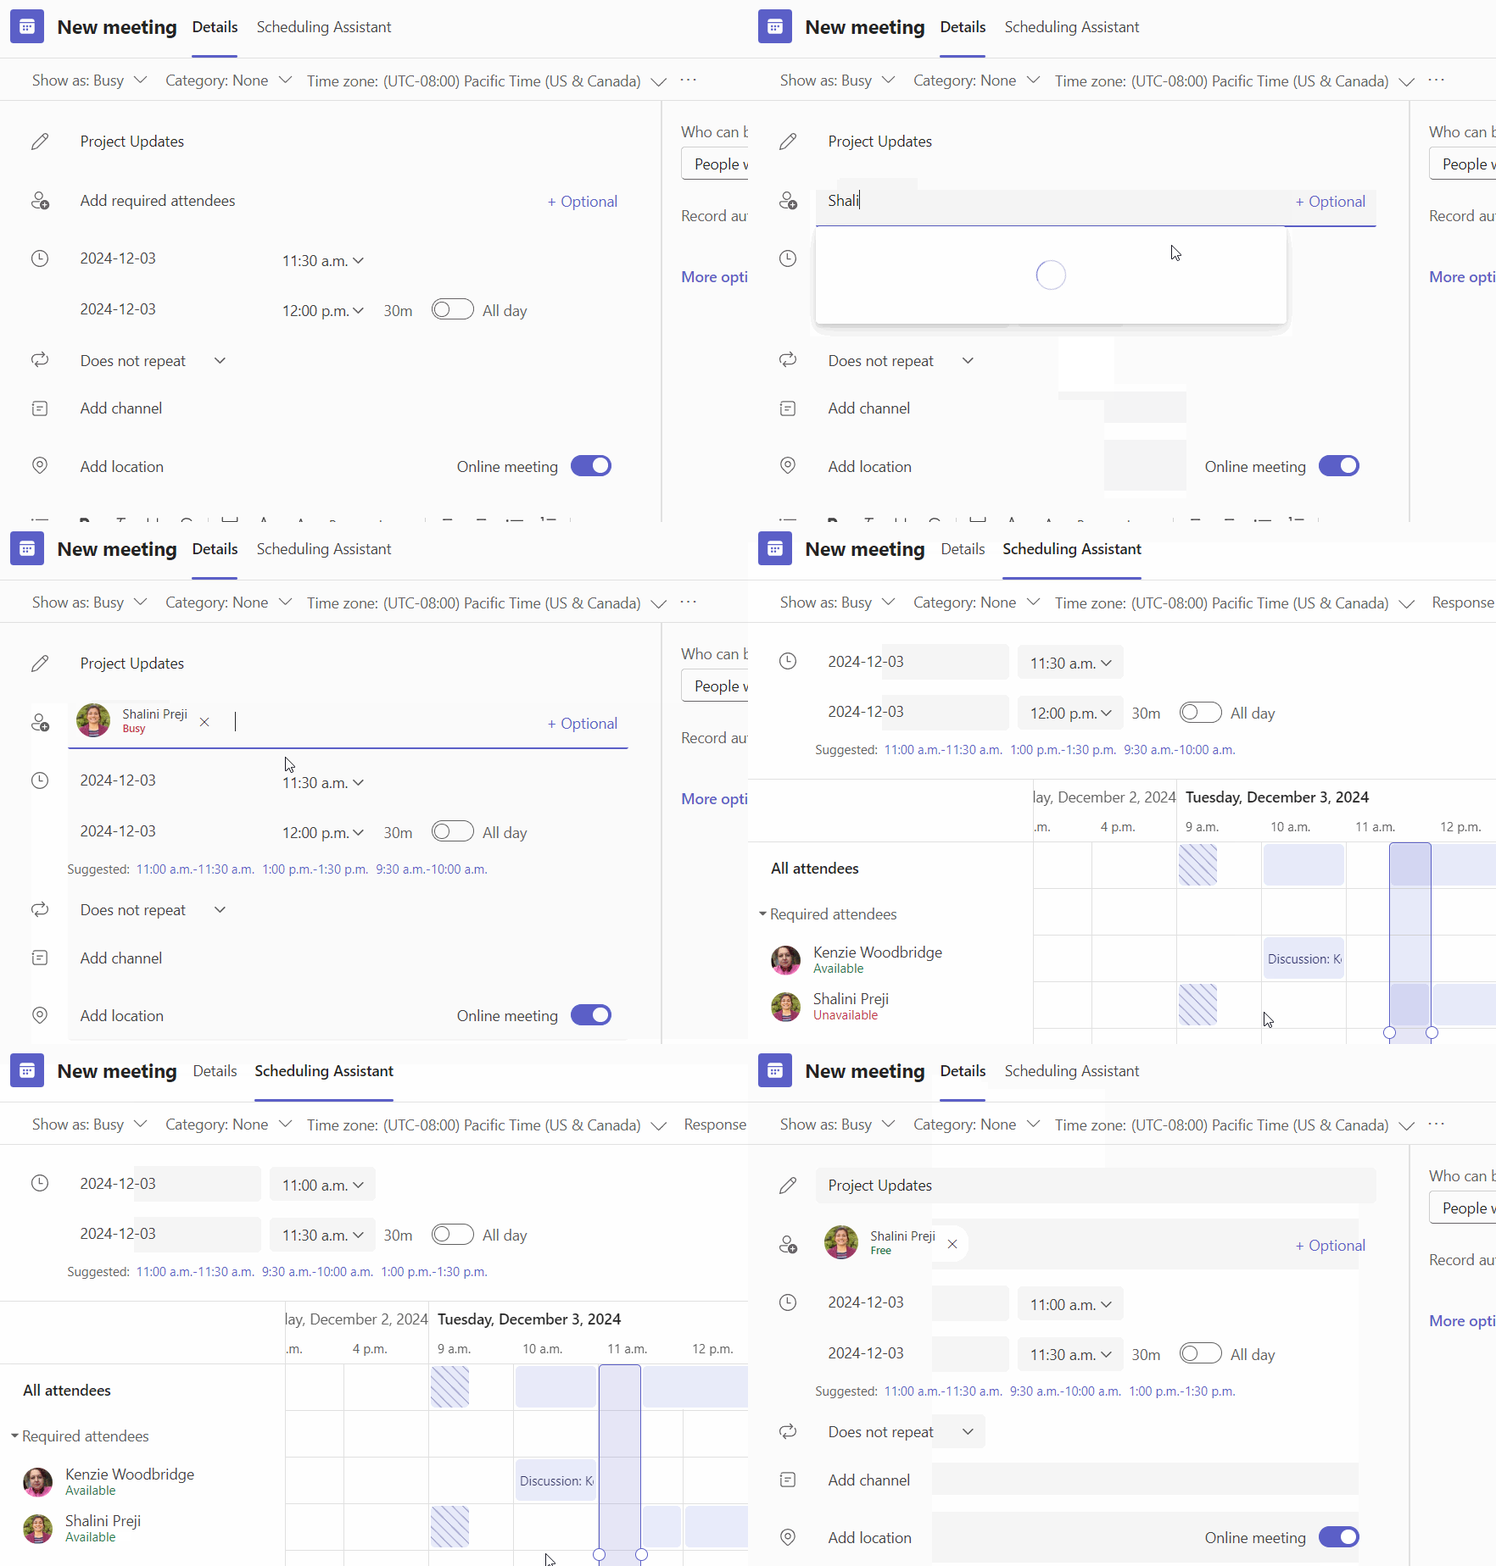
- [Optional] Add a channel to the meeting by clicking the the Add channel field and navigating to the correct channel in your list of teams.
- Note: Adding a channel to a meeting has the advantage that any chat or recordings from the meeting will be visible in the added channel rather than in a separate meeting-specific chat. As well, any files or meeting recordings will be attached to the OneDrive storage for that channel rather than that of an individual.
- Note: Once you’ve added a channel, you could also optionally choose to turn on the Send personal invites option, which automatically adds the meeting to the calendars of everyone associated with the channel. However, this is rarely the best method of inviting participants because it does not permit you to use the Scheduling Assistant to find a time that works for everyone, view Tracking information to see who has and hasn’t accepted the meeting, or assign specific roles (such as co-organizer) or abilities to any specific person.
- [Optional] Adjust meeting options by clicking Options and More options and making any desired changes.
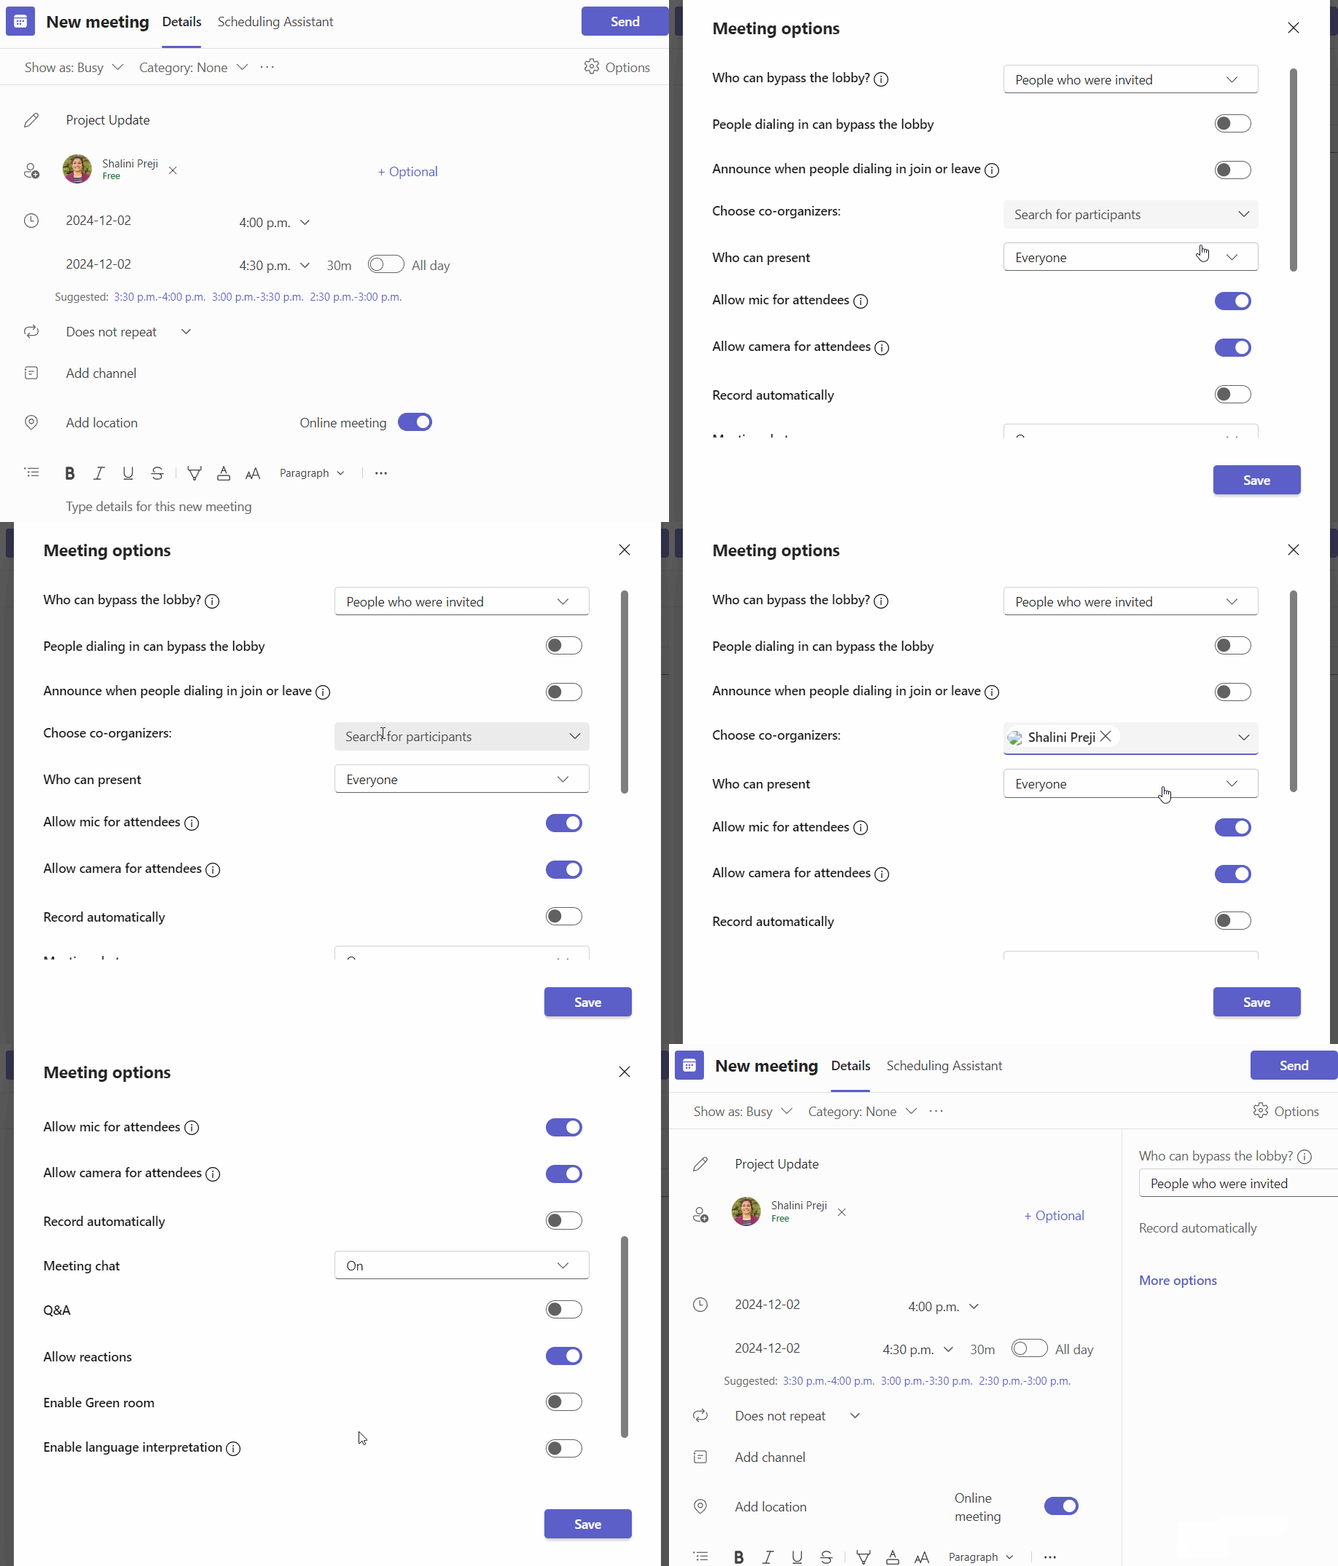
- Click the Send button to send the invite.
More information from Microsoft support:
Recording Teams meetings
All BCIT staff and faculty have the ability to record Teams meetings. Recording meetings is cloud-based, meaning that the processing and storage of the recording doesn’t initially rely on your computer’s resources and won’t affect meeting performance.
Important: By default, recordings will only remain available online for 120 days, after which they will be automatically deleted and cannot be retrieved. If you want to retain a recording for longer than 120 days, you can adjust the expiry date or download it to your computer.
By default, any participant in a meeting can start recording and transcription, though the meeting organizer can change this to “only organizers and co-organizers” in the meeting settings when they set up the meeting, either in Teams or Outlook.
Important: The person who starts the recording is the default owner of the recording, able to manage or delete it. The meeting recording will be housed in and count towards that person’s OneDrive storage. Only the person who starts the recording and the meeting organizer (if a different person) will be able to access the recording unless they choose to share it further.
To start a recording, in a Teams meeting:
- Click the More icon in the meeting toolbar at the top of the screen.
- Click Record and transcribe, then Start recording.
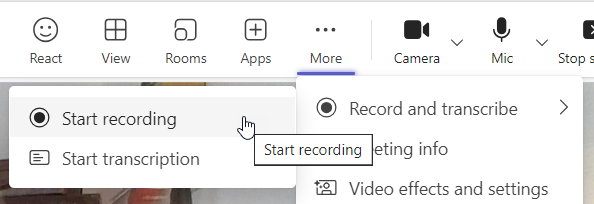
- Click Continue in the pop-up to confirm that you understand that participants will need to agree to be recorded.

When the recording is started, to protect the privacy of participants, Teams automatically starts to transcribe any audio in the meeting and also mutes, turns off video, and stops any content sharing for all participants other than the person who started the recording. Each participant is then required to consent to being recorded before they can turn their audio and video back on or start sharing content.
Note: Especially for larger meetings where a recording is planned, it is likely to be less disruptive or confusing to start the recording early, before many participants join. When a recording is already started, every participant joining the meeting is asked to consent to recording upon joining the meeting and can confirm their audio and video setup as usual at that time, after which their participation can proceed as usual without interruption. Recordings can be easily edited after the meeting to remove the initial empty time.
To stop a recording before ending the meeting (which stops it automatically):
- Click the More icon in the meeting toolbar at the top of the screen.
- Click Record and transcribe, then Stop recording.

- Click the Stop button to confirm.
When the recording has been processed and is ready for you to access it, you will see it noted as ready in the meeting’s chat. This could happen almost immediately or may take up to half an hour for especially lengthy or complex meetings.
Note: If you start and stop recording more than once within the same meeting, it will show up as multiple recordings.
More information from Microsoft support:
Once a meeting has been recorded and the recording has been saved, a notification will appear in the chat or channel associated with the original meeting. This notification is usually the simplest method of accessing a specific recording soon after the meeting ends.
Accessing recordings for meetings that were not associated with a channel
In Teams:
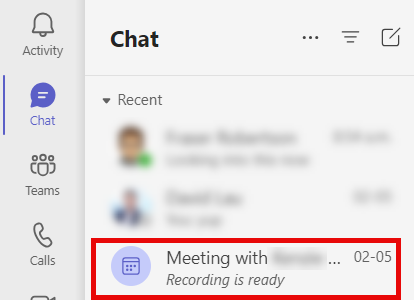
- Click Chat in the left menu.
- Look for the chat associated with the meeting you recorded in your recent chats. It will show a notification that the “Recording is ready”. Click on it.
- Click the Recording link to open its Stream page in your browser.
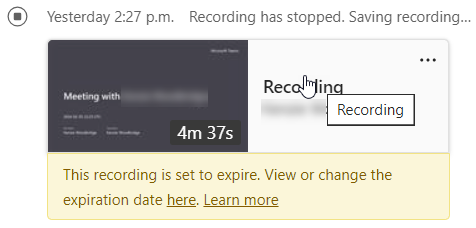
To watch the recording, click the play button in the middle. From the Stream page you can also manage and share the recording (see below).
Accessing recordings for meetings associated with a channel
In Teams:
- Click Teams in the left menu and navigate to the channel which was associated with the meeting.
- Click the Files tab at the top of the channel and navigate to the Recordings folder.
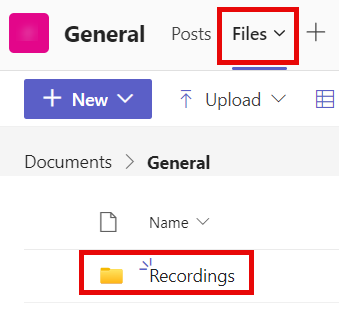
- Click the link for the recording you wish to view to open its Stream page in your browser.
To watch the recording, click the play button in the middle. From the Stream page you can also manage and share the recording (see below).
The Stream web app is part of the Microsoft 365 suite of apps available to BCIT users. It is also the simplest way to see all of the meeting recordings that you own or have access to or to access older recordings without having to scroll back through your chat history.
In your browser:
- Go to teams.bcit.ca and, if necessary, login with your usual BCIT login credentials.
- Click the three dots in the left sidebar menu to view More added apps, then click Stream.
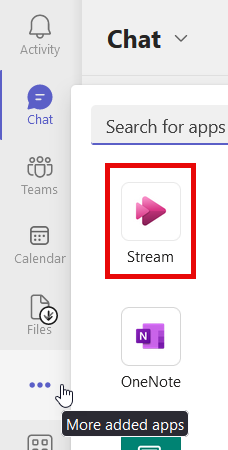
Your most recent meeting recordings will likely be shown at the top in the Recommended area. You can view all of your recordings below that and can use search and filters to help you find the specific one/s you want. You can also upload other videos and recordings and create playlists.
Click on any recording in the list to open its Stream page. To watch the recording, click the play button in the centre of the recording. From a recording’s Stream page you can also manage, share, and delete the recording (see below).
On your BCIT-issued laptop:
- Click the OneDrive icon in the taskbar.

- Click Open Folder to view your OneDrive directory.
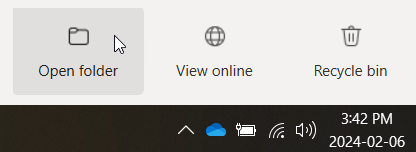
- Scroll down (if necessary) until you see the Recordings sub-directory and double-click to open it.

Once you’ve found a specific recording file in the Recordings sub-directory, you have several options for how to watch the recording:
- Double-click the file to open and play it in Media Player on your computer. This downloads it to the Recordings sub-directory in OneDrive on your computer (if it hasn’t already been downloaded previously) and then opens Media Player.
- Note: Opening the recording file in Media Player (or another local application) does not give you access to the recording transcript and other features available through the Stream webapp.
- Right-click the file and click View online in the contextual menu that appears to open the recording’s Stream page in your browser.
The Recordings sub-directory is where all non-expired meeting recordings that you own are saved automatically.
Once you have arrived at the recording’s Stream page in your browser, either via the link in the Teams app or by navigating to it in the Stream web app, you will be able to to do a variety of things, depending on your role.
Everyone with access to the video can:
- Click the play button in the middle to watch the recording.
- View the transcript.
- Access information about the recording, including:
- When it was recorded and when it is set to expire,
- How many times it has been viewed and by how many viewers over time,
- Where it is being stored, and
- Who has access to it.
- View and add comments.
- Add the recording to a playlist or mark it as a favorite.
Recording owners, meeting organizers, and those who have been granted access to do so can:
- Share the recording.
- Download the recording.
- Note: If you are the recording owner, the recording will already have been added to your local OneDrive listing automatically, but won’t actually be downloaded to your computer unless you interact with the file locally.
- View and make changes to the recording’s metadata, including:
- Title (by default the title will match the meeting)
- Description
- Expiry date (by default all recordings expire after 120 days, but you can extend or remove this)
- Video thumbnail
- Edit the recording transcript or upload a new one.
- Create and edit chapters.
- Move or copy the recording to a different location in OneDrive.
Note: Microsoft is still developing and adding features to the online Stream app and certain critical features – such as the ability to trim recordings – is expected to roll out later in 2024 and this resource will be updated to reflect those changes.
More information from Microsoft support:
The simplest way to delete a meeting recording, assuming you haven’t changed the expiration date, is just to wait. 120 days after the recording was created it will be deleted automatically. The second simplest is to adjust the expiration date to make this happen sooner. You can also delete the file in OneDrive.
When a meeting recording expires and is deleted, it goes to your OneDrive recycle bin for 90 days, after which it become unrecoverable. This allows you a brief window of time to restore it if necessary.
Deleting a recording by modifying its expiry date
Navigate to the recording’s Stream page via whatever method you prefer (via the Teams app, in the Stream web app, through OneDrive). From the Stream page:
- Click on the “Expires in … days” marker below the meeting title, then click Select a date.
- Click the Go to today link at the bottom of the calendar, then click to select tomorrow’s date (the earliest date you can select).
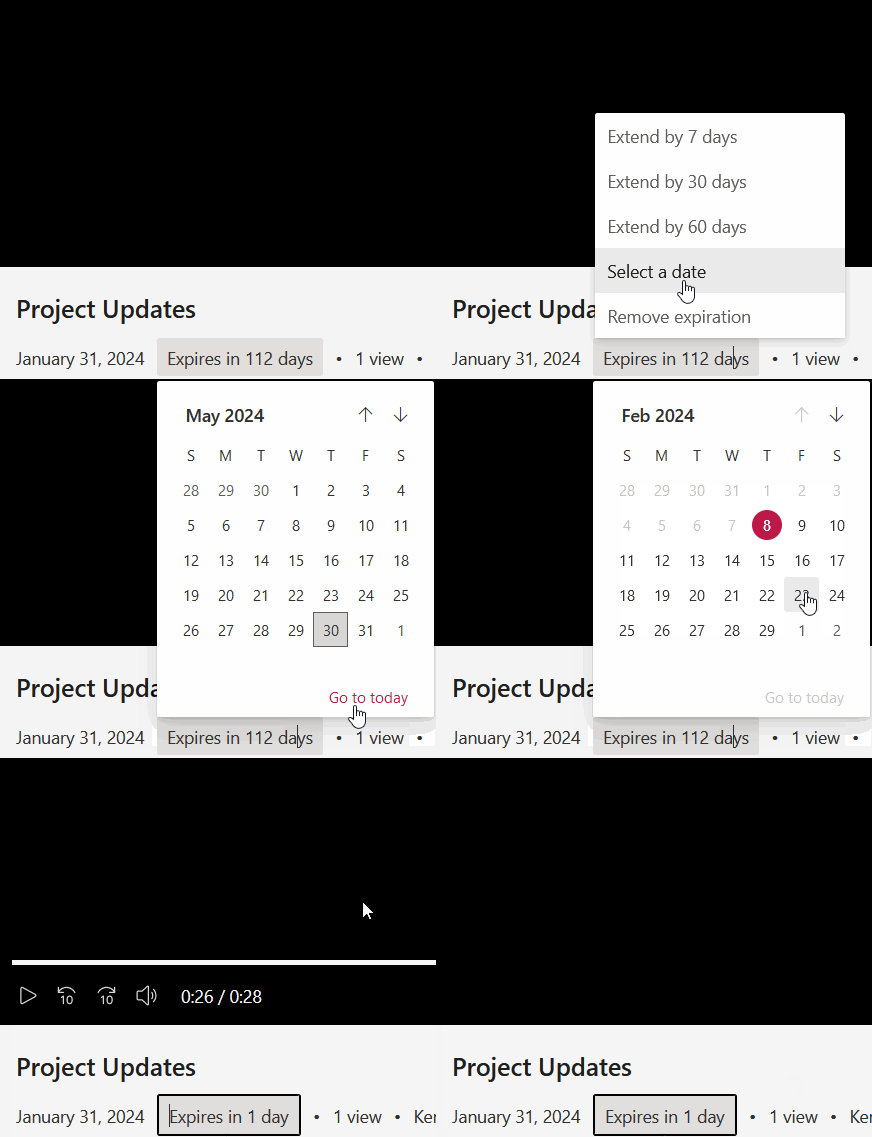
The recording will automatically be moved to your OneDrive recycle bin on the selected date.
Restoring expired meeting recordings
Whether a meeting recording expired after the default 120 days or on a date that you selected, if you need to get it back, this is possible for up to 90 days after it was deleted. The process for restoring meeting recordings is the same as the process for restoring any other file that ends up in your OneDrive recycle bin. Follow the instructions for Deleting and Restoring Files with the OneDrive Recycle Bin.
Note: When you restore a meeting recording, it will no longer have an expiry date set. If you only need access to the file for a short period, you may wish to set another expiry date right away to proactively manage your OneDrive storage.
More information from Microsoft Support:
- Restore deleted files or folders in OneDrive (Microsoft)
More information about Microsoft Teams
-
Considerations for Hybrid Meetings (In Person and Microsoft Teams Meetings)
-
Using Cisco Video Conferencing Units with Microsoft Teams and Other Meeting Software
-
Using Microsoft Teams for Workgroup Collaboration and Communication
-
When to Choose OneDrive, Teams, or SharePoint Online for Faculty & Staff