Jabber is part of the VoIP applications at BCIT that offers Presence, Instant Messaging (IM), Voice and Video calls, Voicemail access, and desktop sharing into a single product.
Requirements
You can install Cisco Jabber for Windows on computers with the following specifications
- Microsoft Windows 7 SP1 or later (32 or 64 bit)
- 2 Gig RAM
- DirectX v11 or later
NOTE
Jabber is automatically part of the laptop image and is ready for Jabber personal configuration.
Jabber configuration
This Jabber setup needs to be completed after a new installation of the software or when a Jabber Reset was performed.
- If Jabber isn’t open yet, launch it by double-clicking the Jabber icon on your desktop.

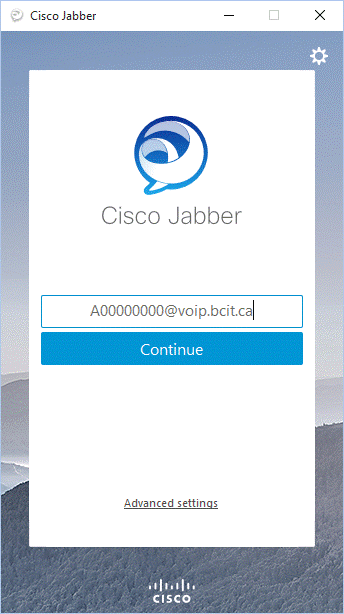
- In the first screen, enter your BCIT ID (A0xxxxxxx@voip.bcit.ca) and click Continue.
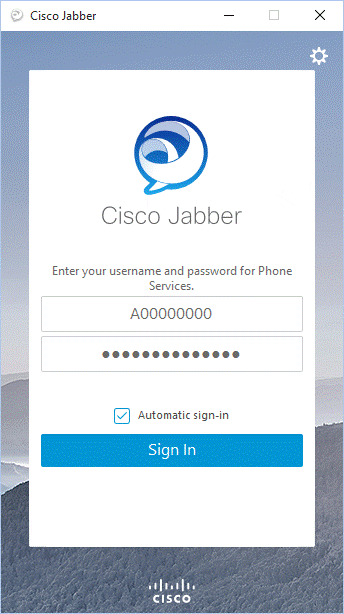
- On the second setup screen, ensure your BCIT ID number is in the Username box. Type in your BCIT password, checkmark Automatic sign-in, and click Sign In.
- Jabber should now open and you are ready to start!
Phone connection
The next step is to ensure you can connect to Phone services. This will allow you to control your Cisco desk phone (take and make calls) using Jabber. By default, Jabber should connect to phone services without any changes. Keep in mind that you should be within reach of your Cisco desk Phone before taking and receiving calls this way. Jabber merely acts as a call controller.
Jabber can also act as a softphone where your computer’s microphone and speakers are used for audio. In this instance, you do not need to be by your Cisco desk phone to make calls.
- Click the bottom left phone icon.
 2. Select Use my computer for calls.
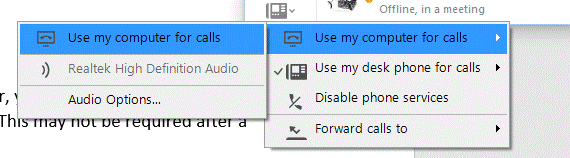 3. If connected successfully, the icon will change to a computer.
 You are now ready to use Jabber for calls from any location.
For further assistance installing or using Jabber, please contact the Technology Service Desk (604-412-7444 – option 1).