Cognos Analytics is BCIT’s Institute reporting tool, used to generate a wide variety of reports and analytics of BCIT data.
This is a basic navigation guide to help you familiarize & run reports in BCIT’s Cognos Analytics environment. To access the Cognos Analytics reporting environment, you need to request access through Service BCIT. Once approval had been granted and your ID is created, you can login to the environment.
| Remote access: In order to access Cognos, you’ll either need to be on a BCIT campus or connected to the BCIT networks via VPN (GlobalProtect). |
Open up a browser, and type the following: cognos.bcit.ca
HINT: You can bookmark this URL in your browser.
- Cognos production access interface has been switched to Microsoft Azure. When you sign in, you will see the following login screen, OR it will auto login if there is a Microsoft session already active. Enter your usual BCIT credentials (BCIT email + password).

- You will be directed to approve through Multi-factor Authentication.
- You will then be redirected to the Cognos Analytics home page.

Navigation Bar
The Navigation Bar is located at the left menu bar.
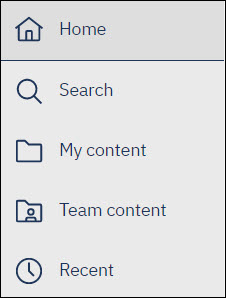
Home – Returns you to the home page.
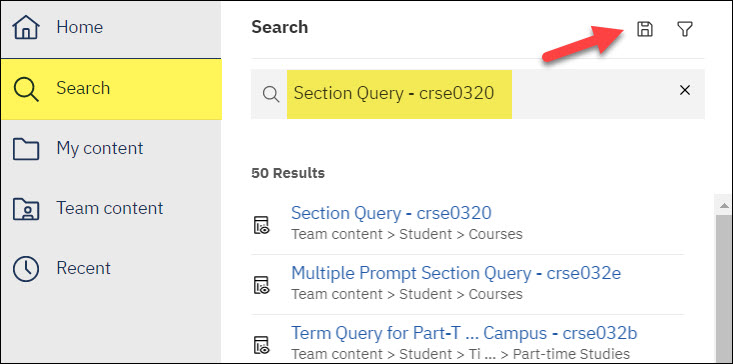
Search – Quick, easy way to find your items. You can enter keywords. After you search and the results are listed, you can save your search. The save icon is available in the Search panel toolbar only after you search and the results are shown.
My content – This folder is for your private use, and only you can see the content that’s stored there. You can copy reports from Team content folders and save to My content for personal use.
Team content – Your department’s content is in this folder. This is where you find reports, packages, dashboards, stories, data modules, and more. Items in Team content are organized in folders so searching with keywords is an easy way to find what you’re looking for.
NOTE: The reports a user may see depends on the security access they are granted according to the needs of their specific role at BCIT.
Recent – This folder contains items that you viewed recently.
Welcome Menu
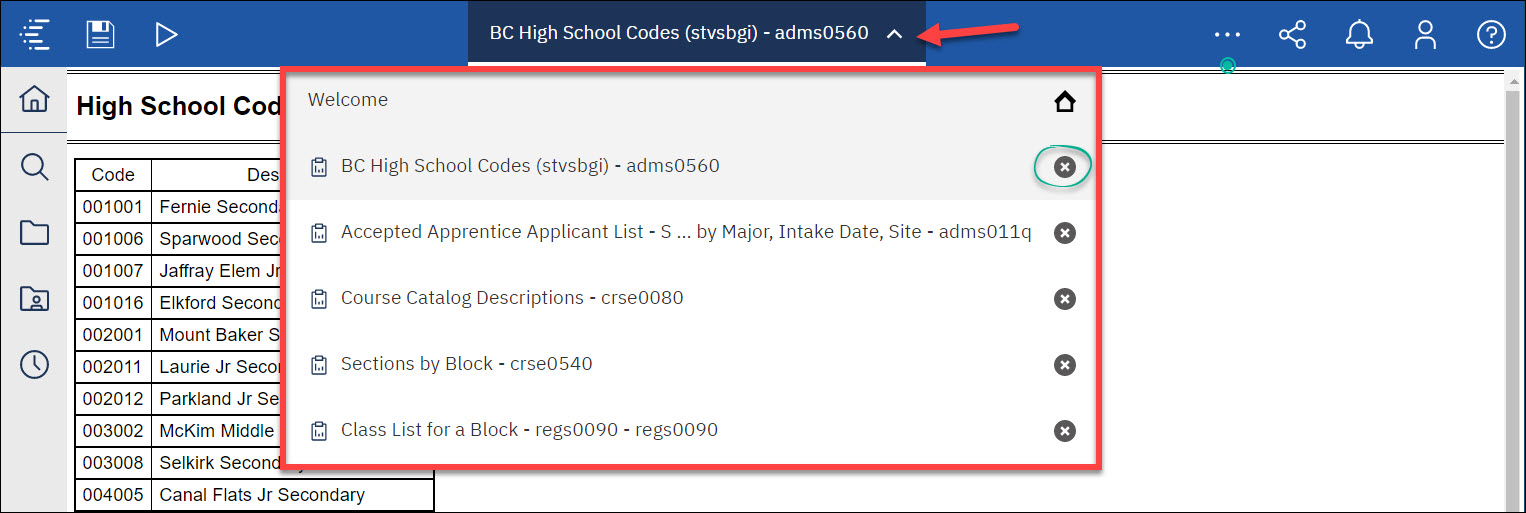
The Welcome icon is located in the middle of the top menu bar.

After you have run a few reports, clicking on the Welcome icon will display all those reports. You can toggle between the main portal page and new or opened reports.
To exit out of a report, click on the X beside the report name.
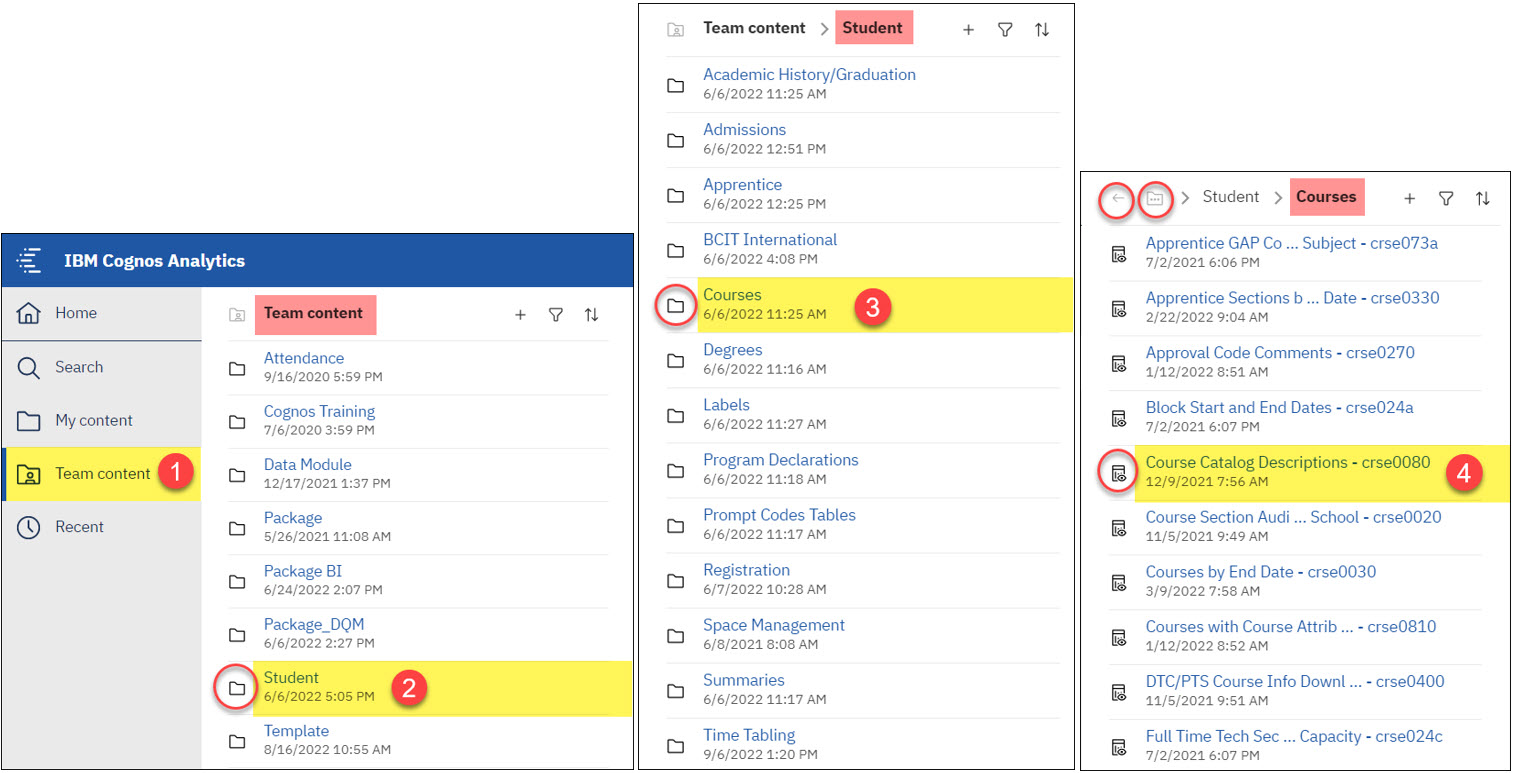
In the Team content folder, you will see a list of those reports in which you have been granted access to, according to the needs of your specific role at BCIT. There is a directory structure flow so you can select specific directories where your report may be located.

Example of navigating through a Team content folder:
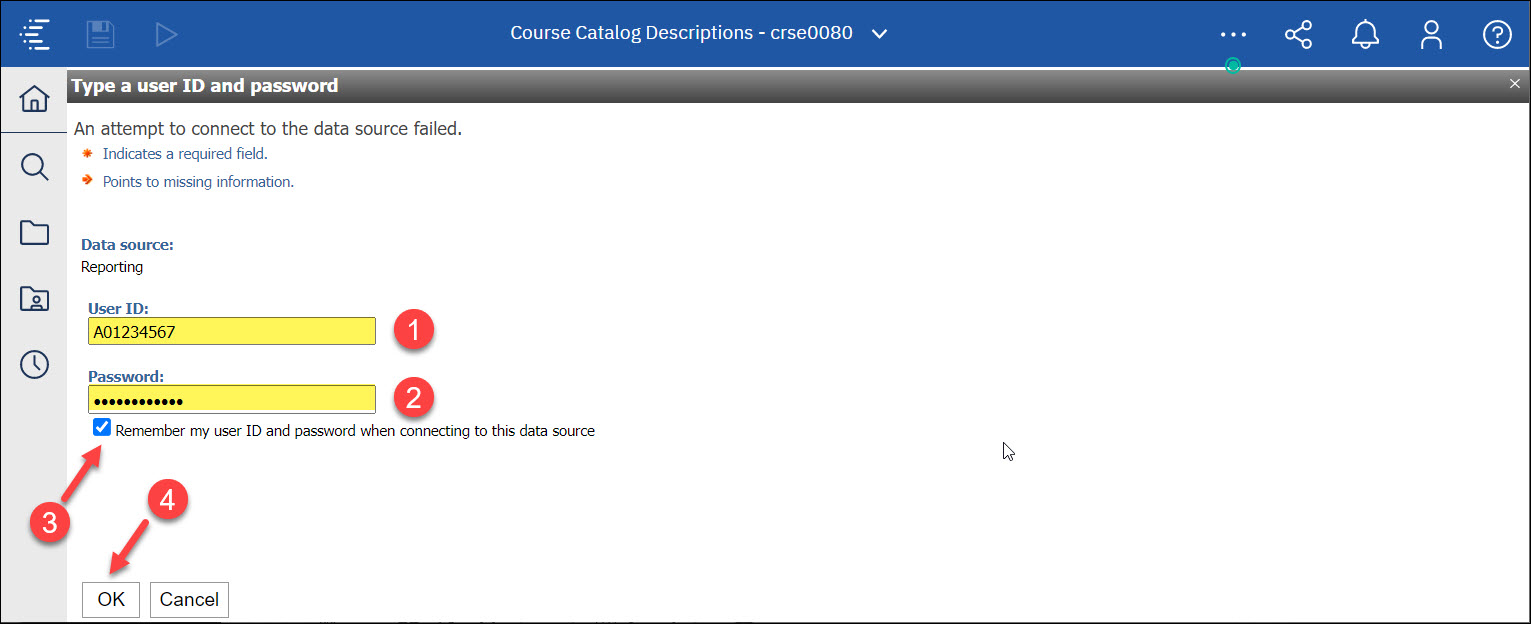
If this is the first time you run a Cognos report, you may be directed to login again with your A0******* number. This will allow you to connect with the reporting database.
At this time, this reporting database is unable to tie in to BCIT’s Single Sign-On (SSO) function, and still requires you to sign in with your A0******* number.
- Enter your A0******* number.
- Enter your password. It will be the same one you would use with your network ID.
- Remember to check the box so that your ID will be remembered, and you will not have to keep re-entering this info every time you run a report.
- Click on OK.
Some Cognos reports require prompts, and some do not.
Reports without Prompts
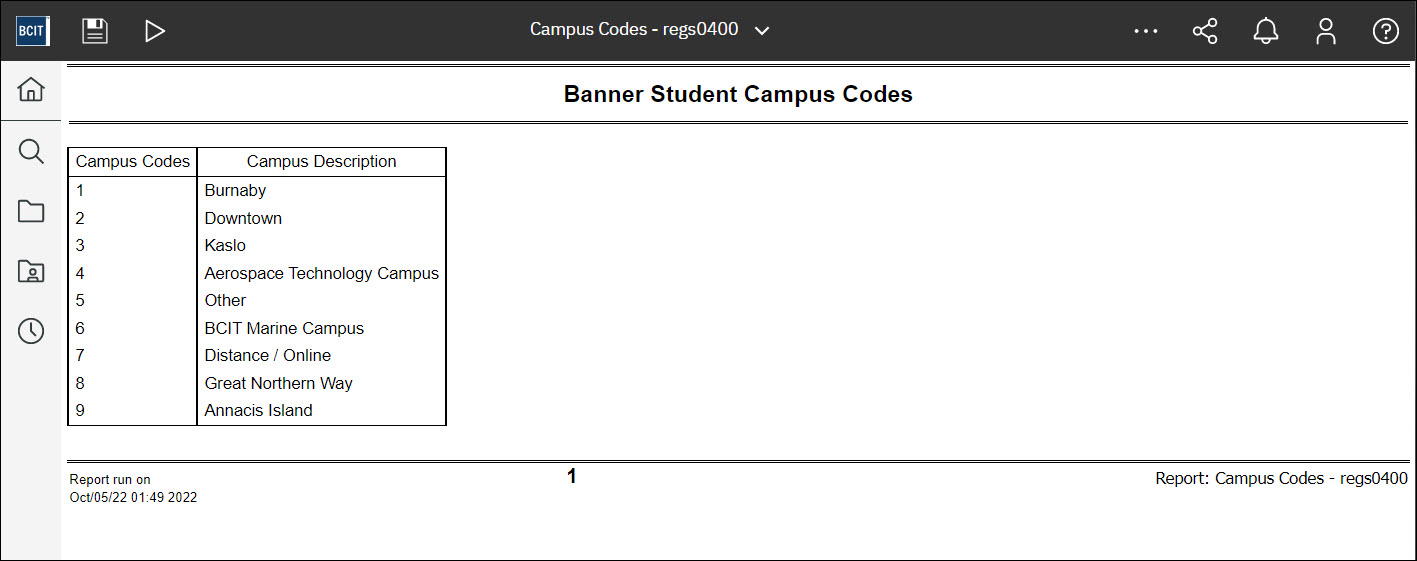
If you select a report that does not require any prompts, the report will run right away and display results in the default format (usually HTML):
Reports with Prompts
- Prompts can be single select or multi select.
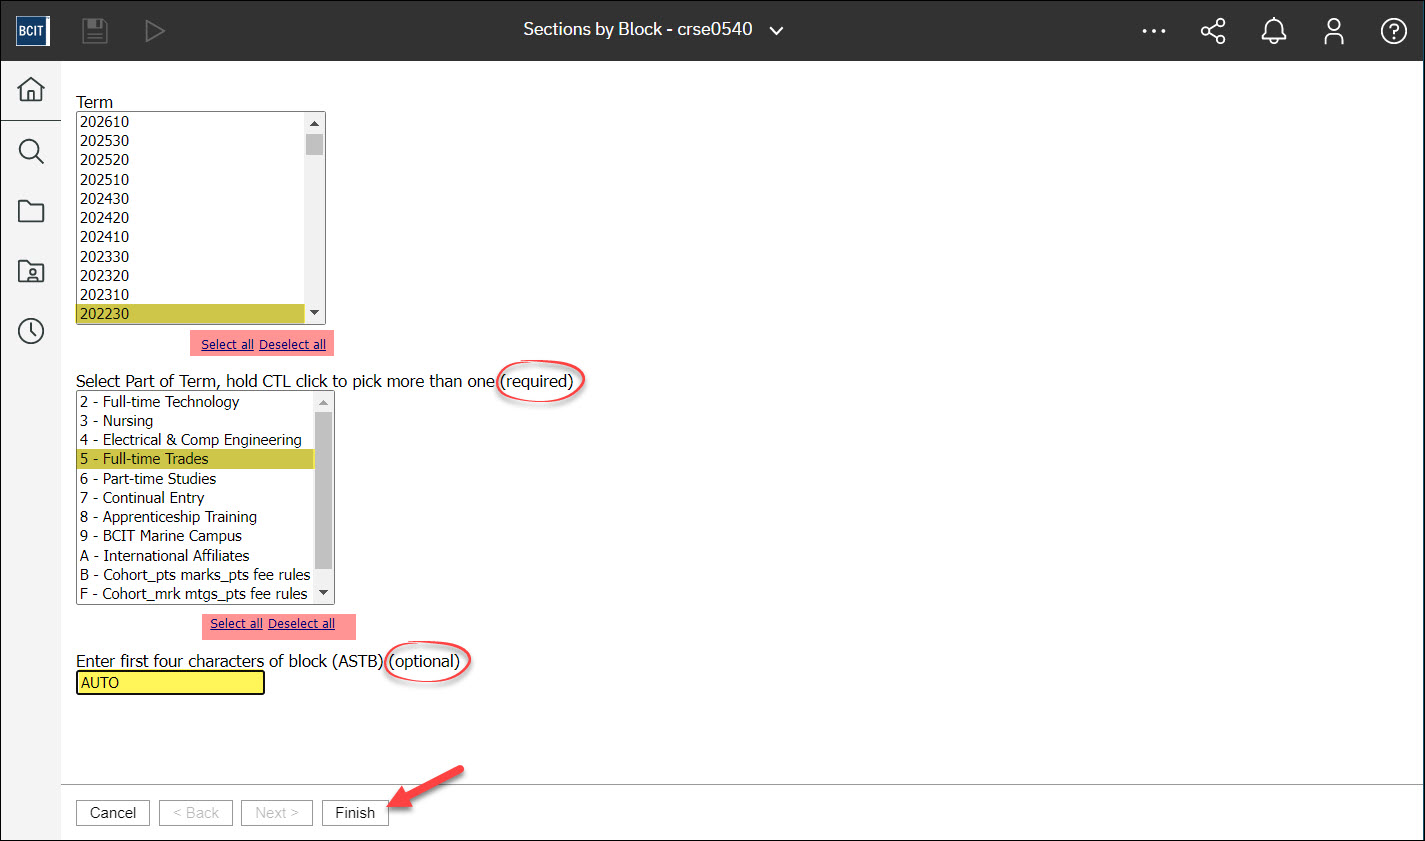
- Prompts can be required or optional. A red asterisk * indicates this prompt is mandatory. For mandatory prompts, you MUST select or key in the parameters, or the Finish button will remain grayed out, and you will not be able to run the report.
- Finish or Submit buttons are grayed out until a mandatory prompt is selected.
- Some prompts only allow you to choose one value.
- Use the Ctrl key and/or Shift key with the mouse to select multiple values within the prompt box.
- Some prompts have Select all and De-select all links below the prompt.
- All prompt pages contain a Cancel, Submit, Finish or OK button to cancel or execute the
report. - If prompts are optional and none are selected, the report may take longer to complete.
Not all prompt pages look the same. Report authors have the ability to create different designs and layouts based upon the best use for the data and report.
If you select a report that requires additional information to be entered, you will be directed to the Prompt page. Enter/select any relevant information, and then click Finish.
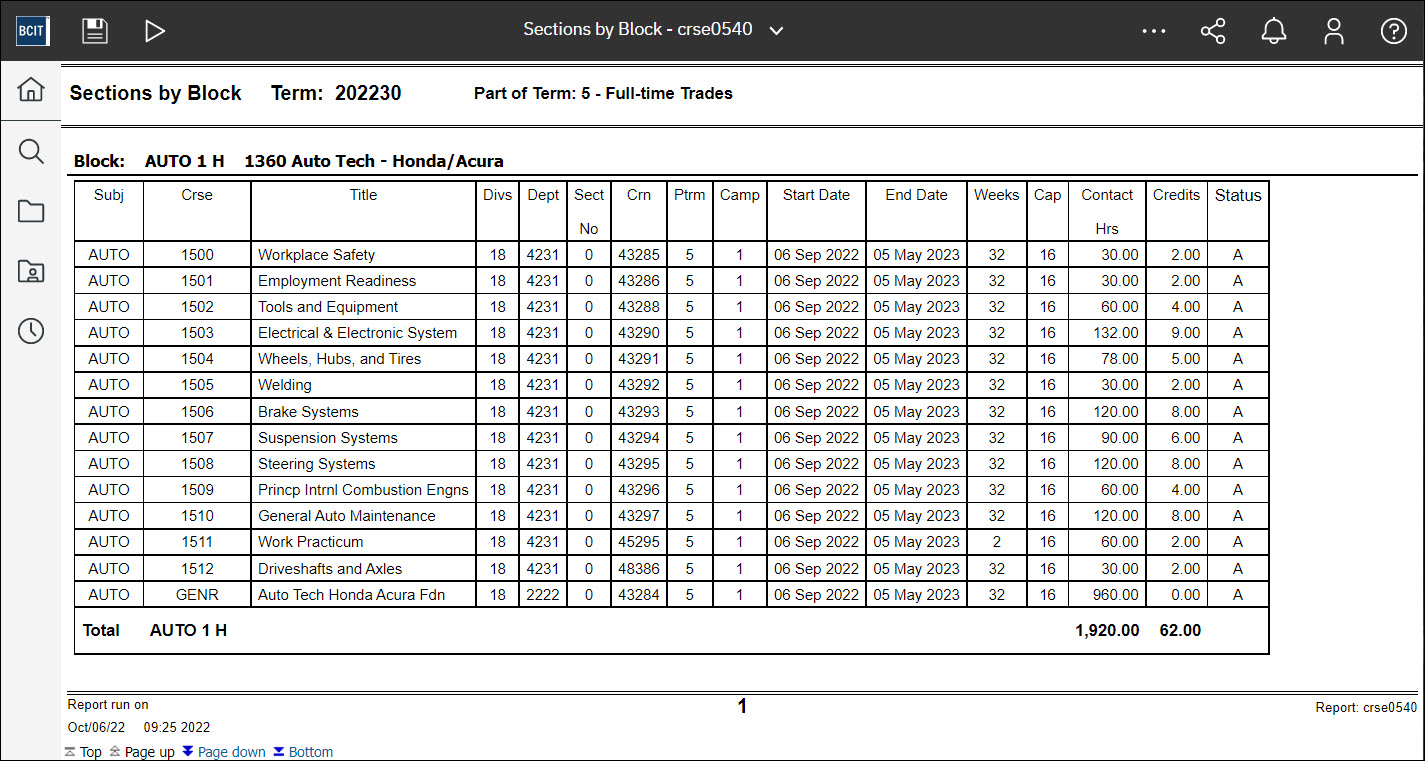
Your report will then run and display in html format:
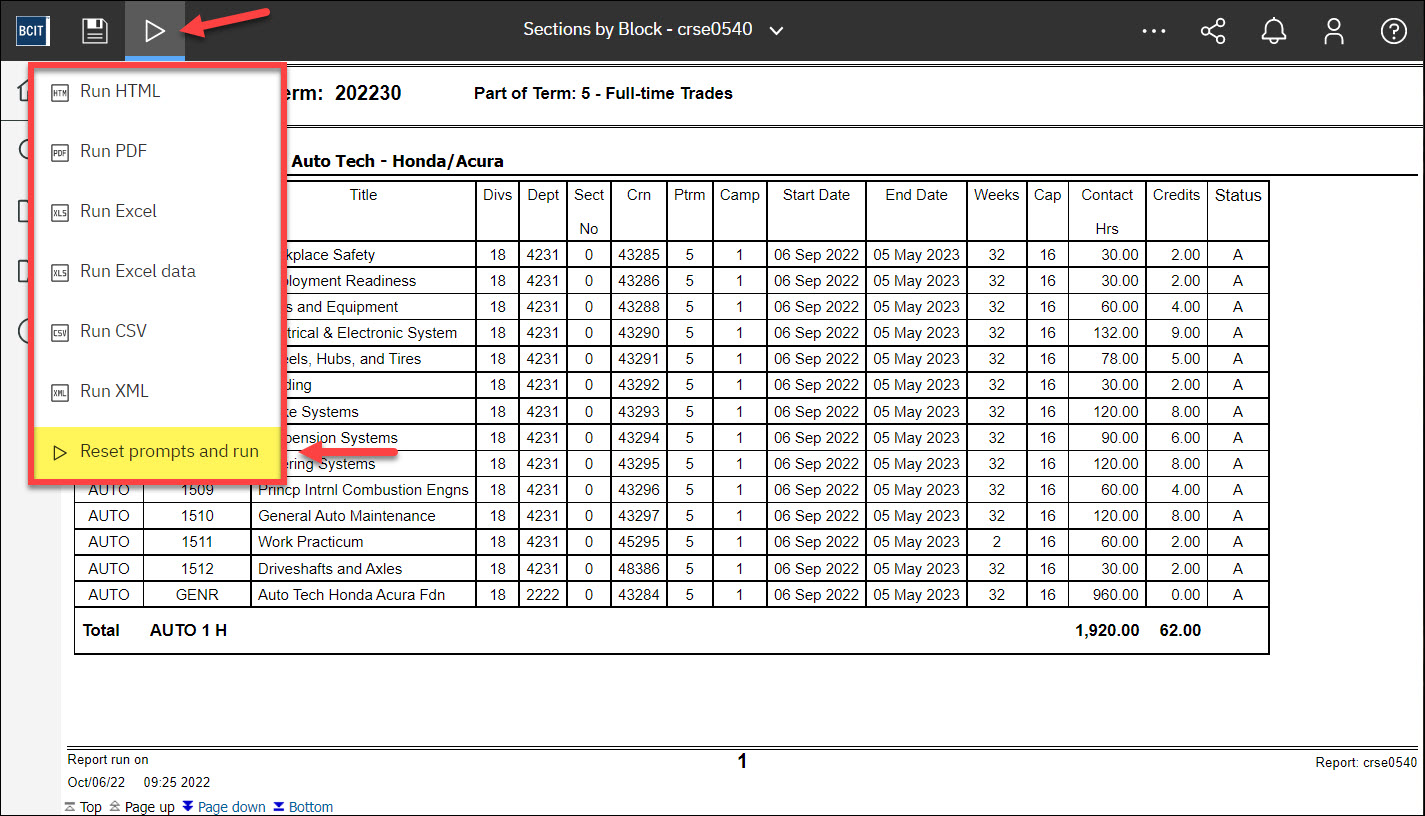
If you would like to reset the prompt values, click on the “Run as” icon, and select “Reset prompts and run“:
Method 1
When you initially run a report, it is presented as a html output format.
If you would like to view the report in a different format, click on the “Run as” icon, and select one of the options:
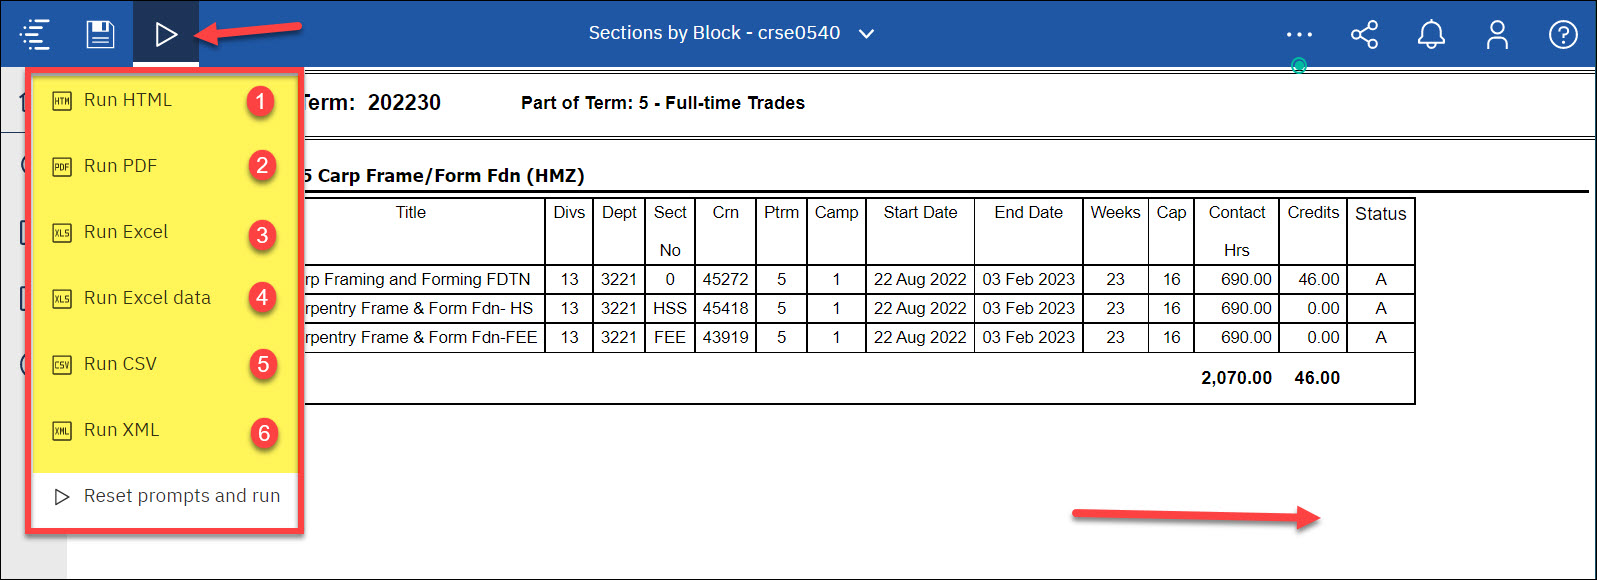
NOTE: The most common selection are usually PDF or Excel.
Method 2
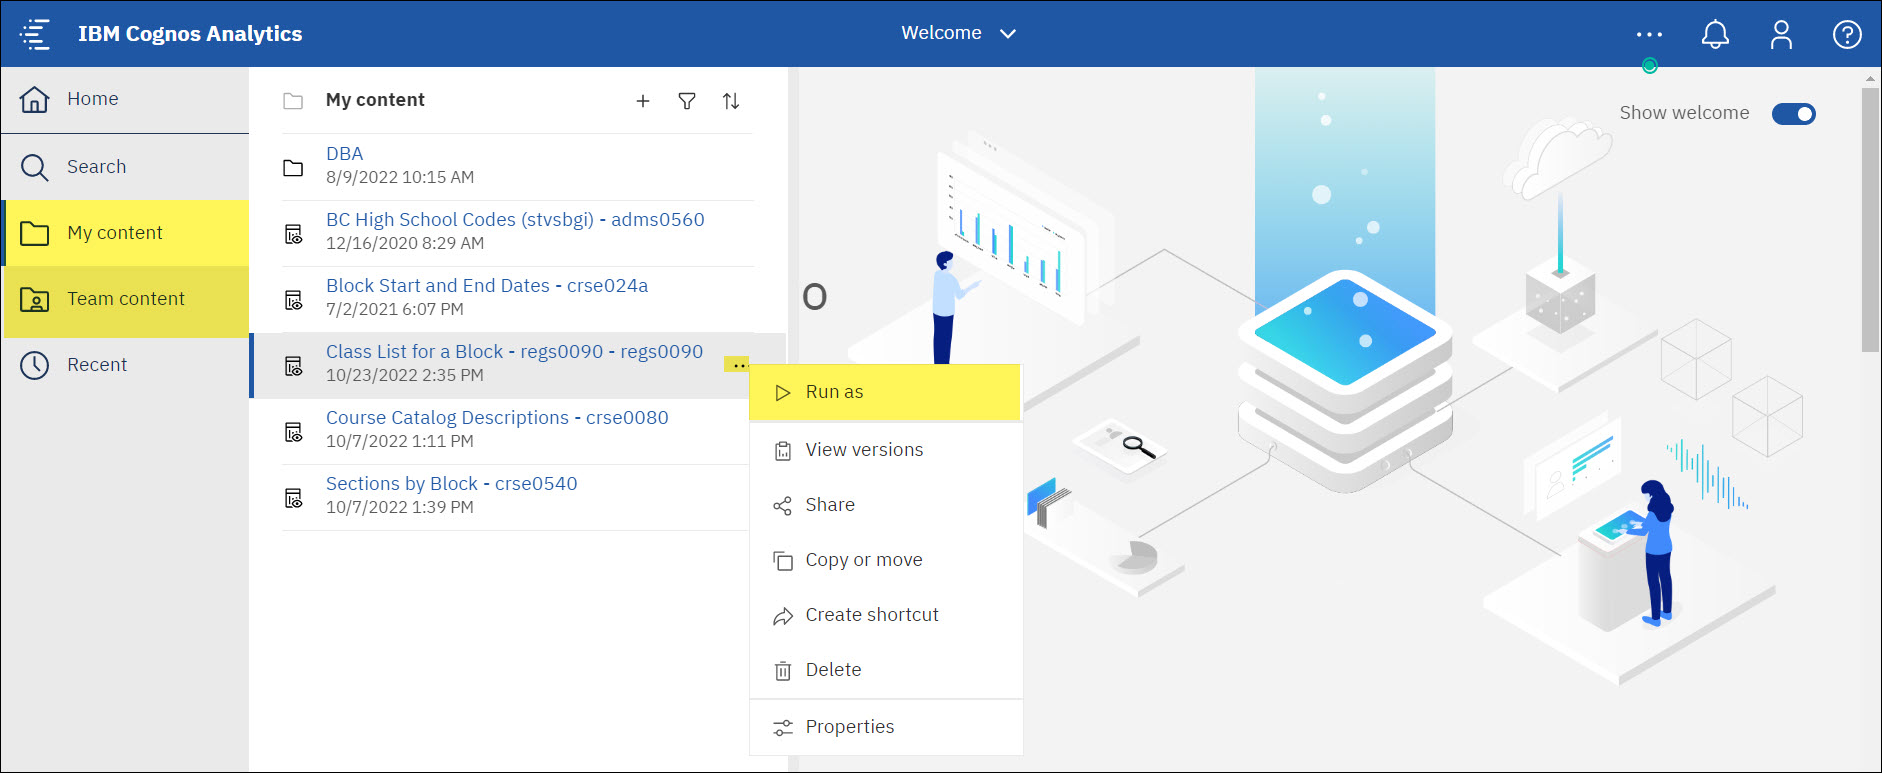
You can also select the Output Format from your My Content or Team Content folders.
This will allow you to generate the desired output without running the report more than once (with the associated wait).
- Identify the report.
- Click on the ellipses (…) to the right of your report.
- Click Run as.
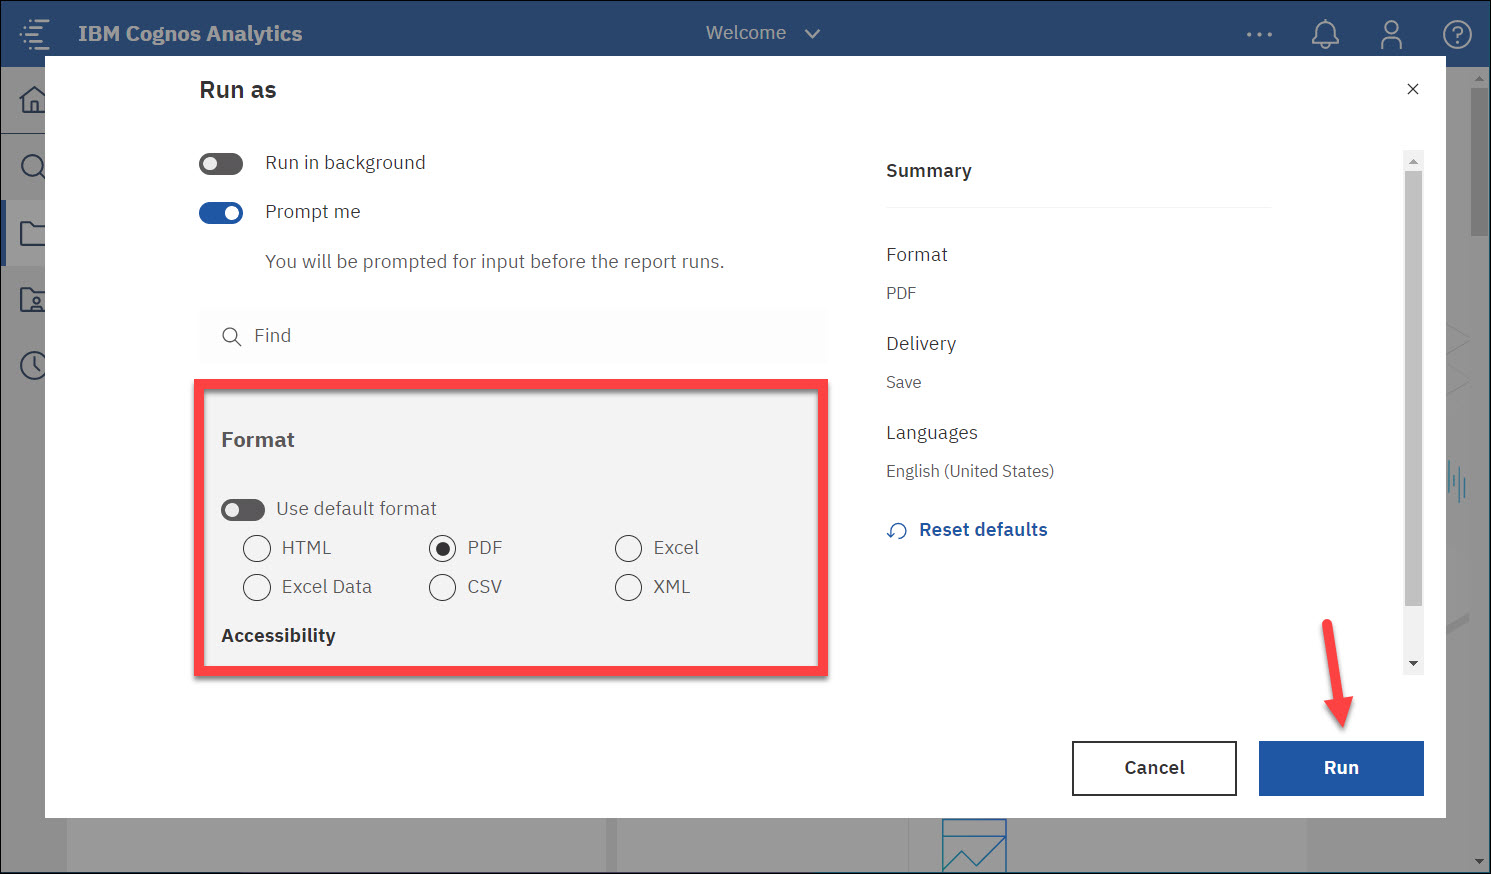
- Select your preferred format.
- Click Run.
- Enter Prompts (if applicable), and your report will appear.
Output Format Definitions
| 1 | HTML |
|
| 2 |
|
|
| 3 | Excel |
|
| 4 | Excel data |
|
| 5 | CSV |
|
| 6 | XML |
|
NOTE: Due to the security control, regular users cannot save/modify a report to the Team Content folder. Therefore it can only be saved to their My Content folder.
| In Cognos Analytics, you must copy (save) the output if you need to keep a copy of the data for that time period. This can only managed in your My content folder. Cognos will default only 1 saved output file at a time. Only the most recent output will have the saved report output available. (Contact your Cognos administrator if you need this expanded) |
Reports that are run may be copied as report views in your own My content folder. This allows you to save your favorite reports in a location that is easily accessible.
NOTE: Before you copy the report, make sure you run the report in the format that you would like to save it as.
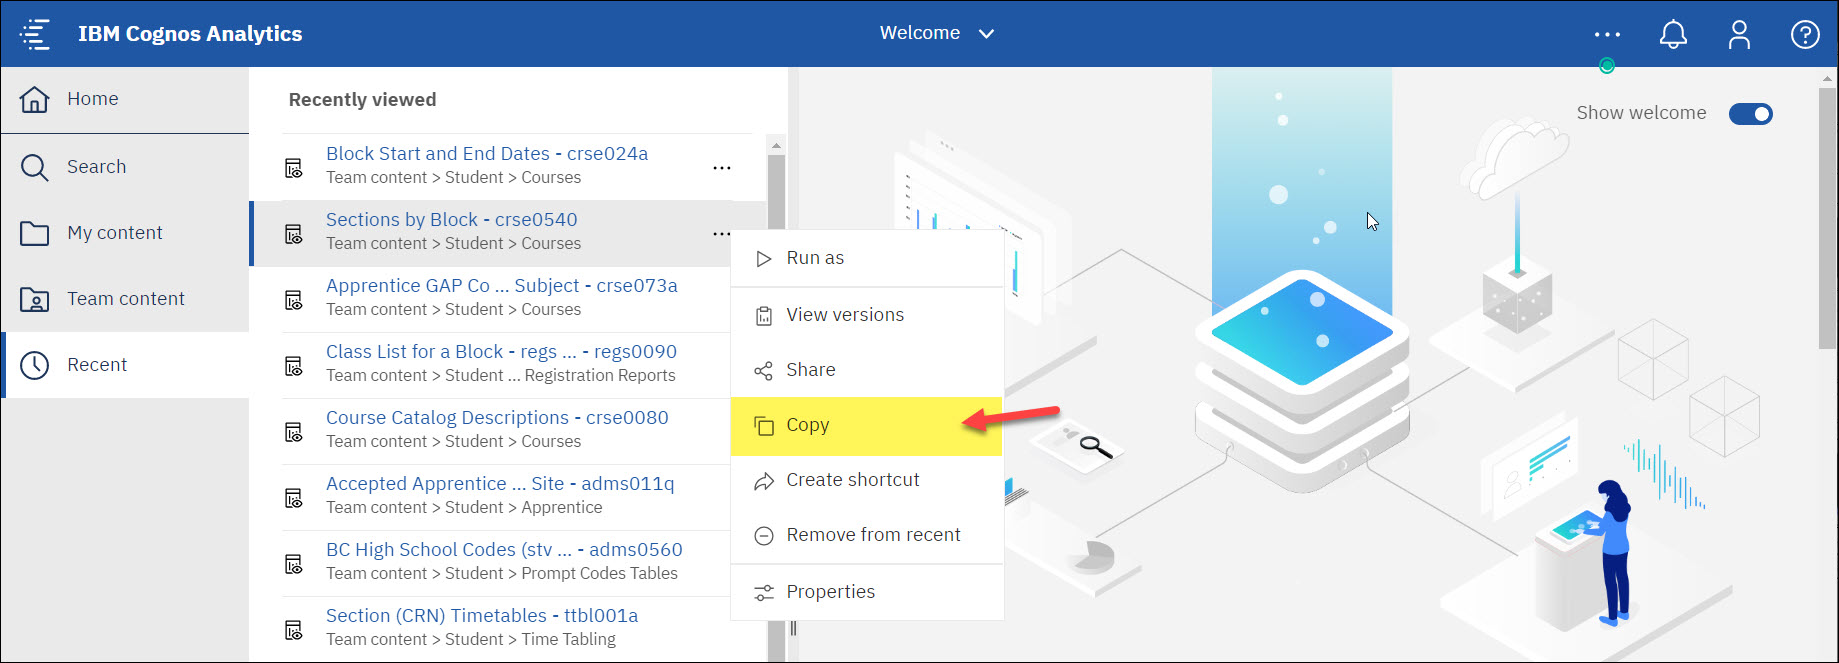
- Find the report you want to copy from your Team content or Recent folders.
- Hover your mouse over the report you want, and click on the ellipses (…) to the right of the report name.

- Select Copy.
- Click on the My content folder icon.

- You will see the blue bar indicating that the destination is now going into your My content folder. Click Copy to.
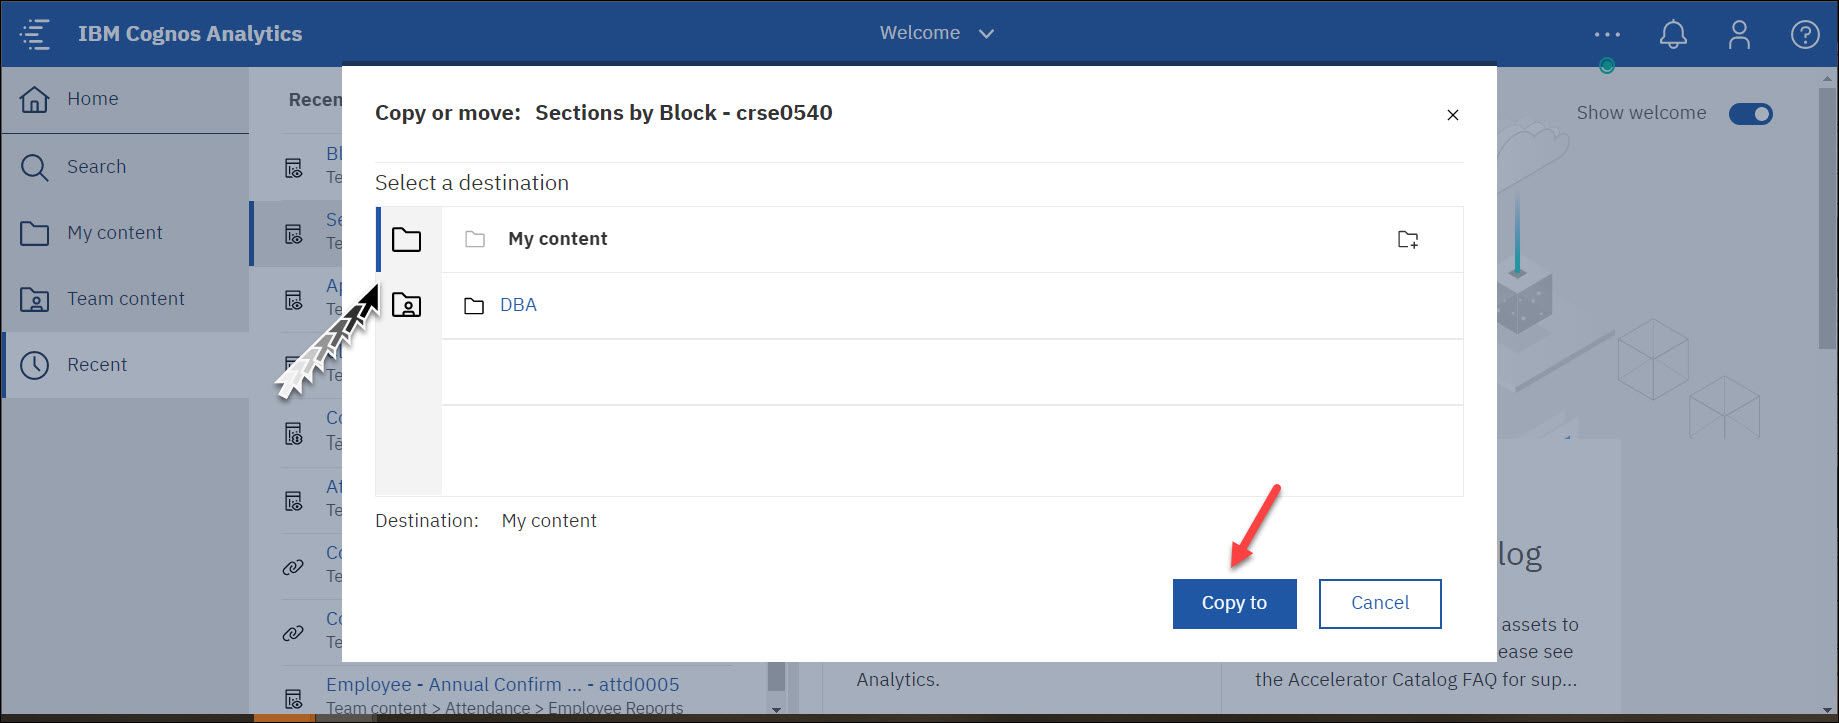 A message will briefly pop up confirming the report was successfully copied.
When you click on My content in the dashboard, you will now see all your copied reports:

If a particular report is copied to your My Content folder, you can run the report, and then save a version of the report you pulled by clicking on the Add this report icon (which looks similar to most Save icons).
NOTE: Before you save the report, make sure you run the report in the format that you would like to save it as.

Select Save Report.

Users may view saved report output.
- Click on My content in your dashboard.
- Hover over the report version you want to review, and click on the ellipses (…) when it appears.
- Click View versions.
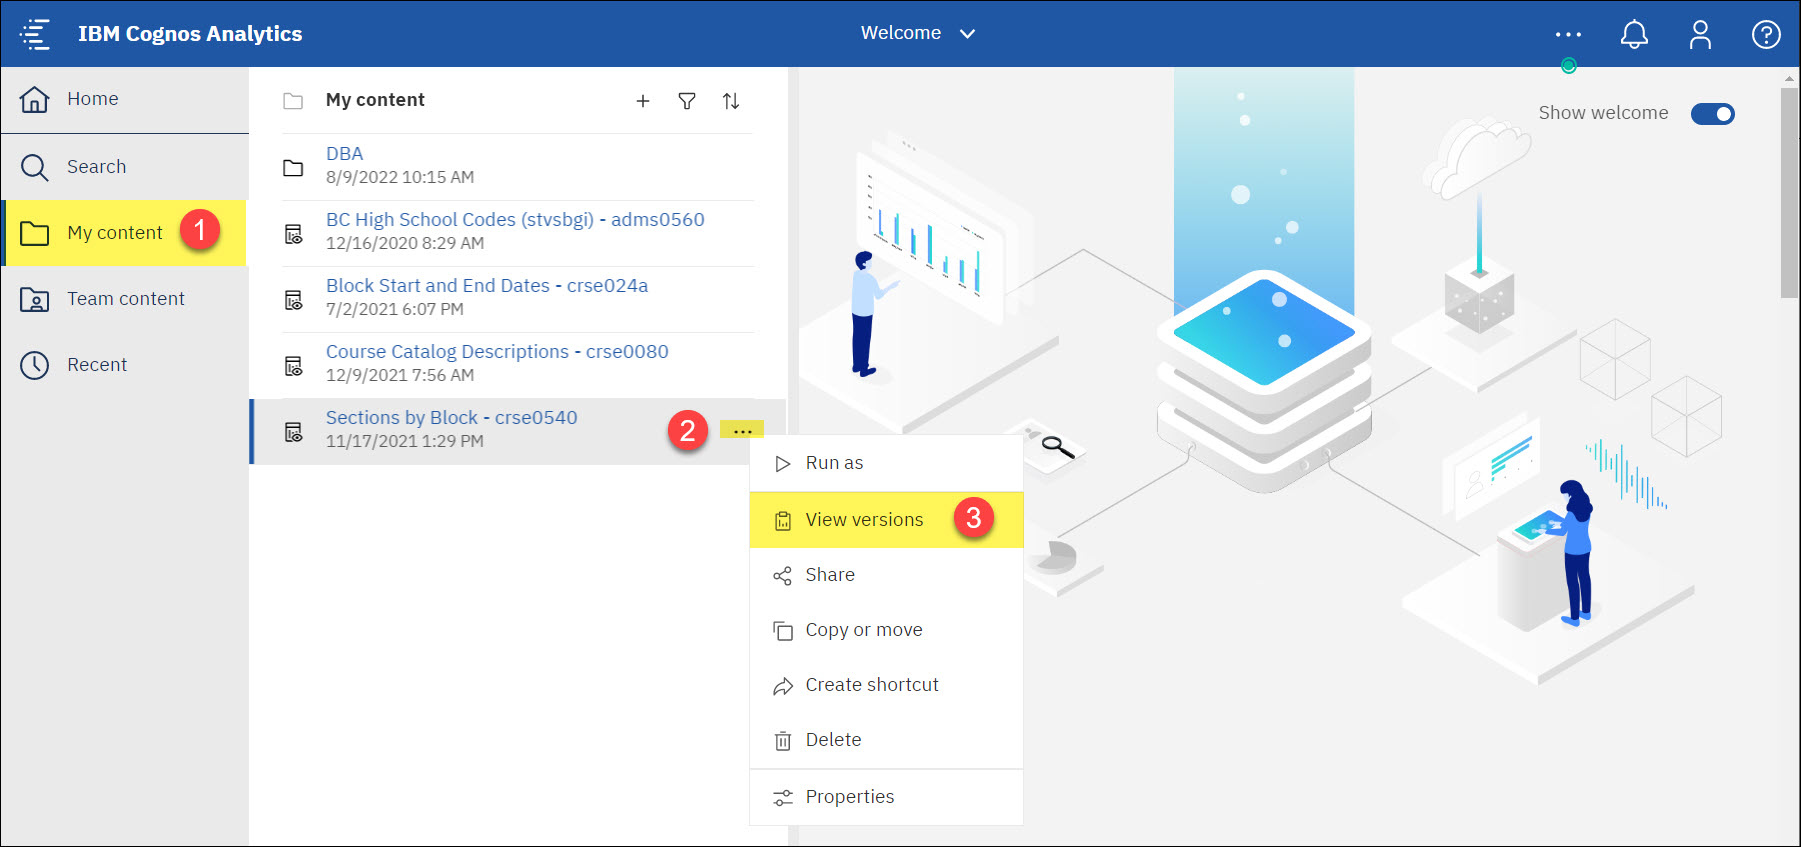
- A Versions window will appear to the right, listing the day and time this report was saved. You can click on the Open details panel icon (the “i”) for more details, or click on the saved report version (which will appear as a link).
NOTE: Cognos will default only 1 saved output file at a time. Only the most recent output will have the saved report output available.

- When you click on the saved report version, it will give you an option to:

(1) Delete report version.
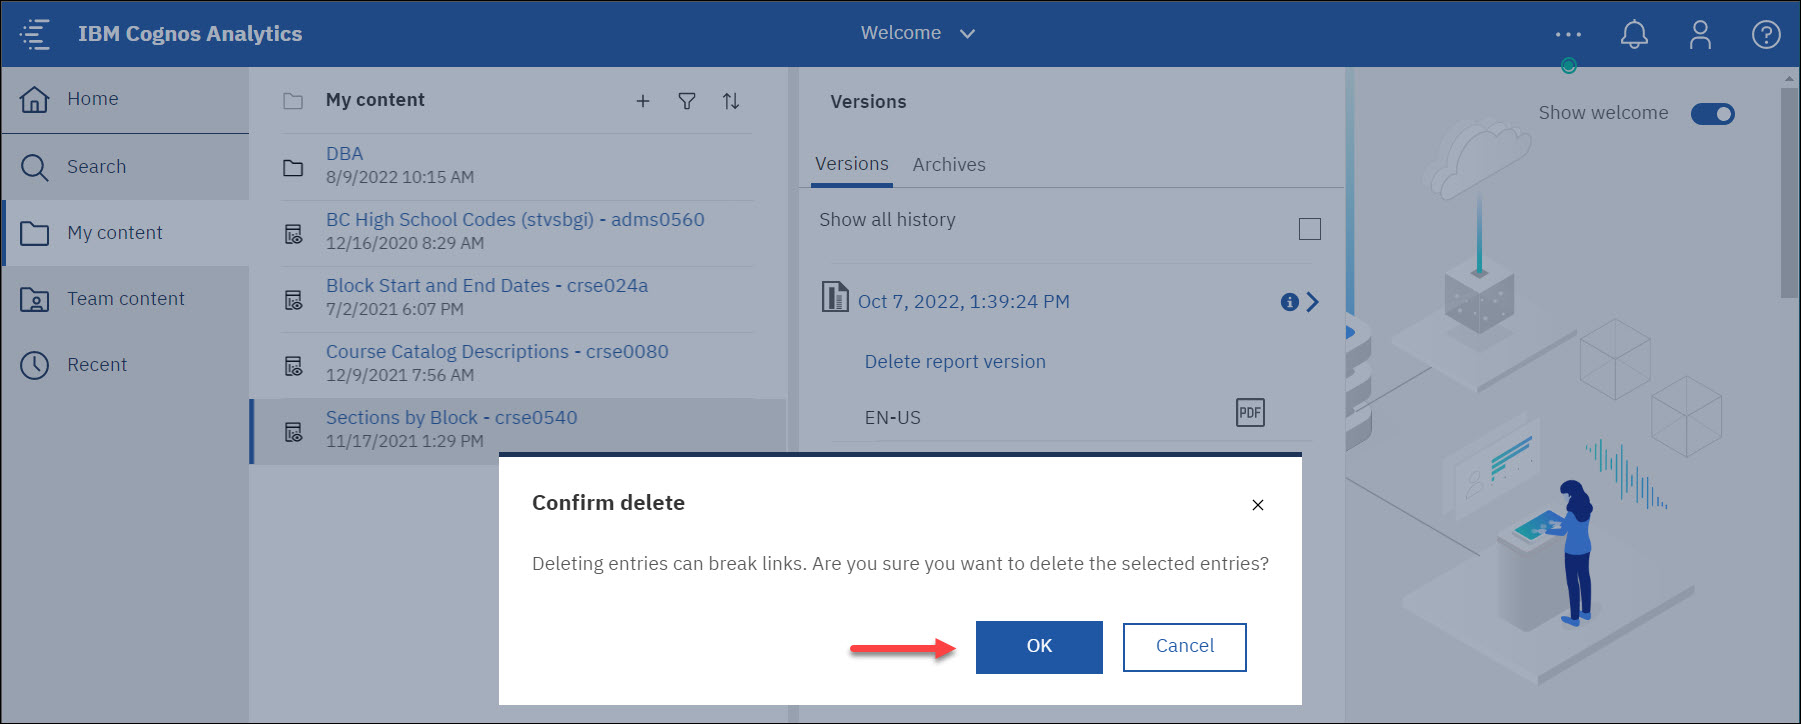
(2) View the saved report.
NOTE: The viewing of this saved version looks a little different than the ‘run report’ version. You may notice that the “Save report” icon is not visible because you are in view-mode. To rerun this same report, you can click on the “Run” icon at the top left corner.

Certain Cognos reports utilize prompt values to define the data range when running a report. Super-users might wish to pinpoint specific prompt values relevant to their role for improved efficiency.
NOTE: To set default values for a specific report, you must first save the report in your My Content folder.
- In your My Content folder, hover your mouse over the report you want, and click on the ellipses (…) to the right of the report name.

- Select Properties.
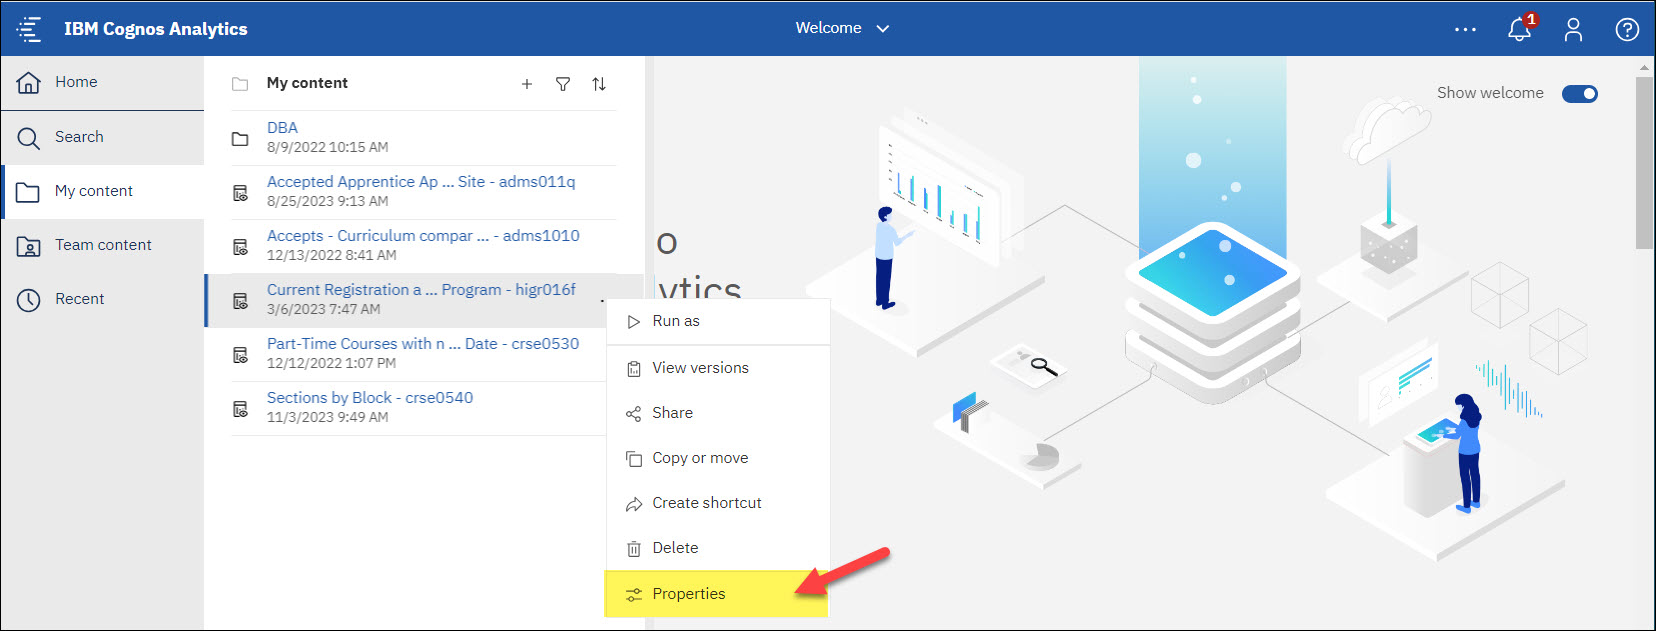
- Click on the Report tab, and then click on Set values.
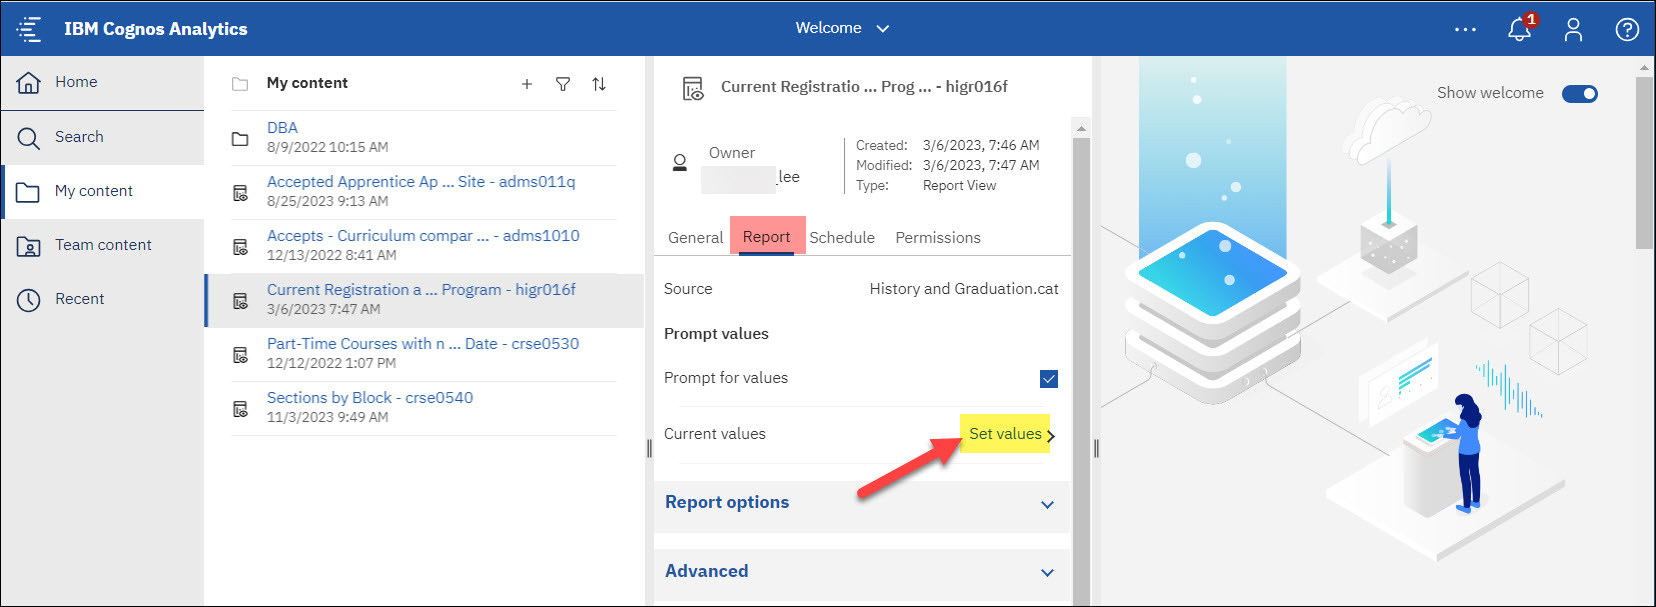
- Click on Set.

- The Prompt values on that report will appear. Select your desired prompt values and then click Finish.
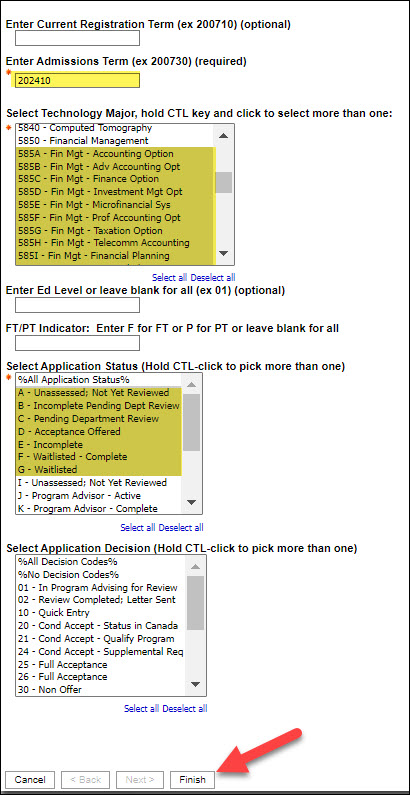
- These selected default values will now be in place every time your run this particular report.

- If you need to change the prompt values in the future, you can click on Edit to make changes.

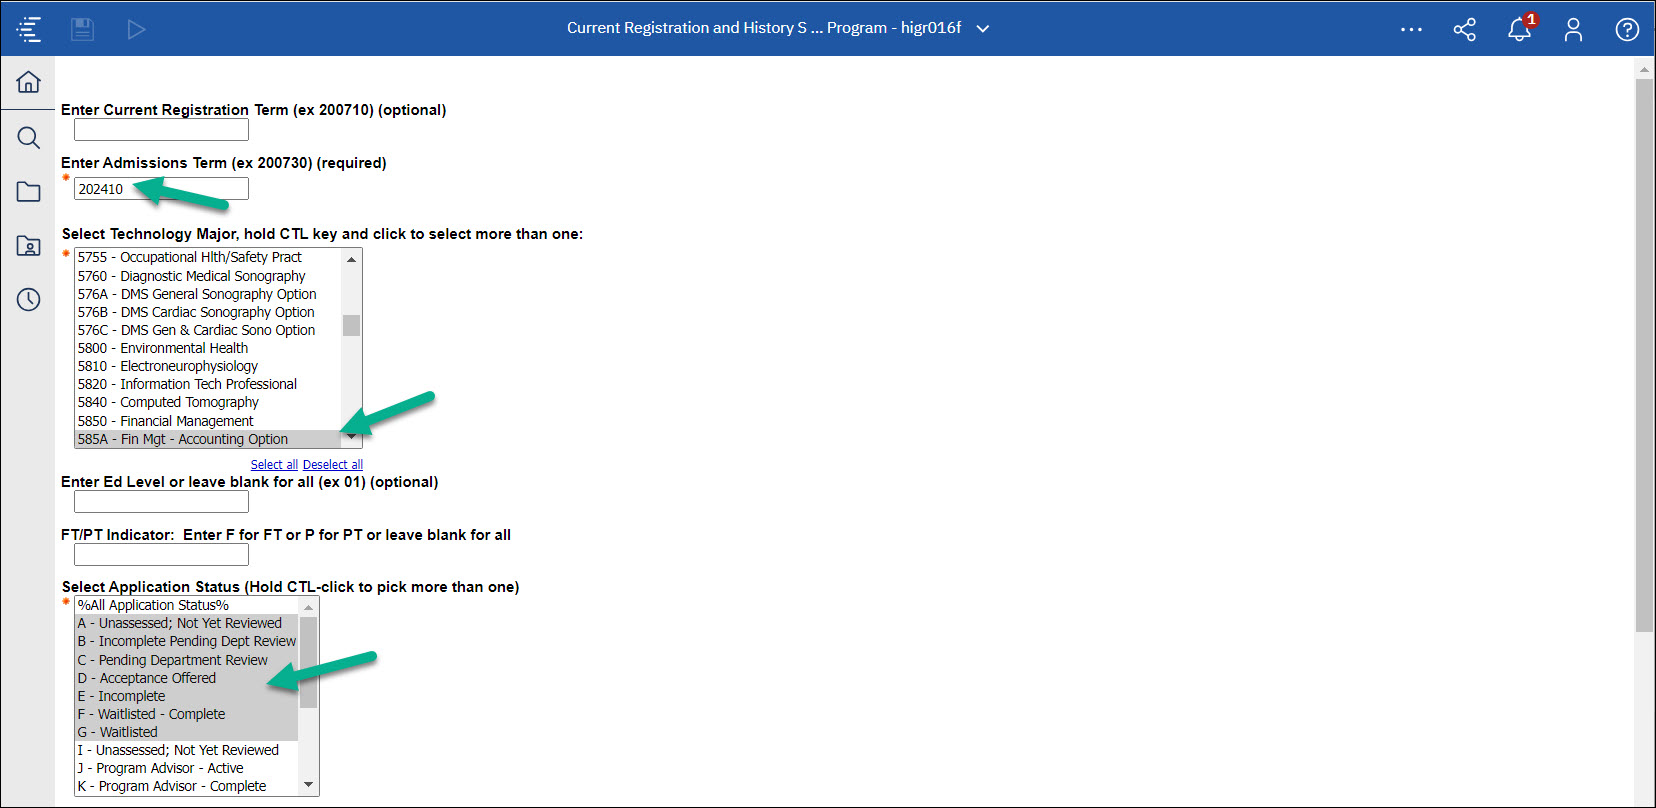
- The next time you generate a new report, the prompts you have previously set as defaults will automatically populate in the report generation process. It’s important to note that while these default prompt values are preconfigured, you can still modify them as needed each time you run the report by making adjustments to the values.
If you use a report on a regular basis, you can set up a subscription to be delivered to you on a preset schedule. You can pick the time, date, format, and output types and how you want it delivered.
NOTE: In order to schedule a report, this report must already be copied into your My Content folder.
- Click on My content in your dashboard.
- Hover over the report version you want to schedule, and click on the ellipses (…) when it appears.
- Click Properties.
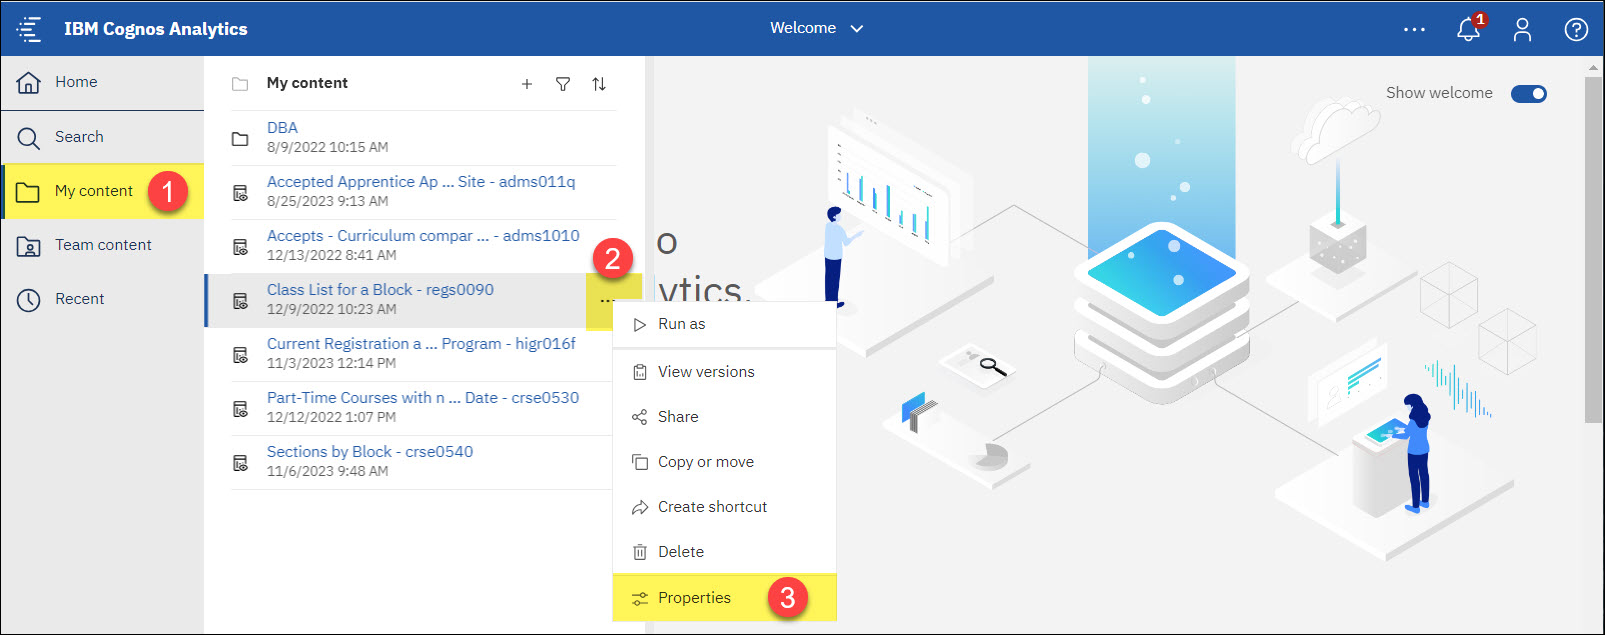
- A window will appear to the right listing the title of your report at the top. Under this properties window, you will see 4 tabs. Select the Schedule tab, and then click Create Schedule.
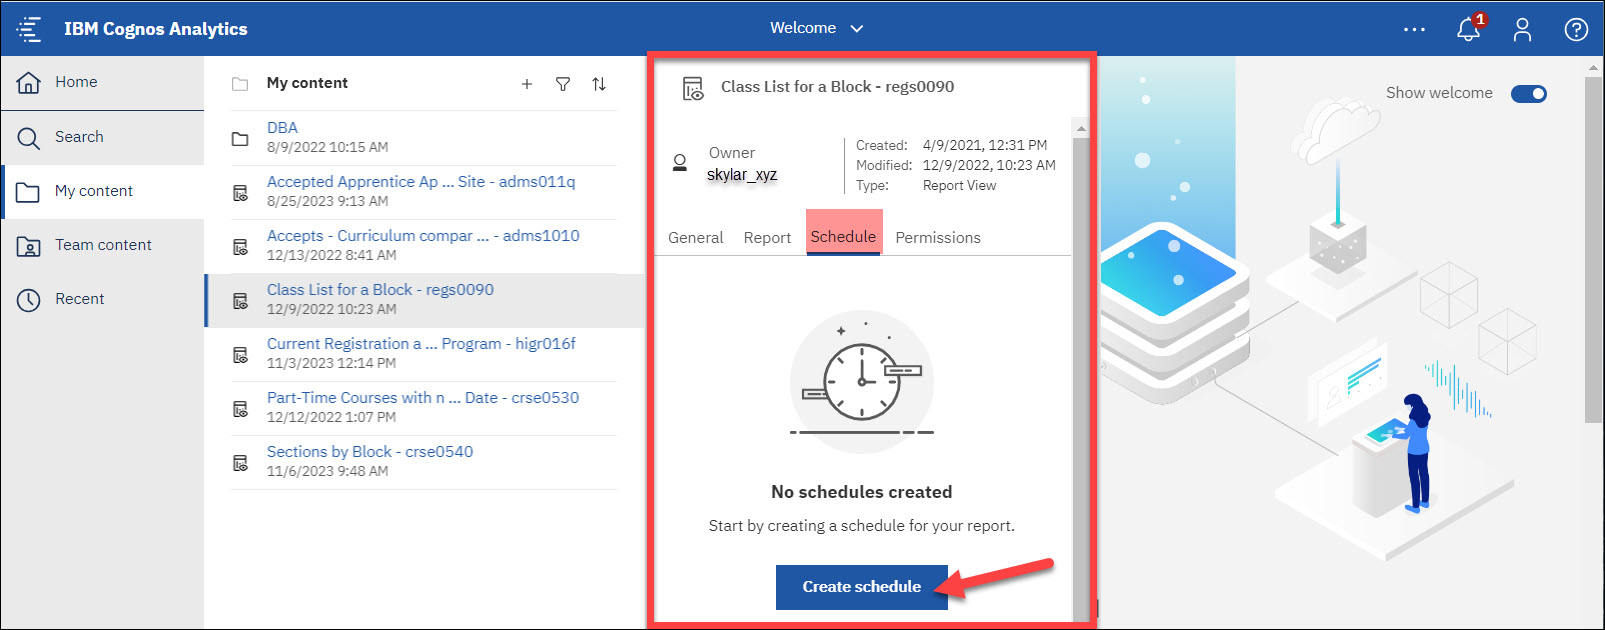
- Select the Schedule tab. In the Frequency section, you can select the Type of report (Daily, Weekly, Monthly or Yearly) and how often you want it to run on certain days. In the Period section, you can enter the Start and End date/times, or check the box if you prefer no end date.
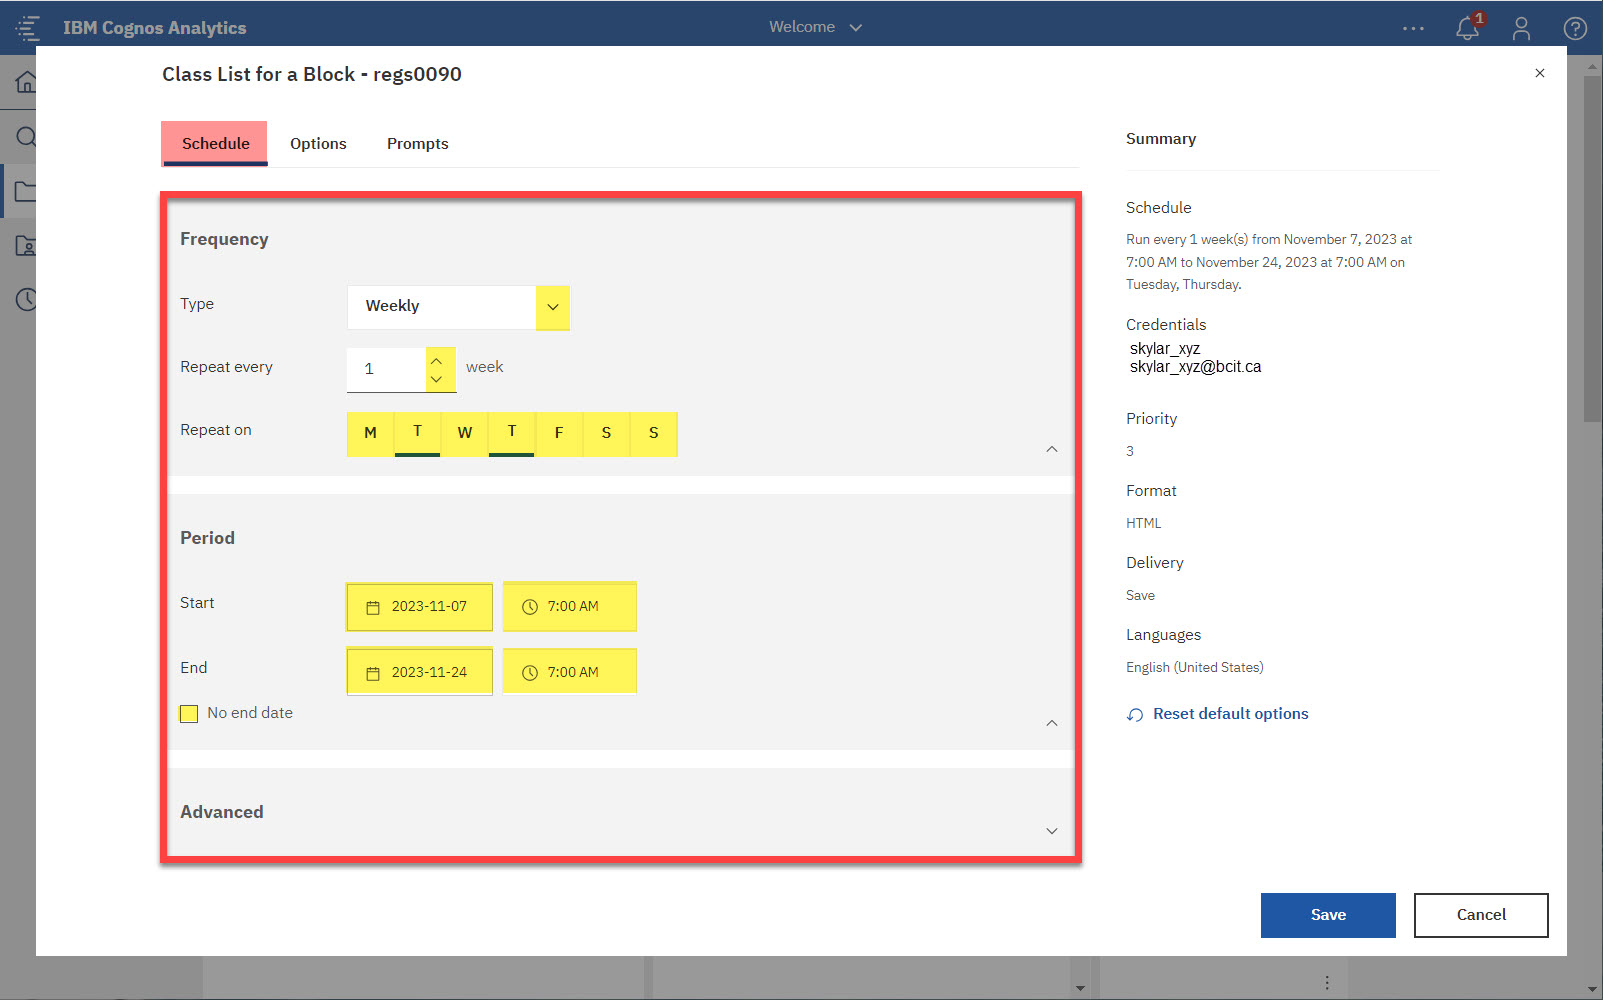
- Then select the Options tab, and you can choose the output format of the report, and set the delivery of this report.
NOTE: HTML is the preferred output, but you can select other options as well.
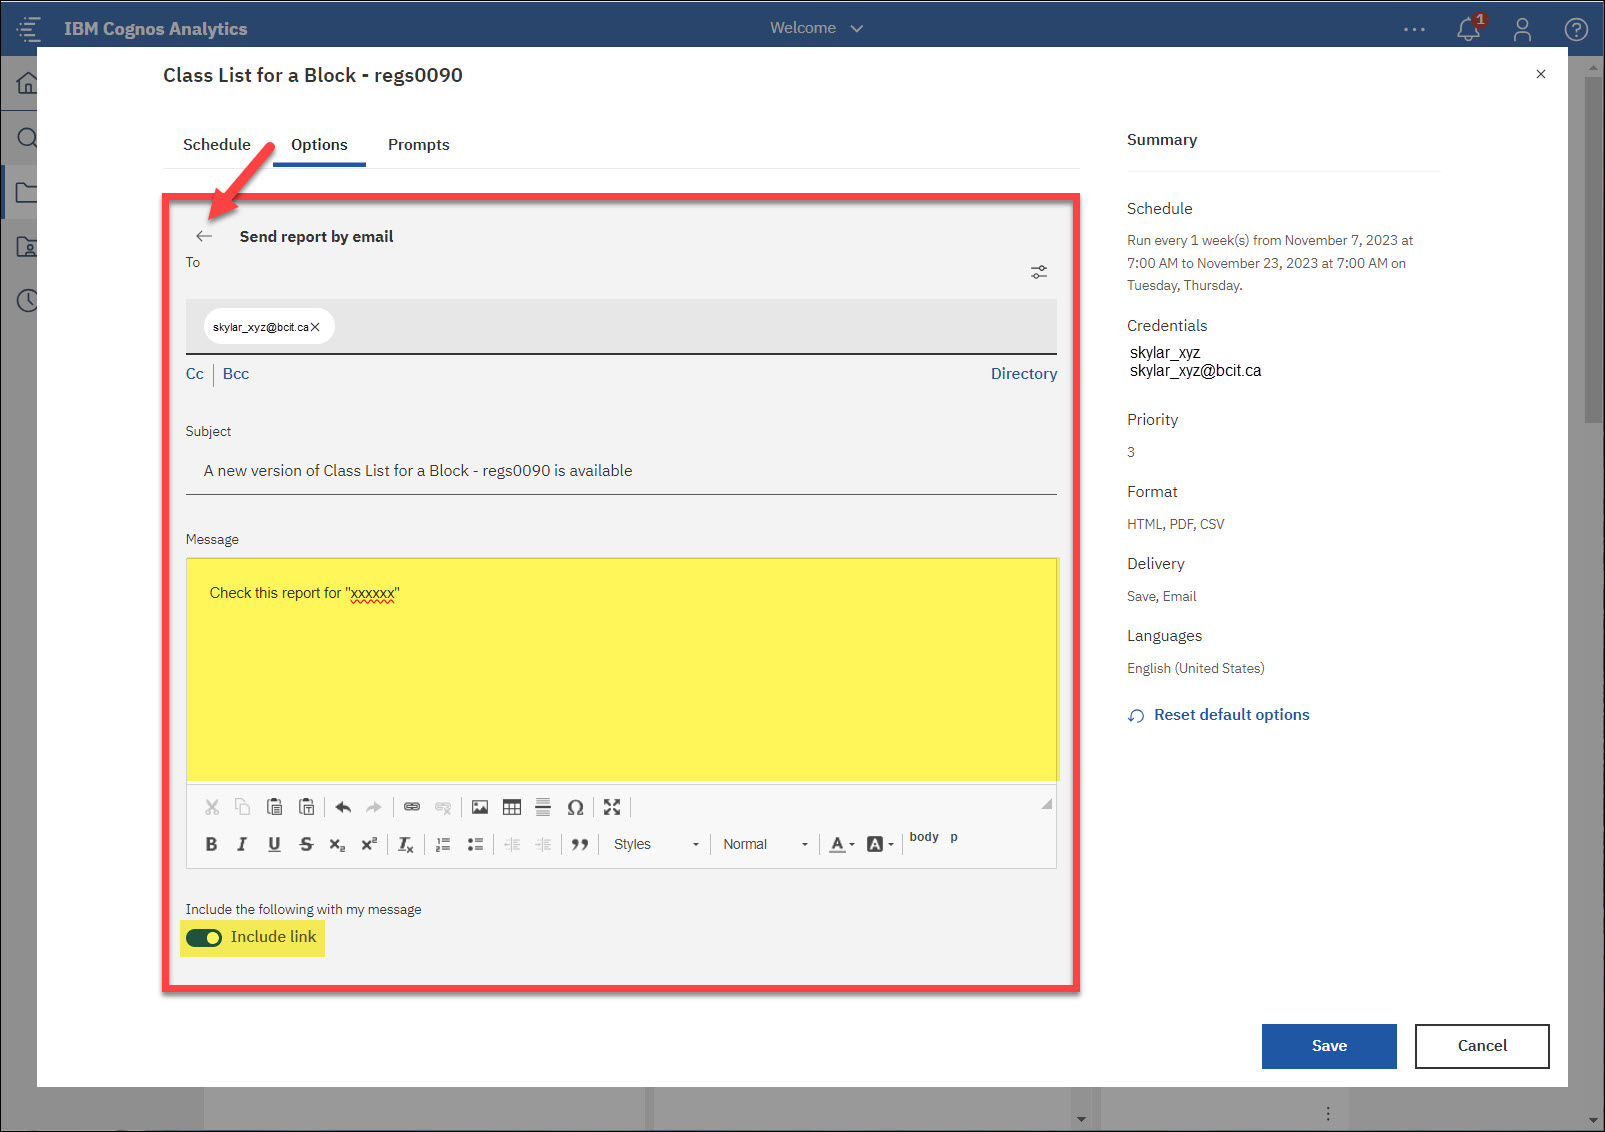
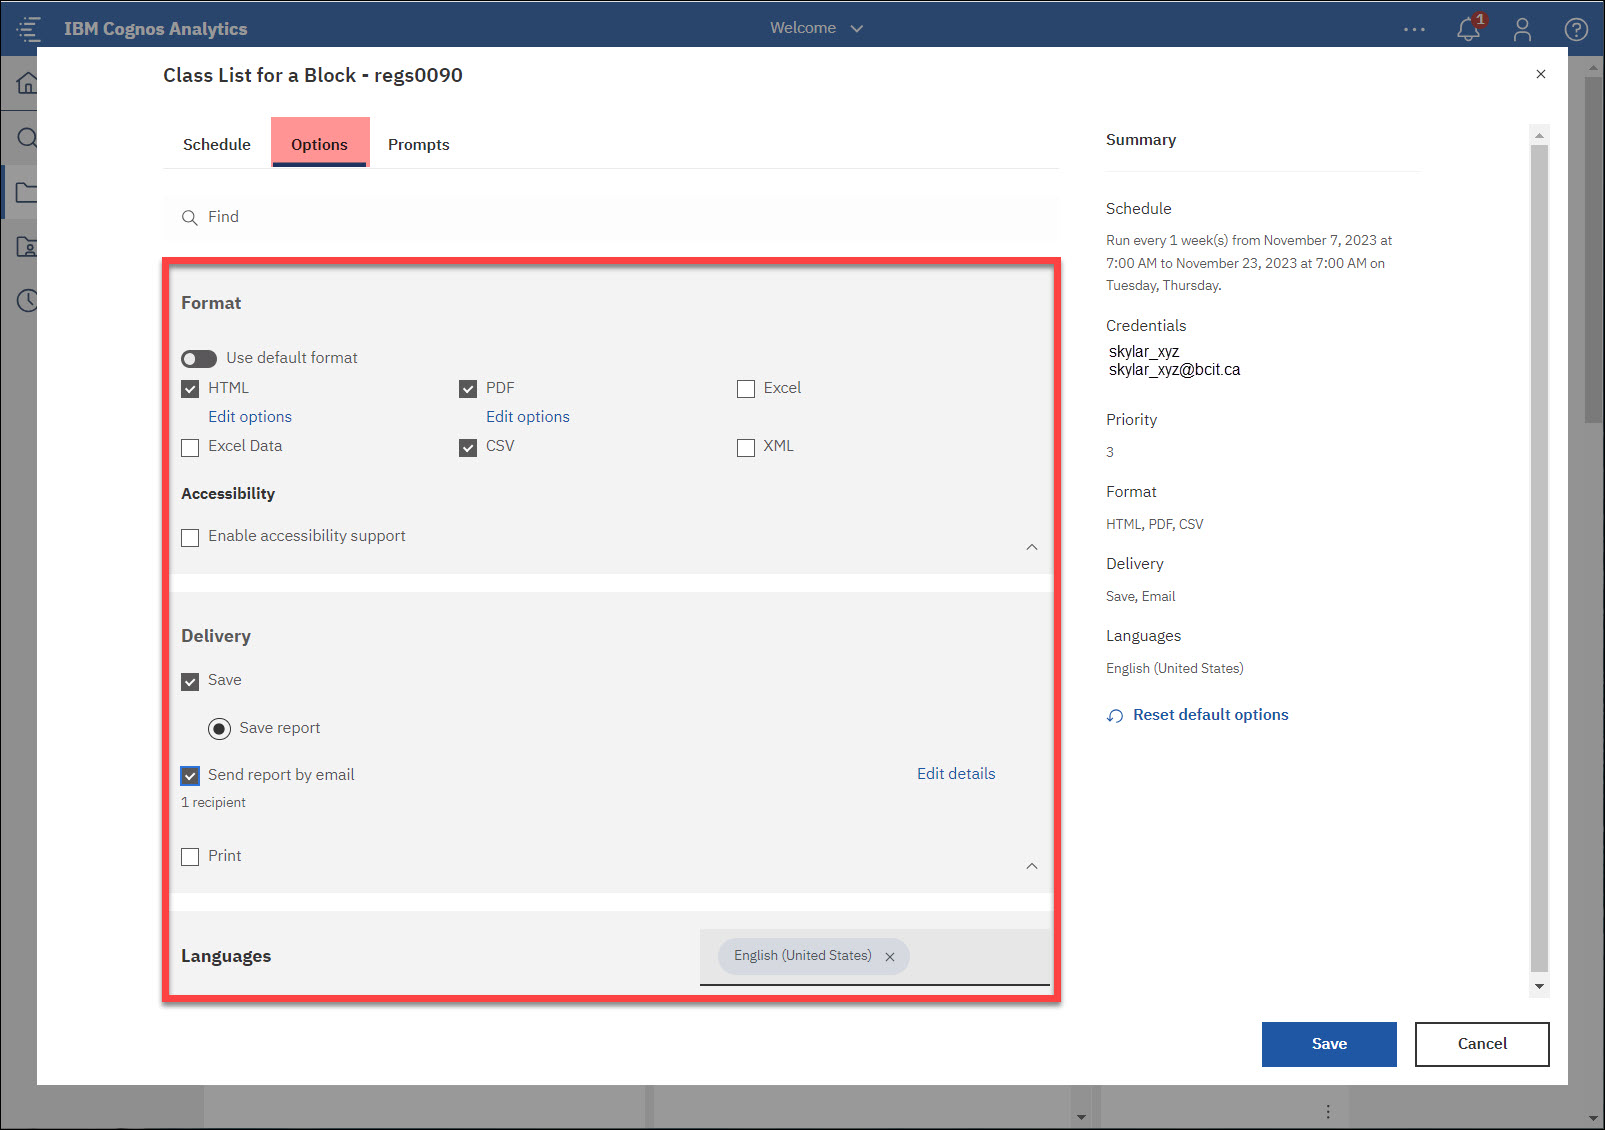 NOTE: If you select the “Send report by email” option, you can click on Edit details located to the right. This will allow you to include additional information in the email that will be sent. Furthermore, you have the option to choose other users who should also receive this email. Once you have finished, simply click the arrow to return to the previous page.
- If the report includes built-in prompts, navigate to the Prompts tab and set the necessary values by clicking on Set values.
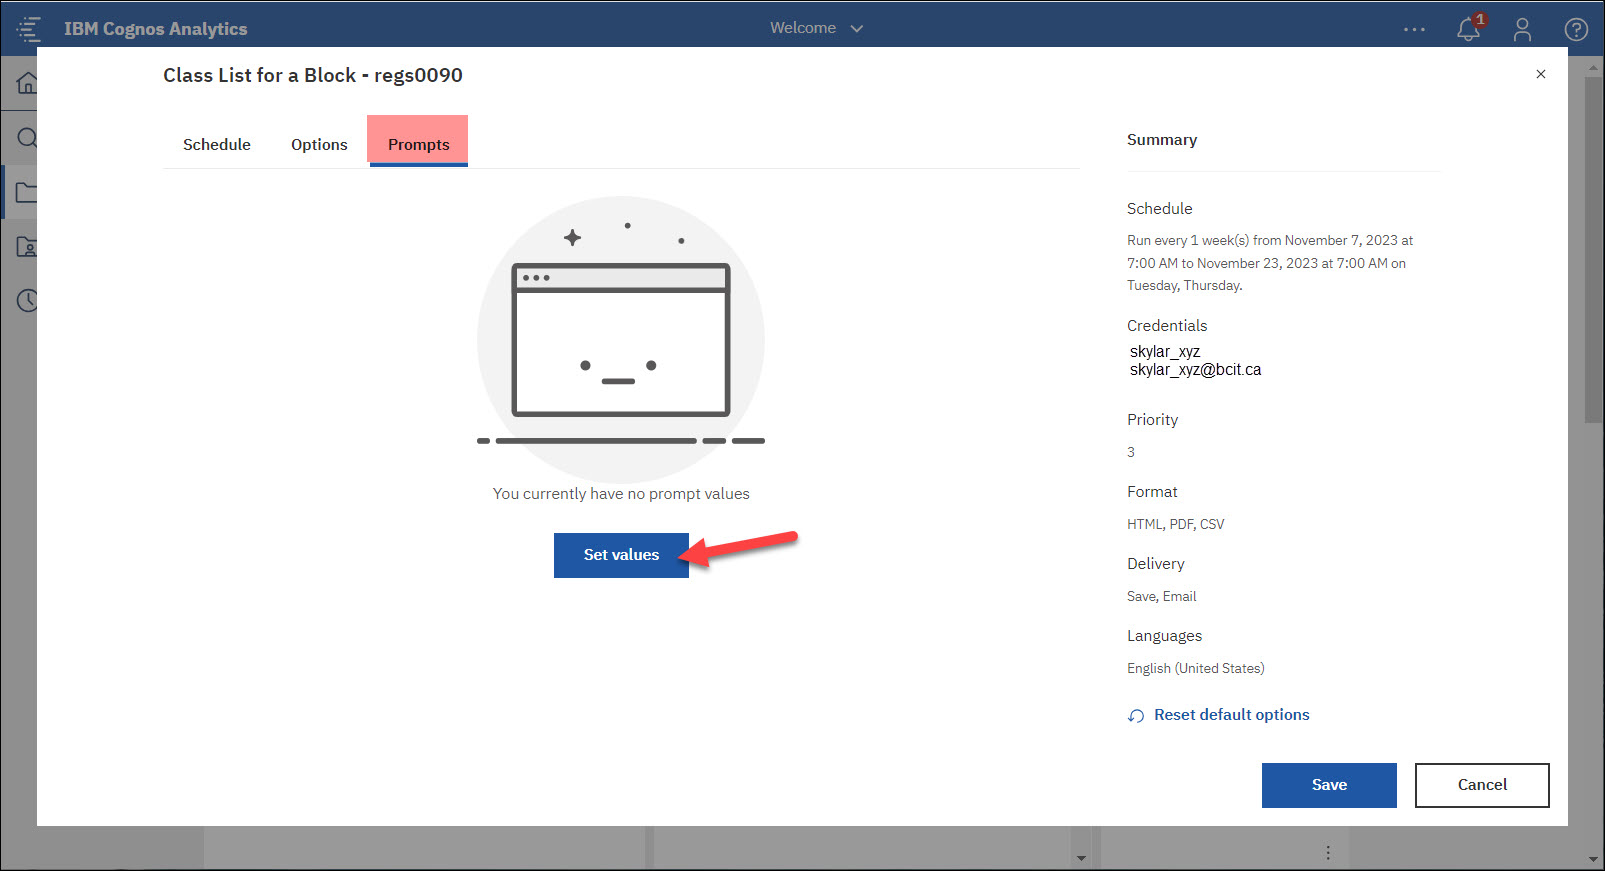
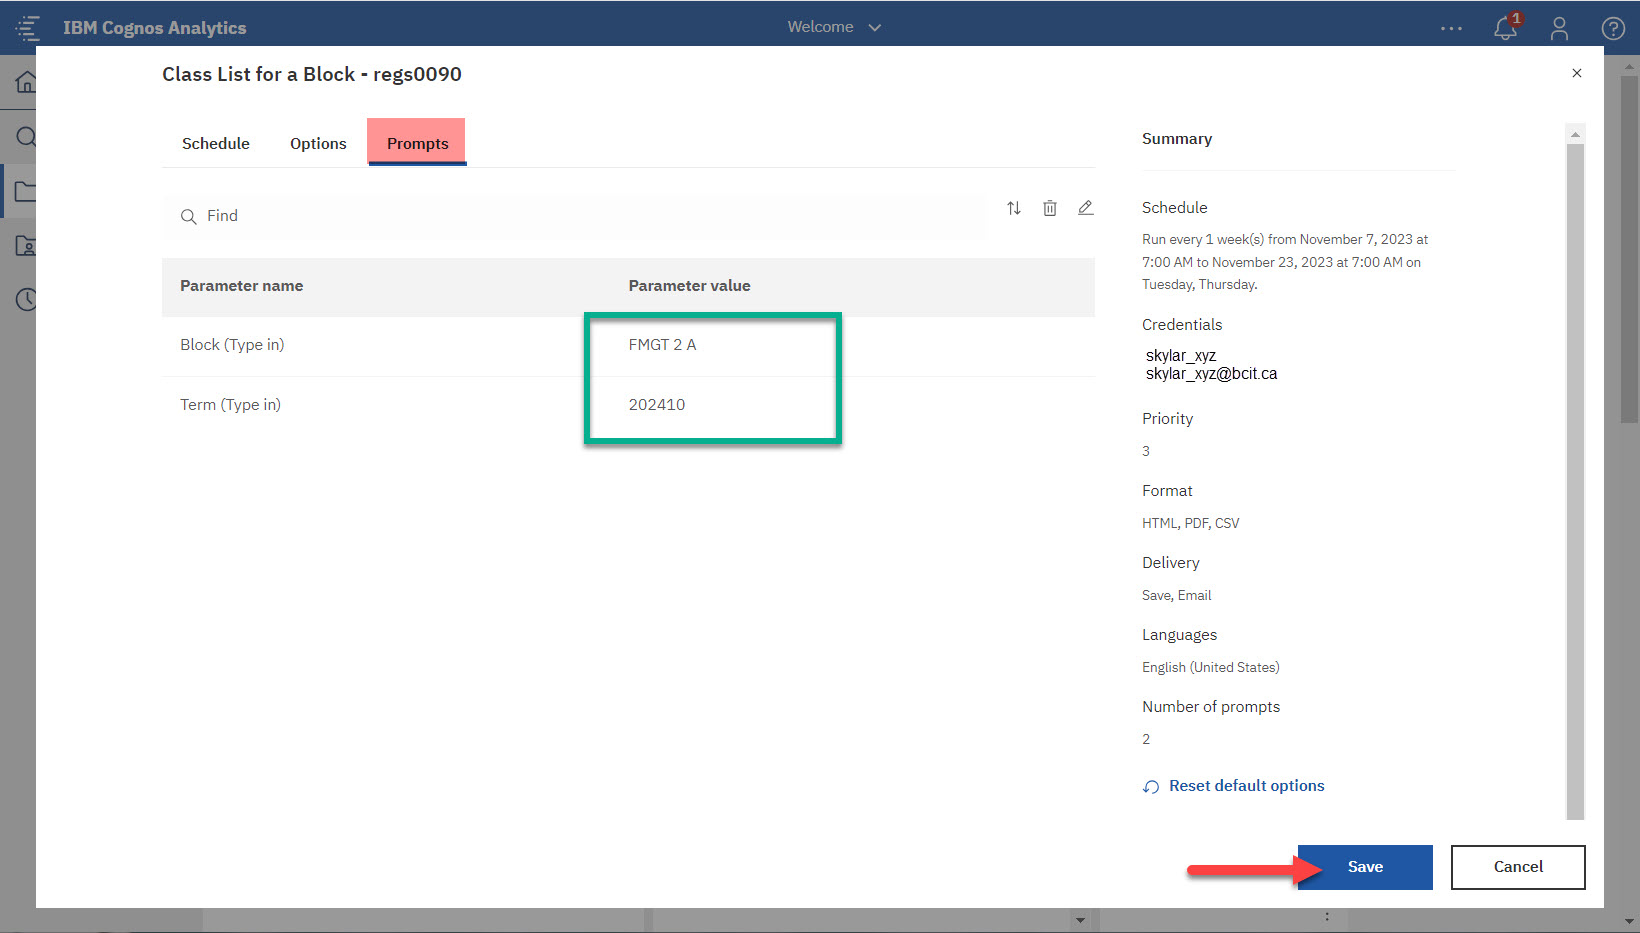
- The prompts created for this report will appear. Enter any if required, and then click Finish.
NOTE: If you have configured default prompt values for this report, you have the flexibility to add new prompts or modify the existing values when making this scheduling request.

- The prompt you entered will now display. Click Save when all selections are made.
- You will receive a temporary pop-up message confirming that your schedule was created.
NOTE: You can make changes at any time to this scheduled report by returning to this Schedule tab, and clicking on Edit or Delete.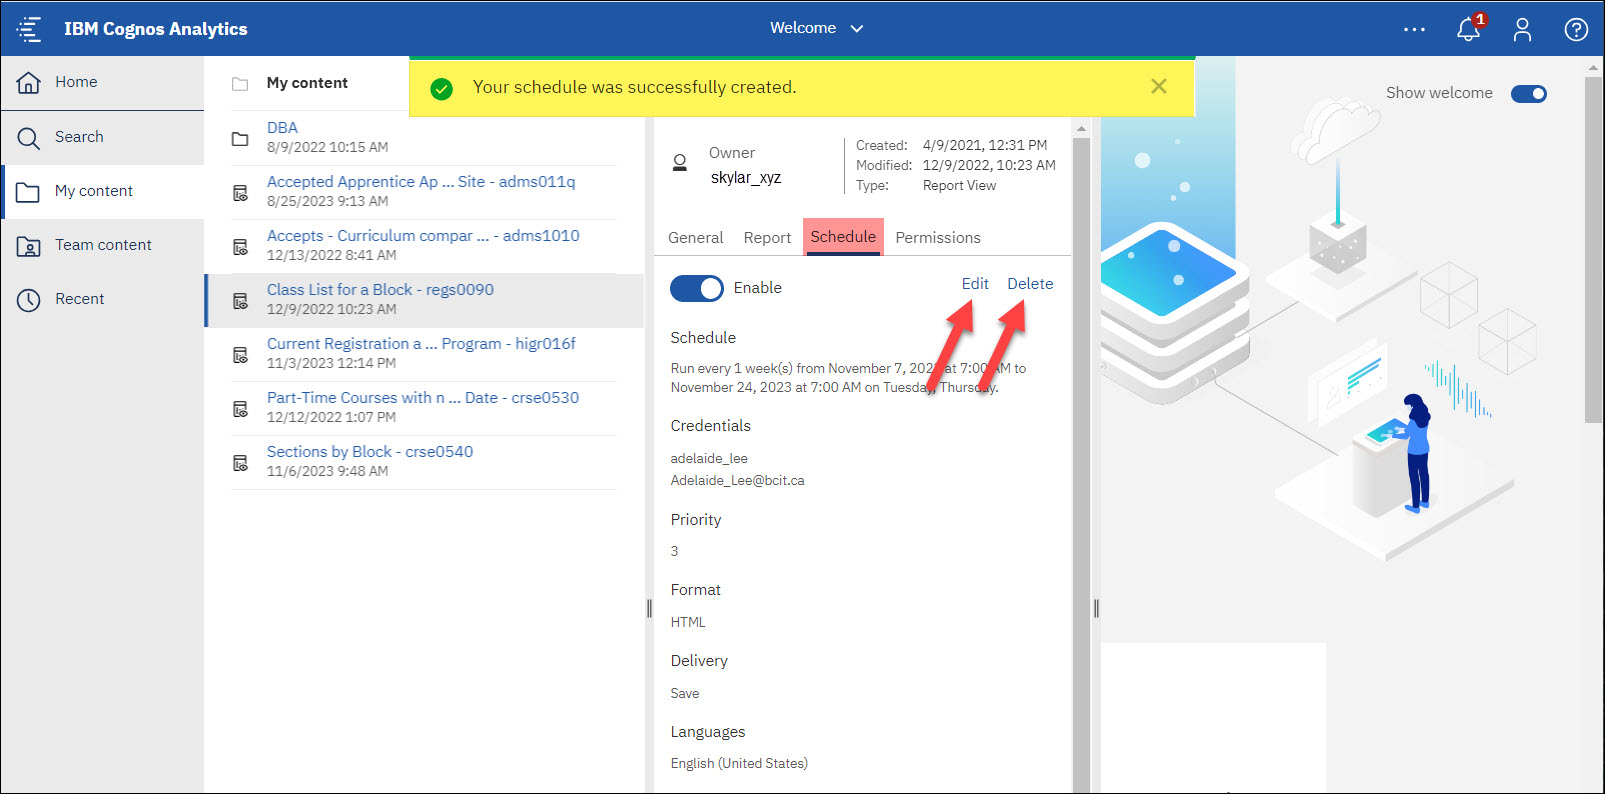
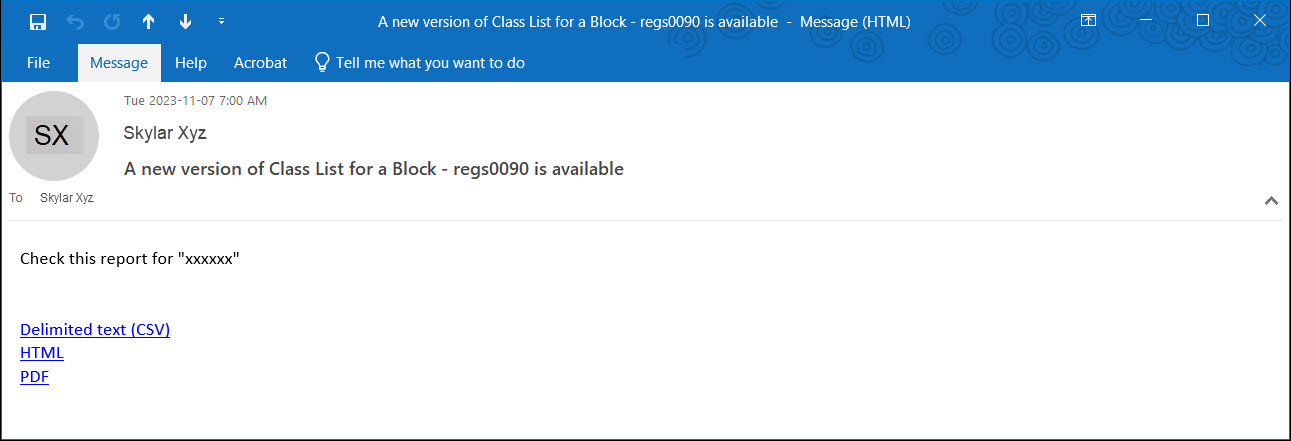
NOTE: If you had chosen the option “Send report by email“, you will receive an email containing links to access the report in your preferred format on your selected days.
.
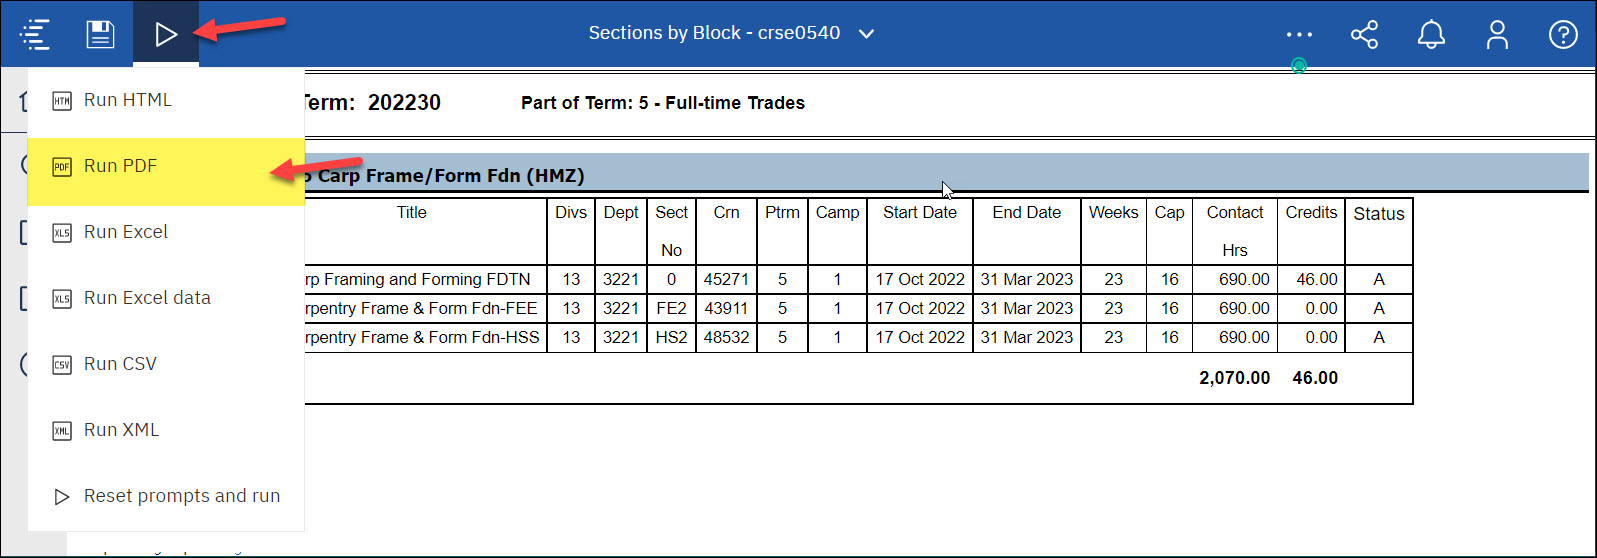
A report can be printed by clicking on the “Run as” icon, and selecting “Run PDF“.
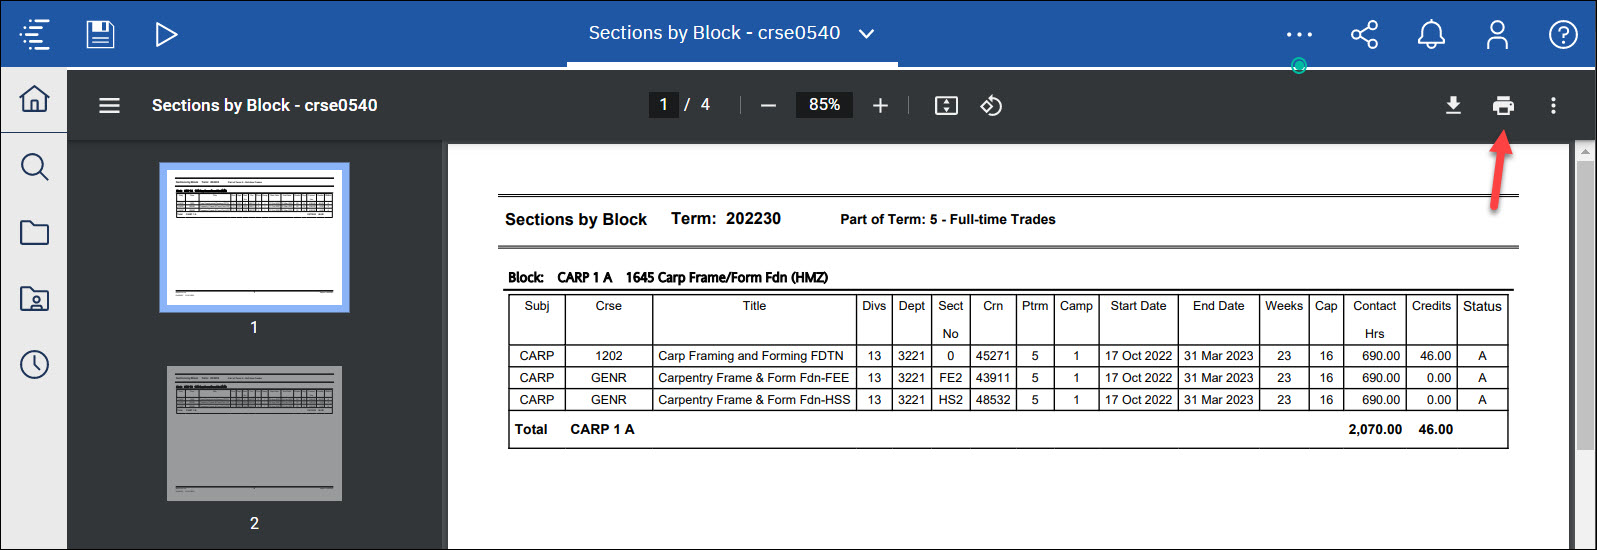
In the PDF format, click on the printer icon.
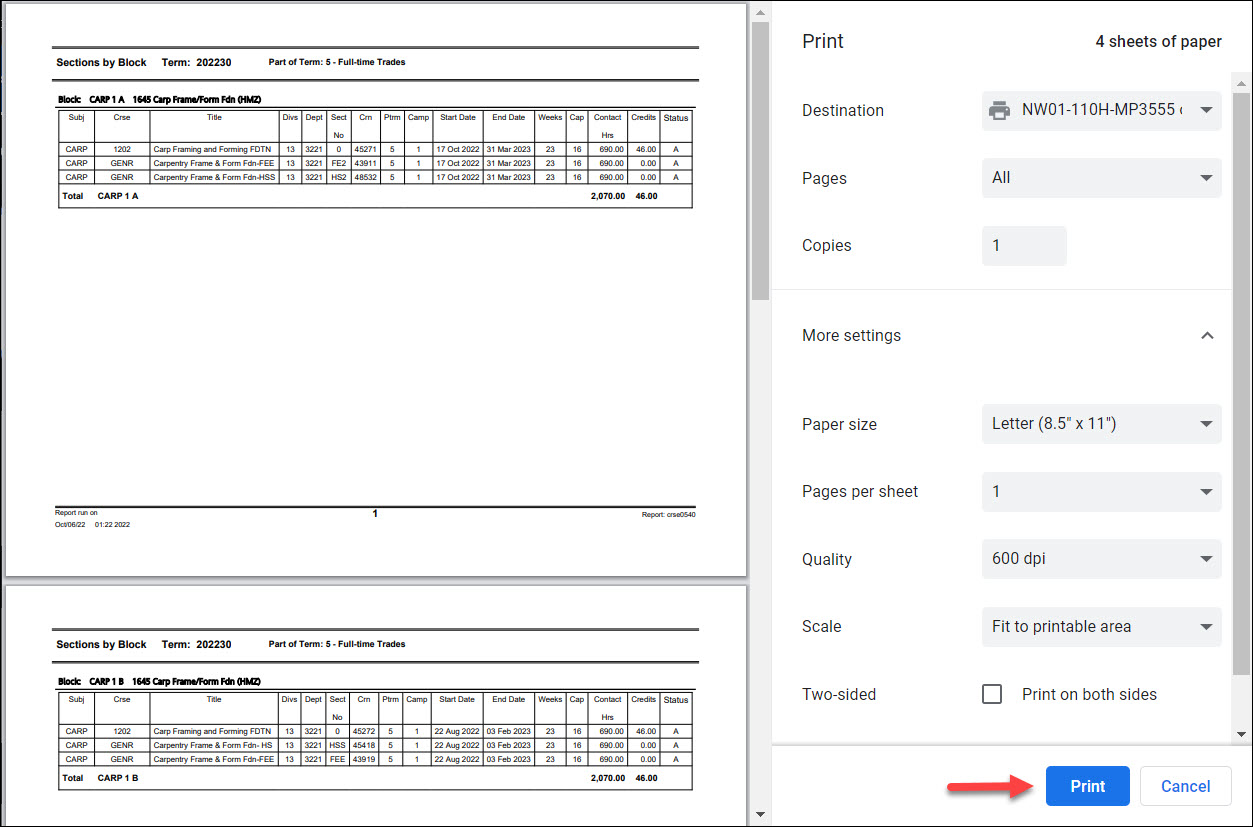
A window will appear, and you can make selections accordingly before clicking Print.
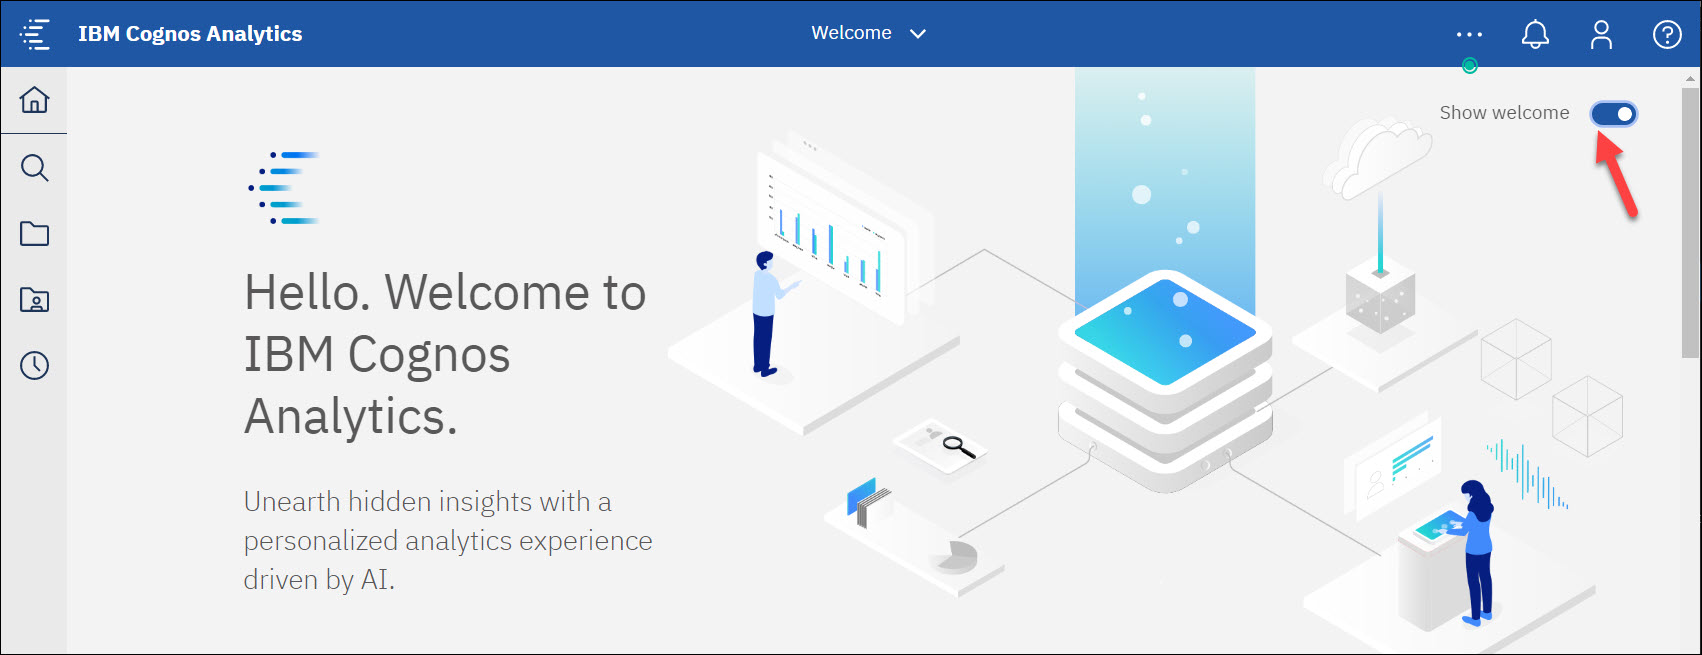
You can set up your Home Page to display your most Recently Viewed reports.
At the top-right of the page, where it displays Show welcome, use your cursor to move the circle to the left of the bar.
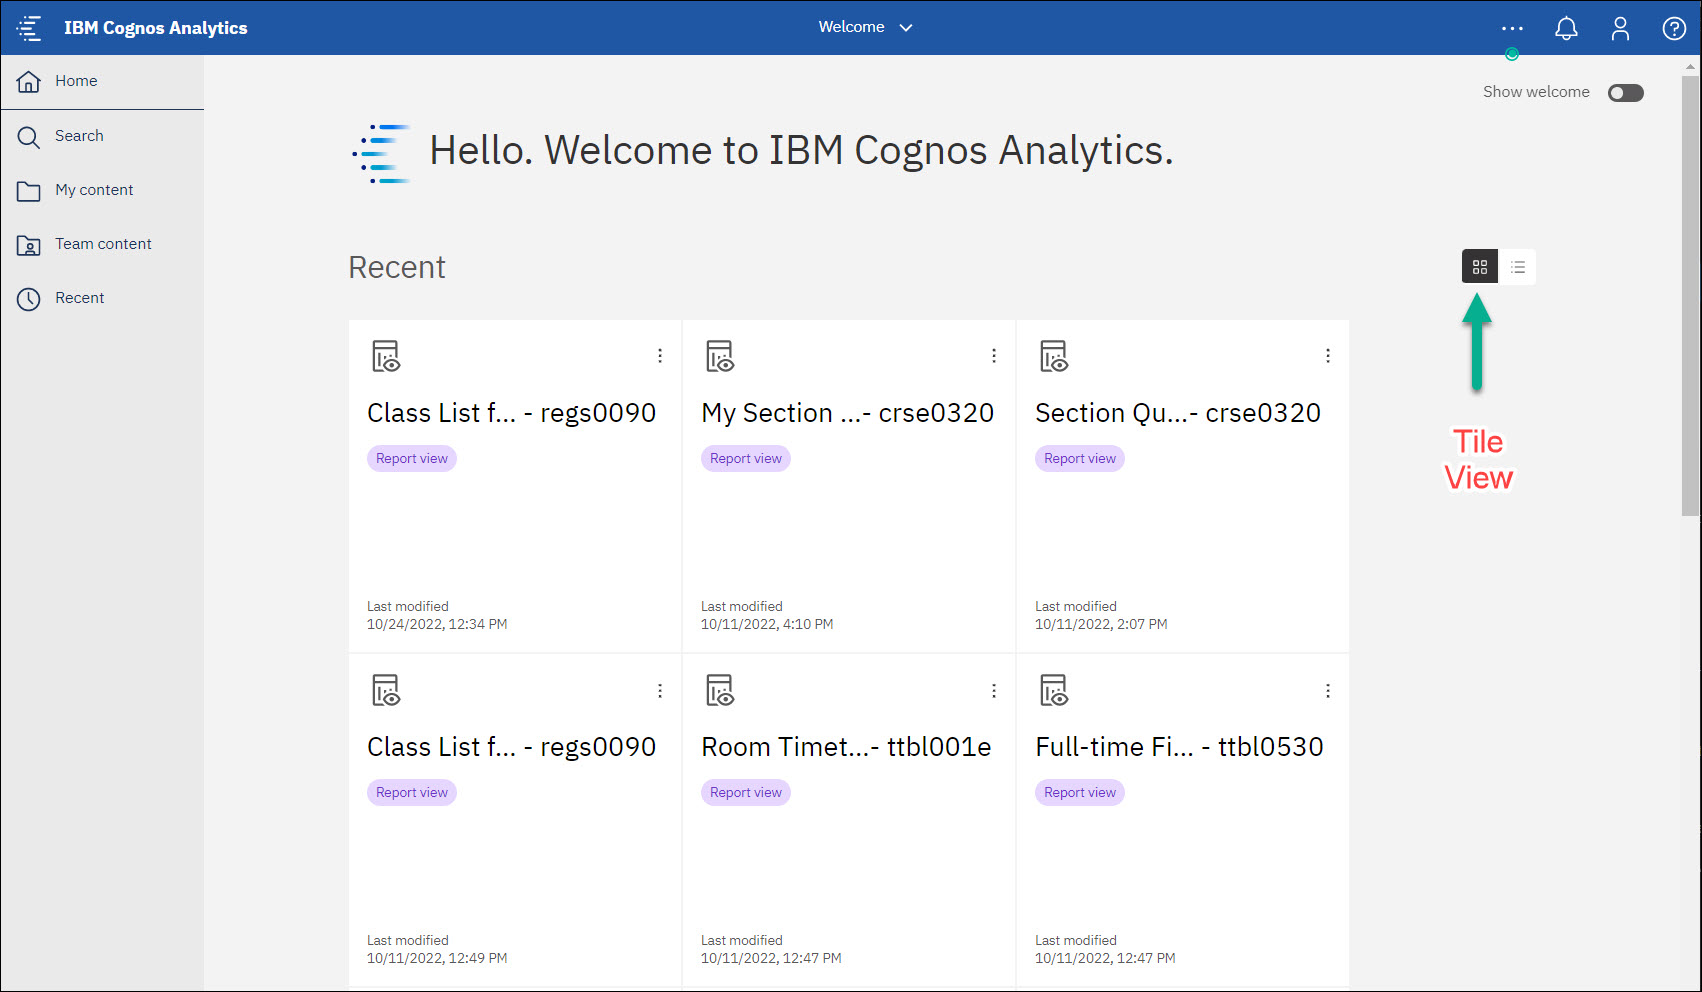
You can select Tile View by clicking the box on the left.
Or you can select List View by clicking the box on the right.
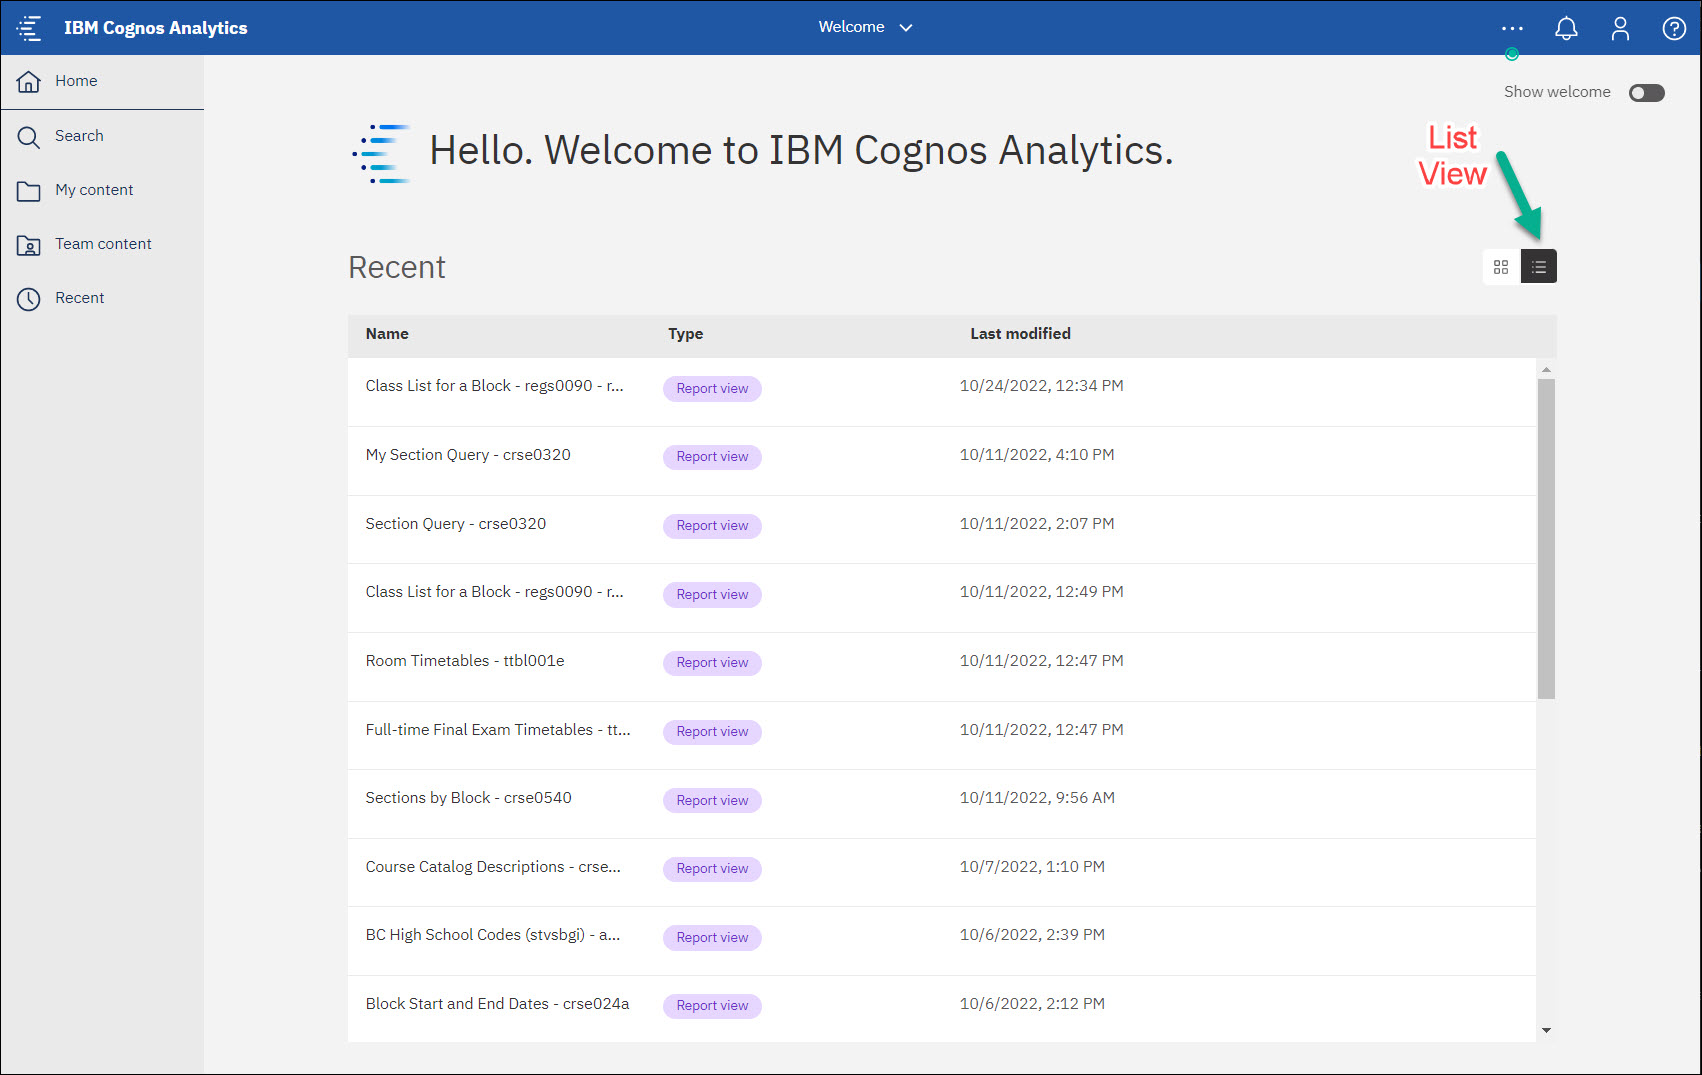
Your Home Page will now display as your most recently viewed reports, which allows for quicker access to those reports.
If you ever want to return to the standard Home Page, use your cursor to move the circle to the right of the Show Welcome bar.