This article is designed to help you navigate and utilize the various features offered by Microsoft Teams Phone, ensuring you can make the most of this powerful communication tool. Whether you’re making calls, joining meetings, or managing contacts, our step-by-step instructions will guide you through each process.
Explore the sections below to discover how Microsoft Teams Phone can streamline your communication and keep you connected effortlessly.
Calls
Important: Microsoft Teams Phone at BCIT is not yet configured for location tracking for emergency calls. In the meantime, please use an alternative method, such as your cell phone, which can provide GPS coordinates.
How to dial
To make a call from your MS Teams Phone:
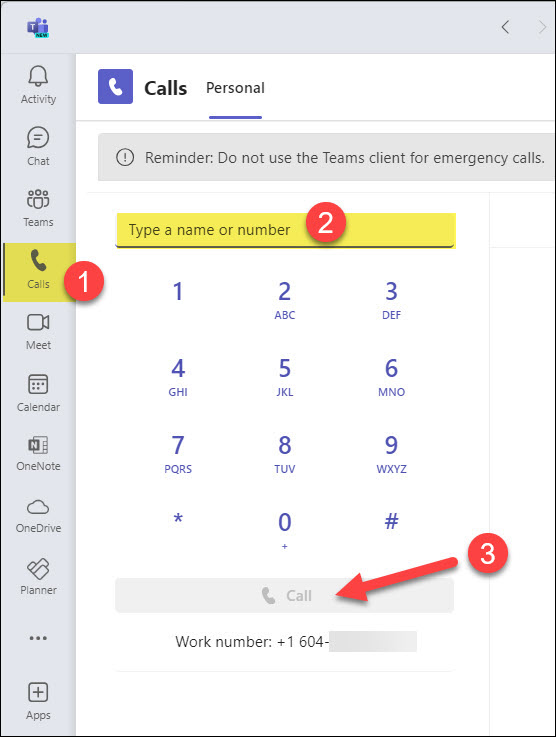
- Click on the Calls icon of the left side of the application.
- To call a specific phone number, enter the number using the dial pad. To call a contact by name, type the person’s name into the dial pad. For group calls, enter multiple names and/or numbers in the dial pad.
Note: As you type names or numbers, a drop-down menu will appear with potential contacts to choose from. - Click Call to start the conversation.
To enter a phone number, note the following:
- Dialing 9 before the number is no longer required
Making calls within Canada and mainland U.S.
All users can make calls within Canada and the mainland U.S.
Note: Hawaii, Puerto Rico, the U.S. Virgin Islands, and similar locations are not considered part of the mainland U.S.
Dial: [Area Code] [7-digit number]
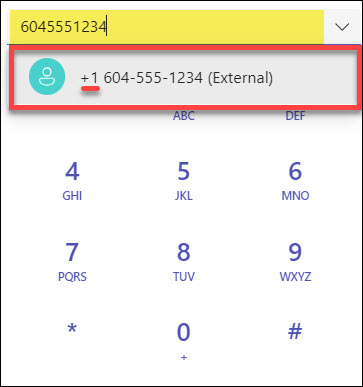
As you enter the number, Teams Phone will automatically insert the +1 prefix. This is because “1″ is the country code for Canada and the U.S.
You can also manually add the +1 before entering the area code and number, but it is not necessary.
Making International calls
Note: International calling is not automatically enabled for all users at BCIT.
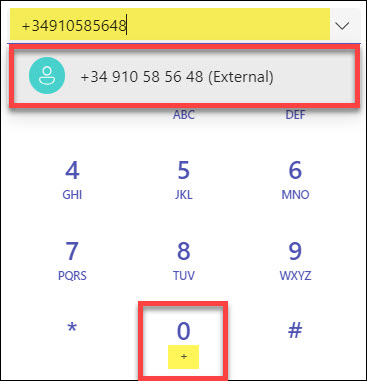
To make an International call, users must first enter the “+” (Plus).
Dial: [+] [Country Code] [Area Code] [Phone Number]
Example 1 – Calling Spain
|
Example 2 – Calling UK
|
When dialing an International number, hold down the “0” key for a moment to trigger the “+” sign on the dial pad. Then, enter the rest of the numbers.
Call Forwarding in Microsoft Teams Phone is a useful feature that ensures you never miss an important call, even when you’re away from your primary device or unable to answer. It allows you to redirect incoming calls to another number, such as your mobile phone or a colleague’s line. This flexibility helps maintain seamless communication and ensures that calls are handled promptly, enhancing your responsiveness and professionalism.
| Important | Do not forward to any long distance numbers. |
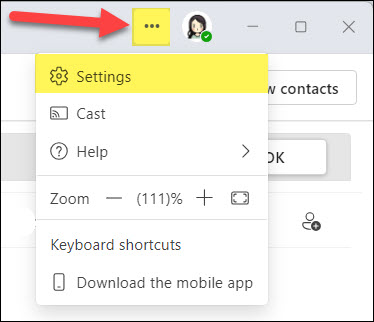
- Click the ellipses (•••) next to your profile picture at the top-right of the Teams app.
- Select Settings.
- Choose Calls from the left menu.
- Under Call handling and forwarding, toggle through the menu options. You can forward calls to voicemail, a new number, a specific contact, a call group, or your delegates.
- Select a ringtone for Calls for you, Forwarded calls, and Delegated calls.
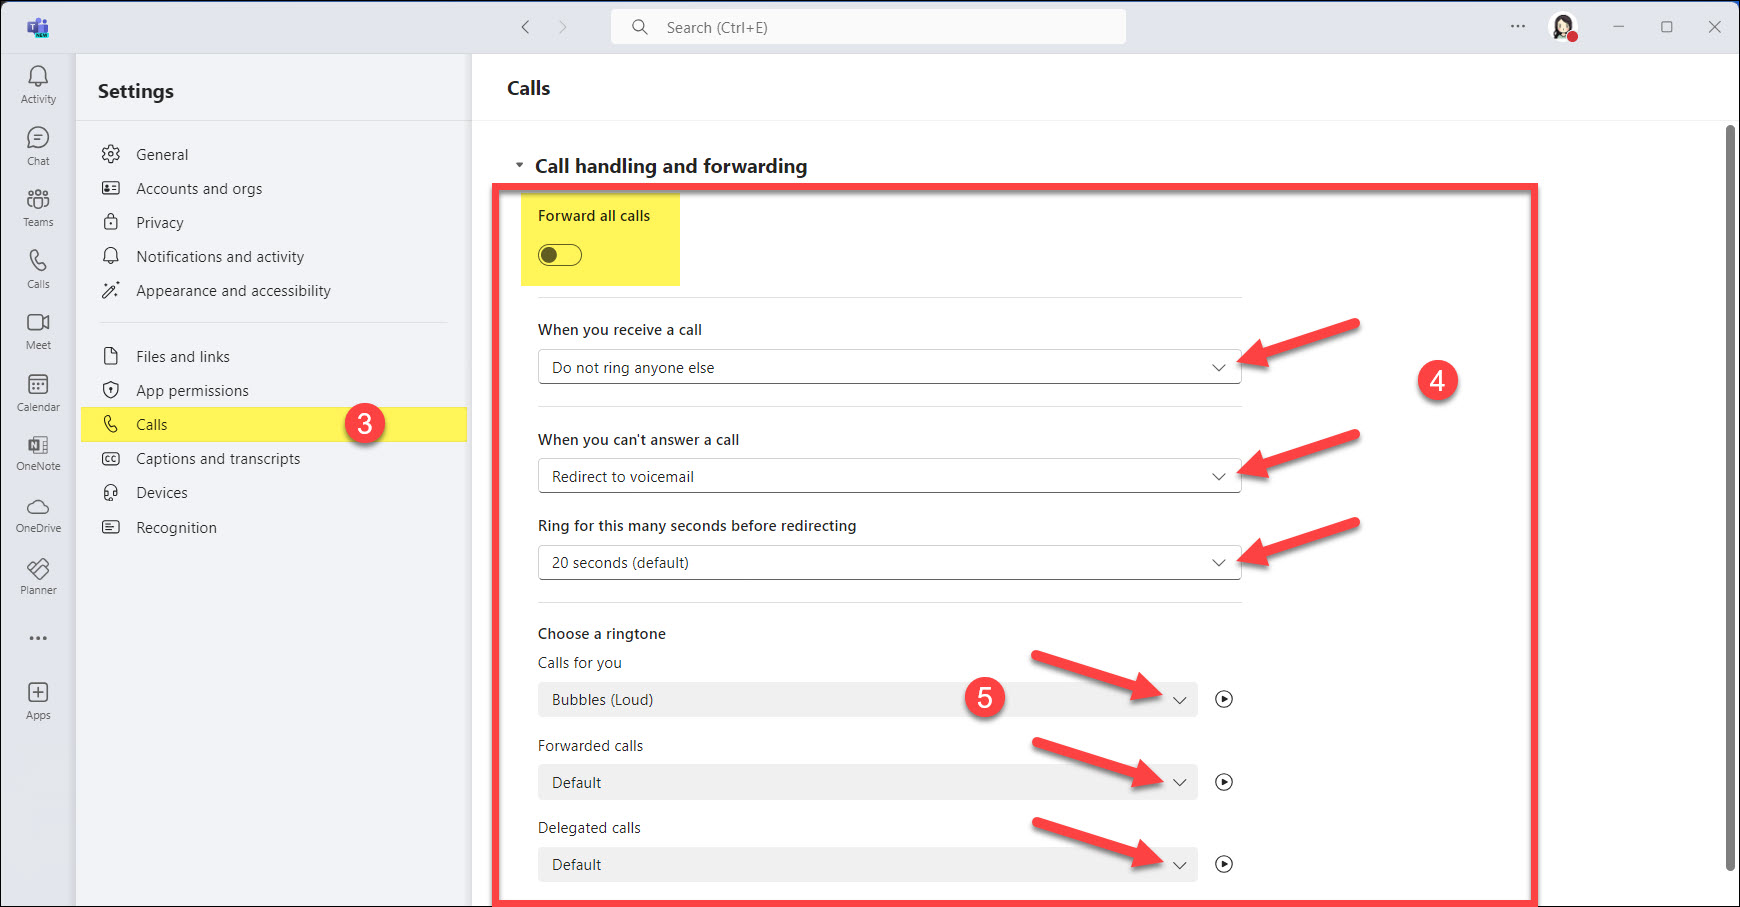
When you receive a call
Answer or decline incoming calls directly in Microsoft Teams, with options to redirect calls to another number if you’re unavailable.
- Do not ring anyone else: Calls will go directly to voicemail.
- Also ring a new number or contact: Redirect calls to another number, such as your mobile phone, or to a delegate or colleague’s number.

When you can’t answer a call
Set up options to redirect missed calls to voicemail or another number to ensure they are properly managed. Note that your phone number will ring first before forwarding to your chosen option.
- Do not redirect calls: Incoming calls will ring only your primary number without being forwarded elsewhere.
- Redirect to voicemail: Incoming calls will be sent directly to your voicemail.
- Redirect to a new number or contact: Incoming calls will be forwarded to another specified number or contact, such as your mobile phone or a colleague.
- Redirect to delegates: Incoming calls will be forwarded to your assigned delegates. (This option will only appear if you have already assigned a delegate.)

Putting someone on hold is useful in various situations, such as:
- Needing to consult with a colleague or supervisor before providing an answer.
- Gathering additional information or documentation to assist the caller.
- Handling multiple calls at once and needing to temporarily pause one conversation.
To put a caller on hold:
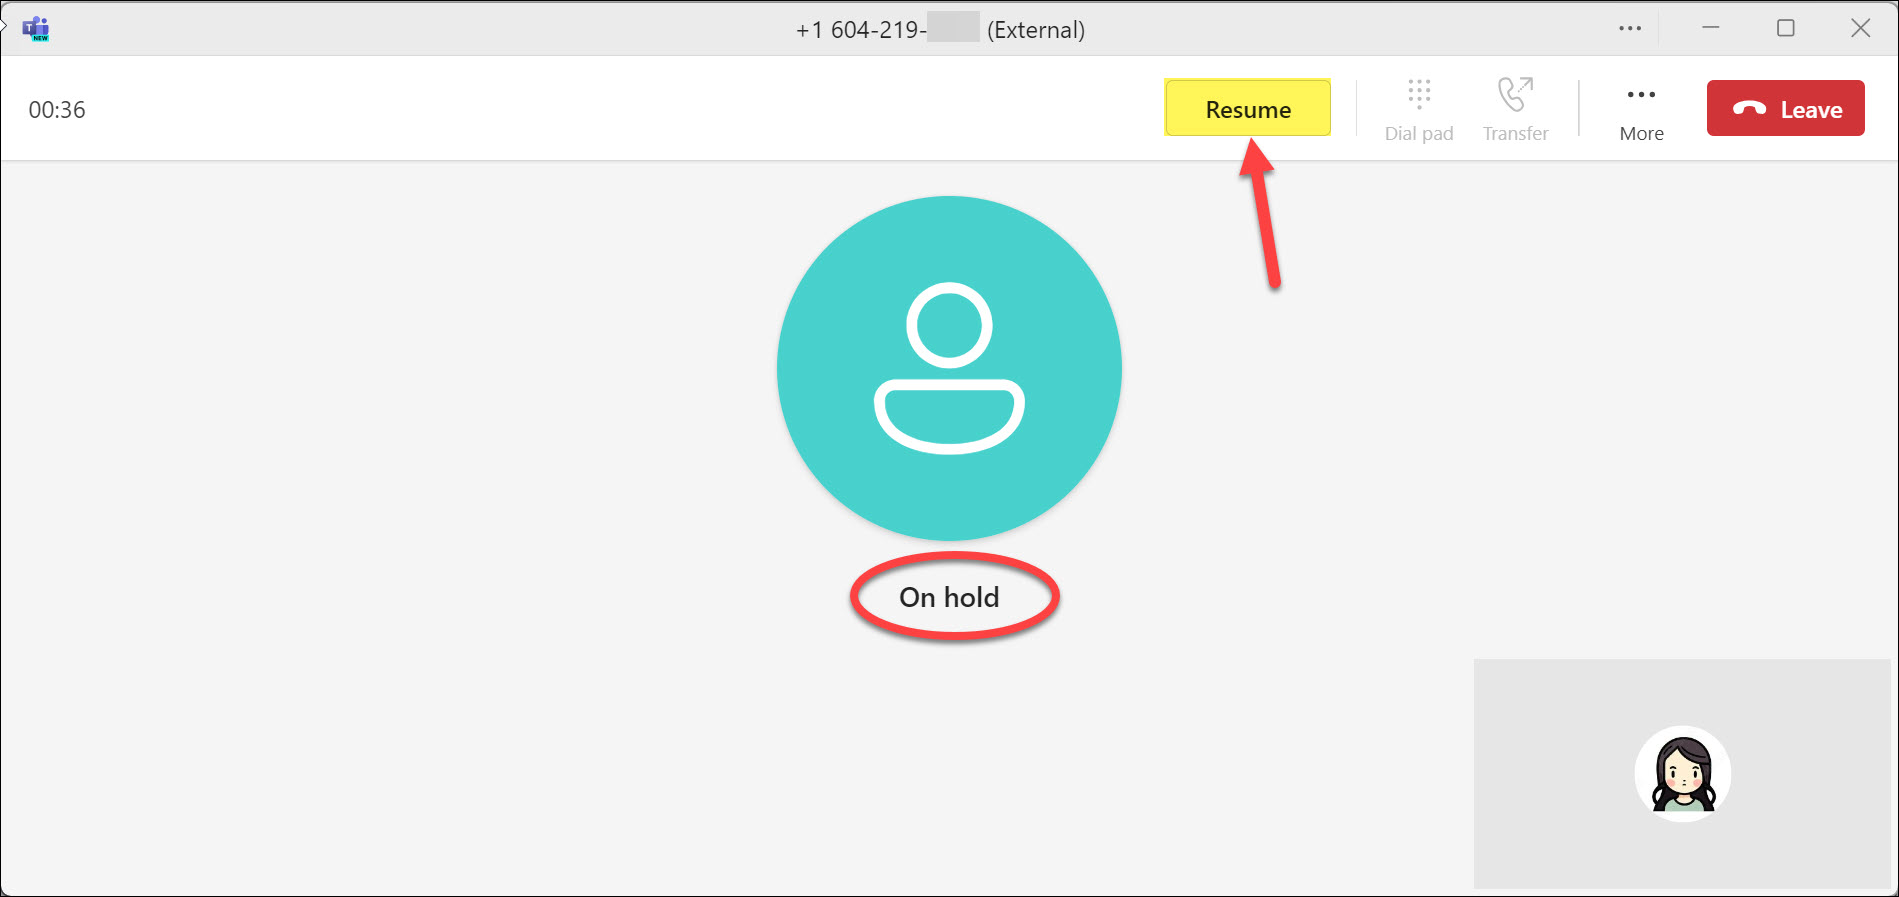
- Inform the caller that you are putting them on hold (they will hear hold music), and then click Hold.
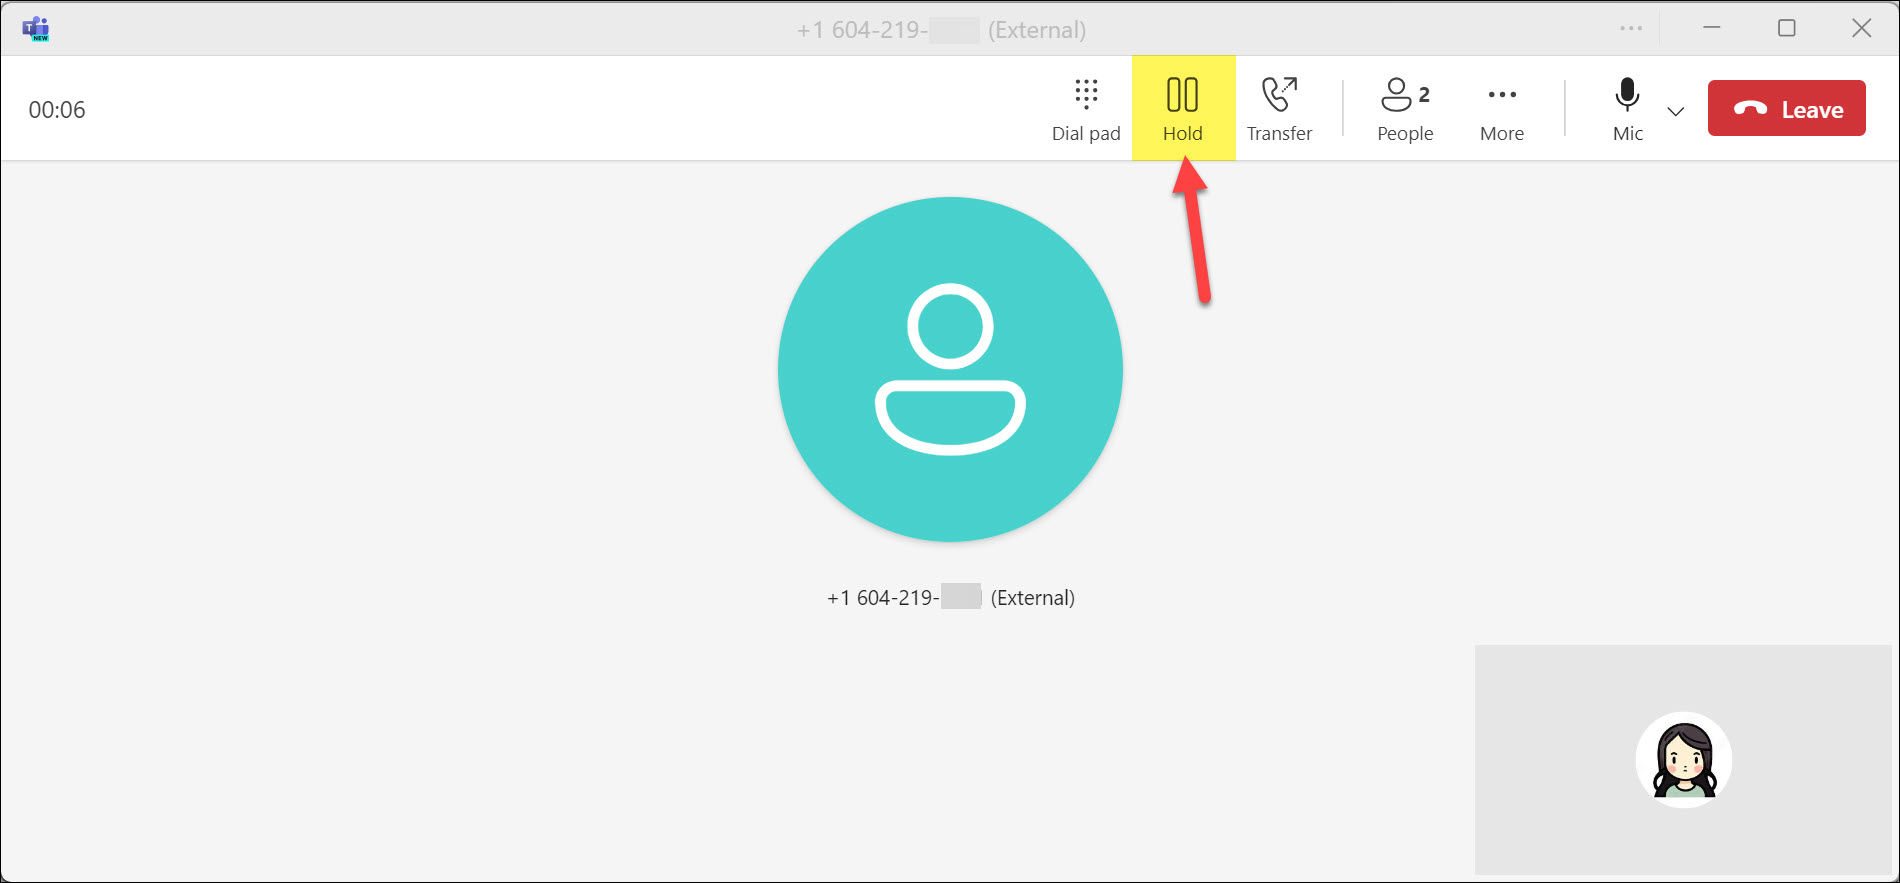
- When you are ready to resume the call, click Resume.
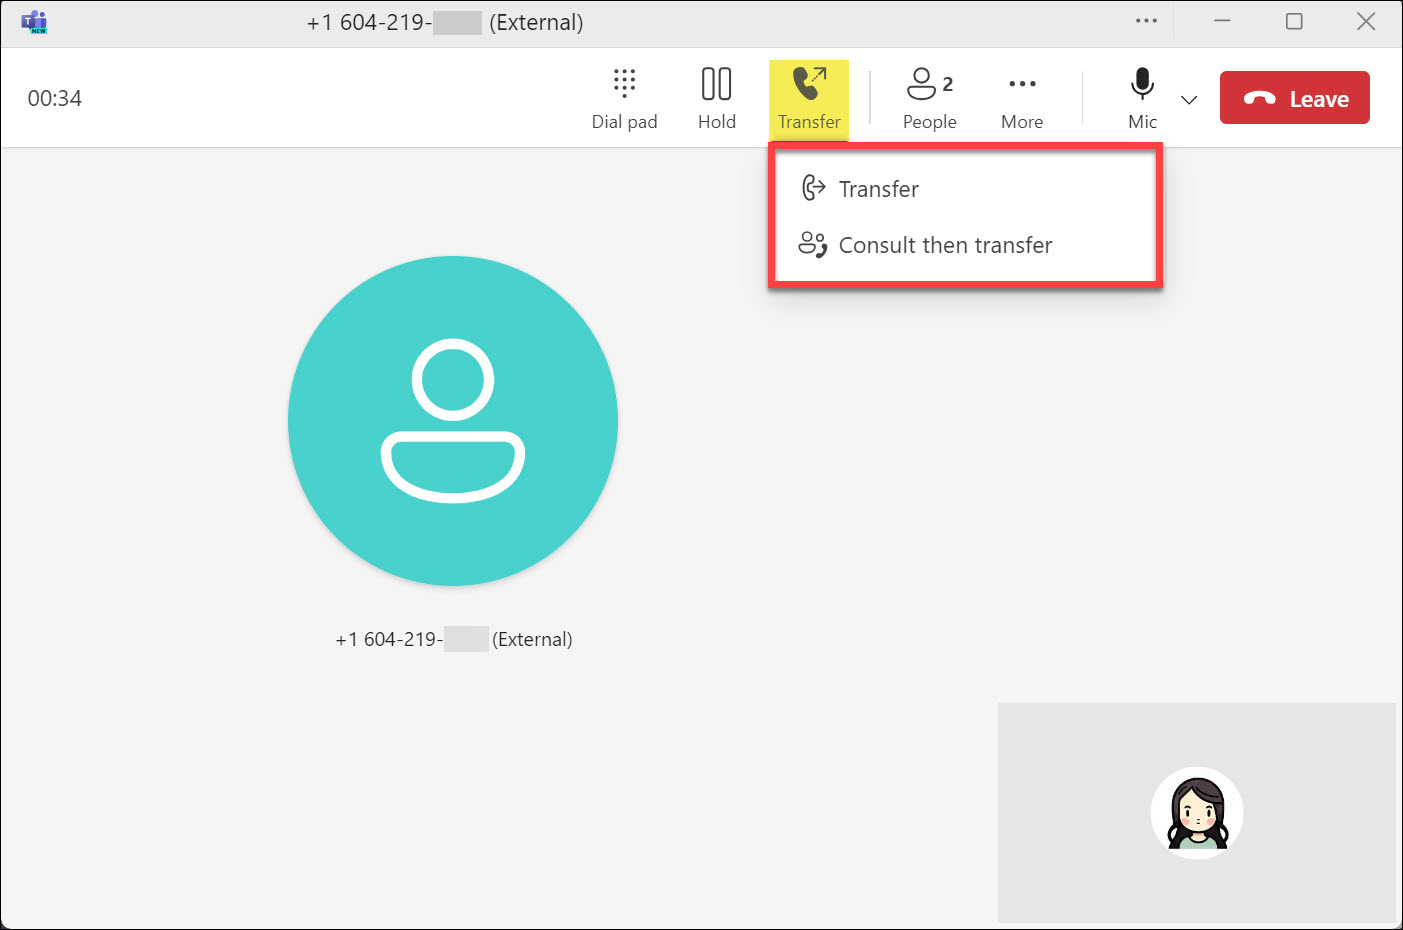
Transferring a call on Microsoft Teams Phone ensures the caller reaches the most appropriate person for their needs, enhancing efficiency and customer service. When you answer a call and determine that someone else can better assist the caller, you can transfer the call in two ways. You can transfer calls directly to another person (“Transfer”) or consult with them first to provide context before transferring the call (“Consult then transfer”).
Click the Transfer button and choose either Transfer or Consult then transfer.
Selecting “Transfer”
Use this option when you need to transfer the call directly to another person without any prior communication. This is useful for straightforward call hand-offs when the recipient is expected to take the call without needing additional context.
While on the call:
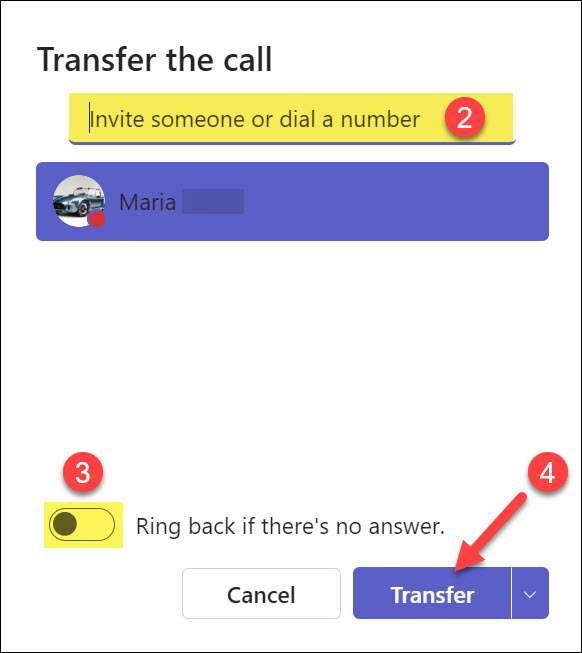
- Select Transfer → Transfer.
- In the new window, type the recipient’s name or number.
- You can choose to Ring back if there’s no answer.
- Click Transfer.
Selecting “Consult then transfer”
Use this option when you want to speak with the recipient before transferring the call. This allows you to provide context or ensure the recipient is available and ready to take the call. It’s beneficial for more complex situations where additional information needs to be communicated before the call is transferred.
While on the call, inform the caller that they will be put on hold briefly (they will hear hold music). Then:
- Select Transfer → Consult then Transfer.
- In the new window, type the recipient’s name or number.
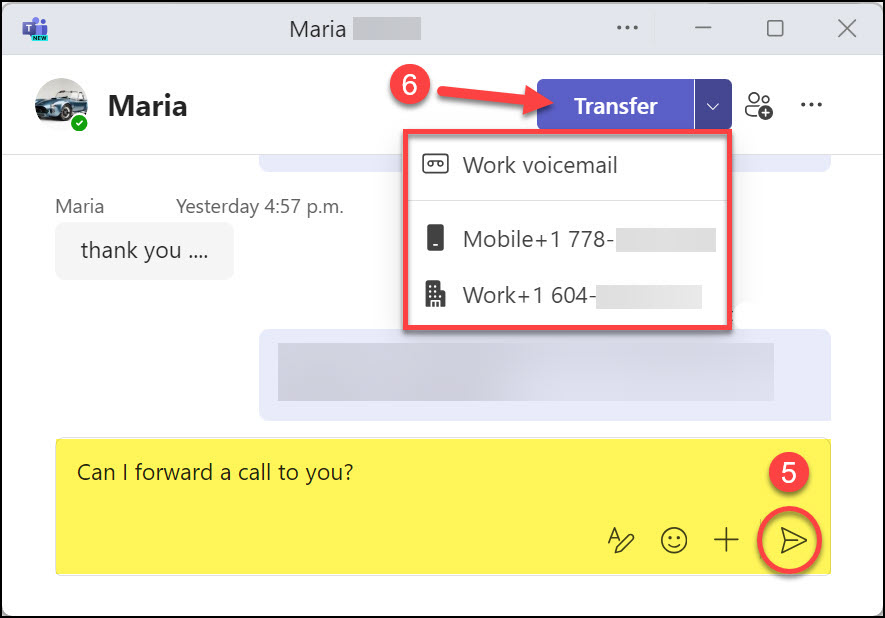
- Click the drop-down menu if you want to call the recipient. If they have more than one number assigned, select the specific number you wish to call.
- Alternatively, click Chat to message the recipient.
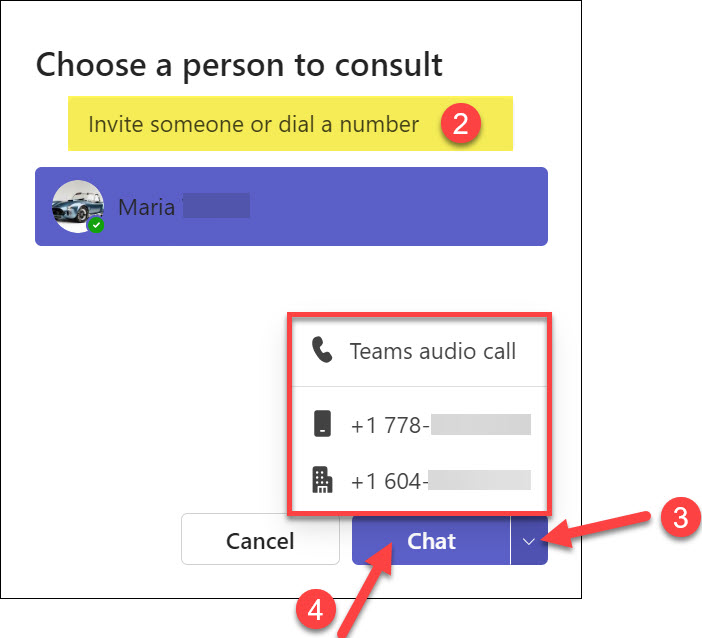
- If you select Chat, compose your message and send it.
- Once the recipient agrees to take the call, click Transfer.
Note: If the recipient has multiple numbers, use the drop-down menu to select the desired one for transferring the call.
Microsoft Teams Phone allows you to easily bring multiple people into the same call, whether you’re already on an active call or starting a conference call from the beginning.
Start a conference call from the beginning
- Click the Calls icon on the left side of the application.
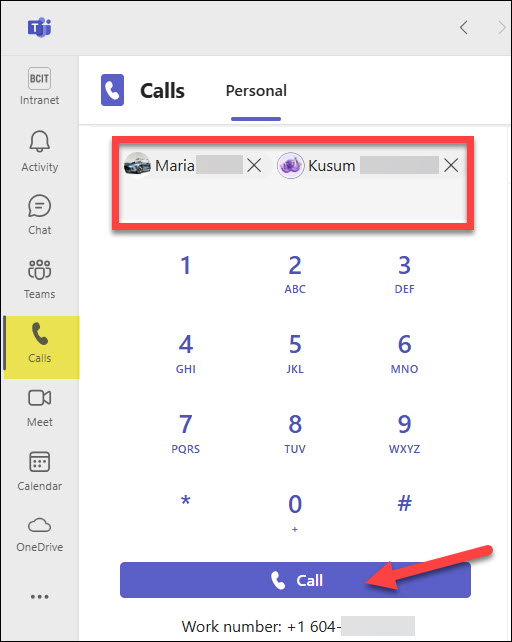
- In the dial pad, enter the names or phone numbers of the participants.
Note: As you type names or numbers, a drop-down menu will appear with potential contacts to choose from. - Click Call to start the conference.
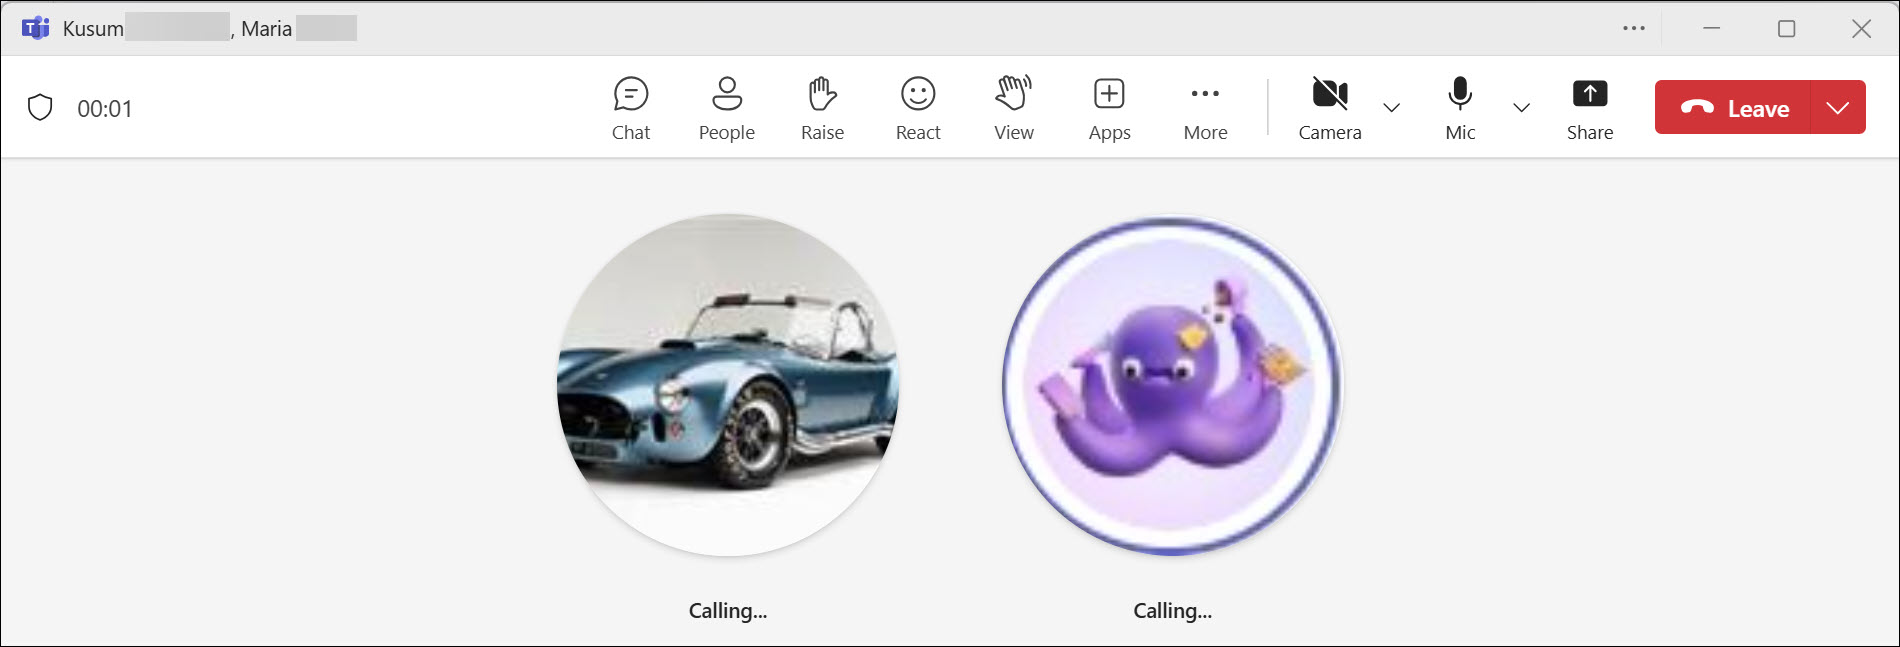
- A Teams calling window will open, and the calls will begin.
Add a participant to an active call
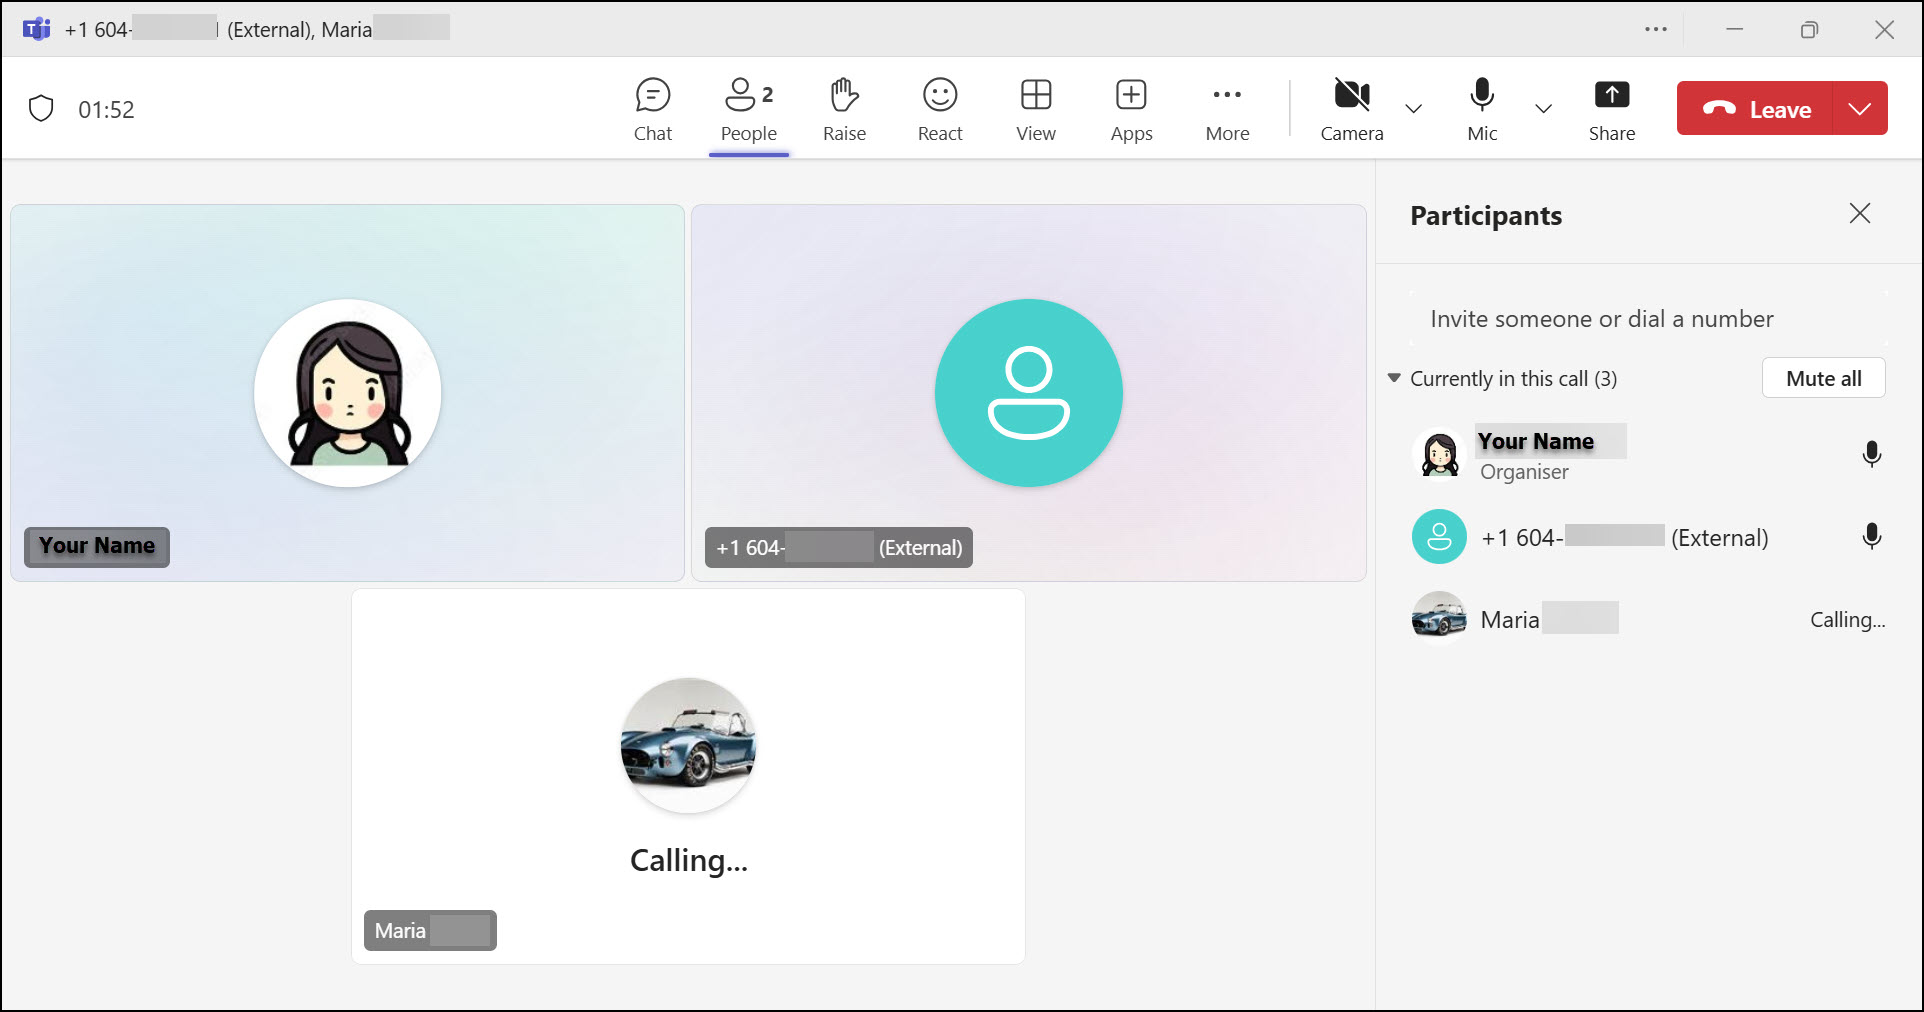
- While on a call, click the People icon.
- In the Invite someone or dial a number box, enter the name or phone number.

- Select the person from the search results to call them.

- They will be added to the call once they answer.
Assign colleagues as delegates to manage your incoming calls. Delegates can answer, make, and redirect calls on your behalf, ensuring that important communications are handled even when you are unavailable.
Adding a delegate
To delegate phone calls:
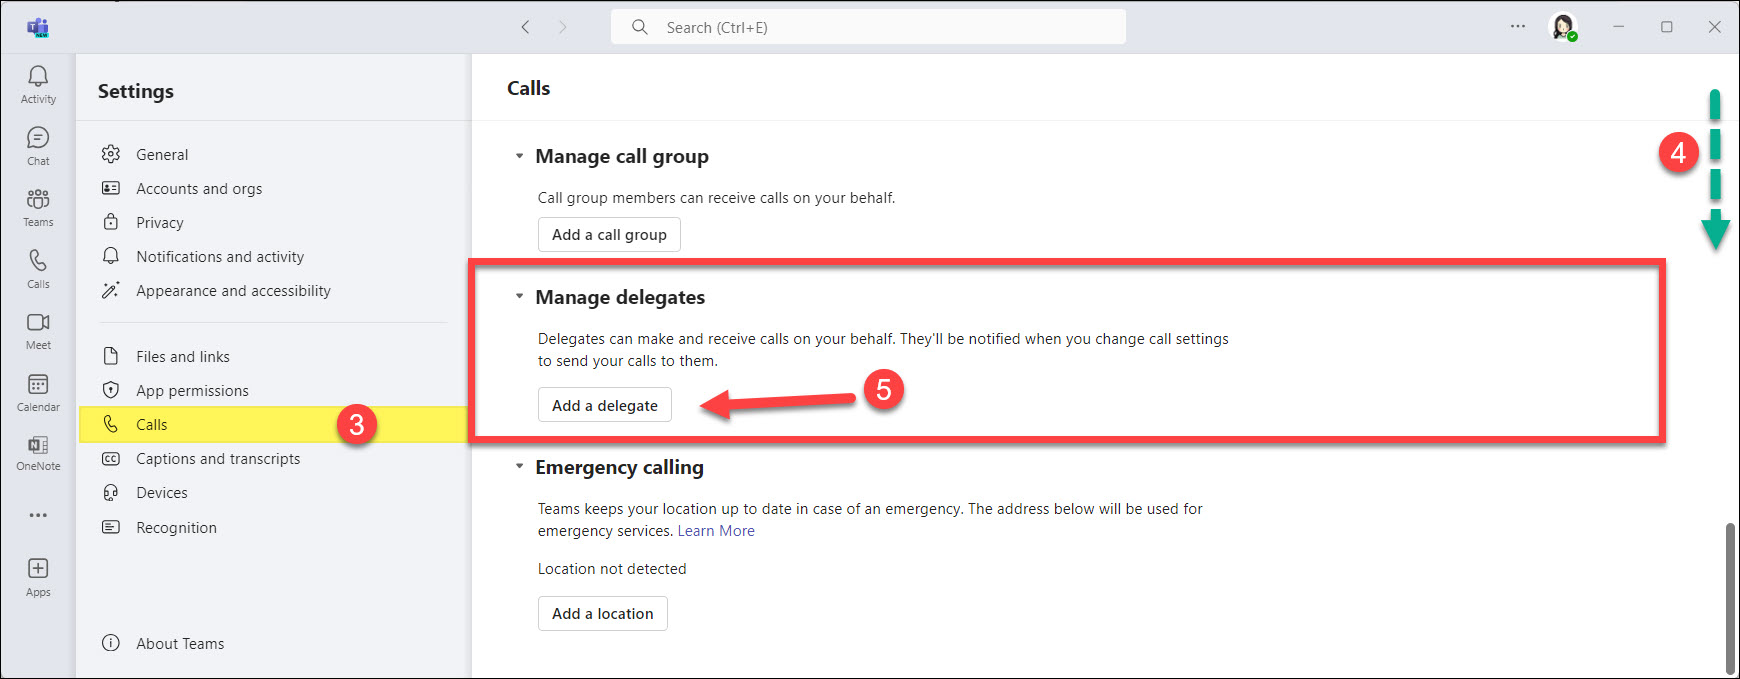
- Click the ellipses (•••) next to your profile picture at the top-right of the Teams app.
- Select Settings.

- Choose Calls from the left menu.
- Scroll down to Manage delegates.
- Click the Add a delegate box.
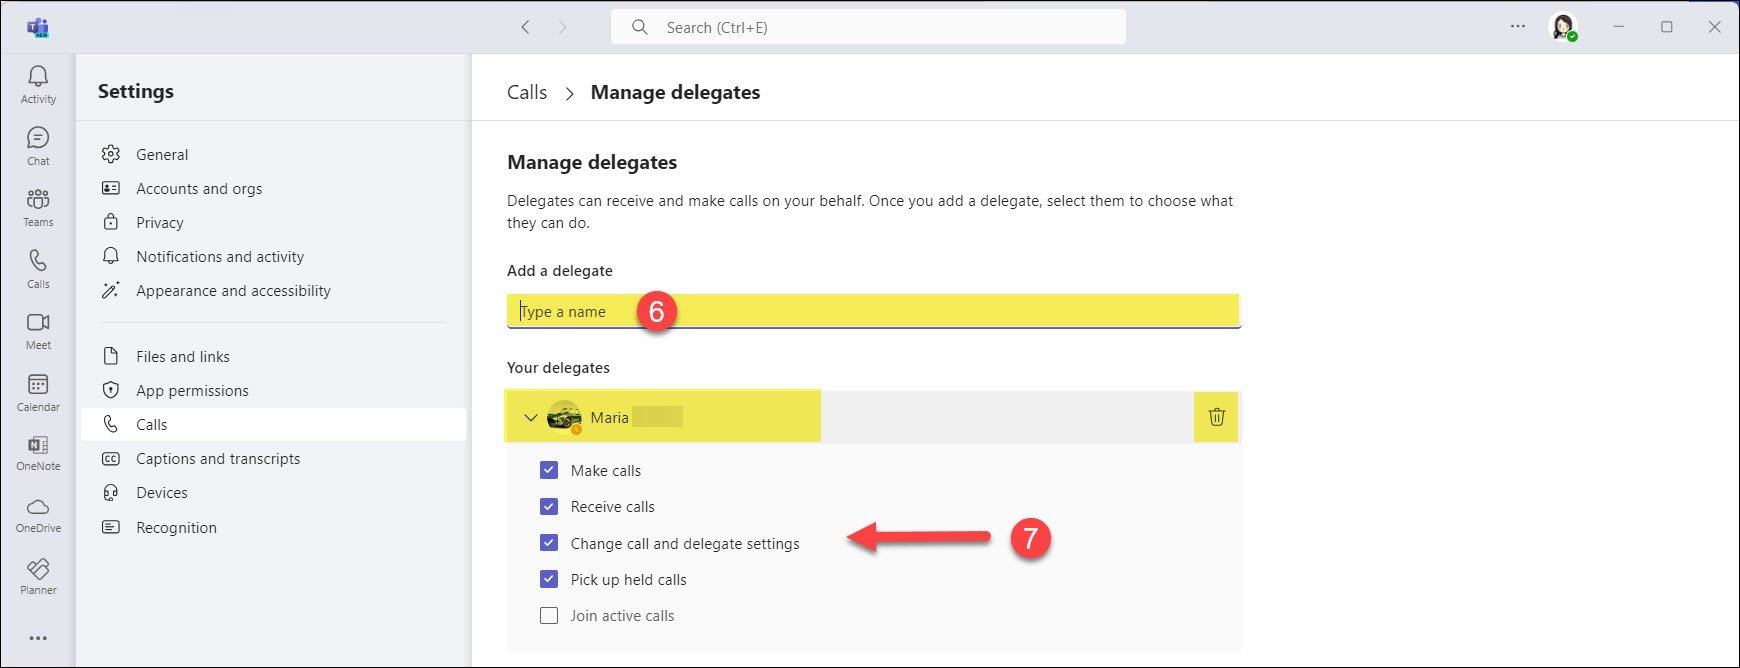
- Start typing the name of the contact you’d like to add as a delegate and select their name from the drop-down menu.
- Choose the functions you want to allow your delegate to perform.
Note: To remove a delegate, click the trash can icon next to their name.
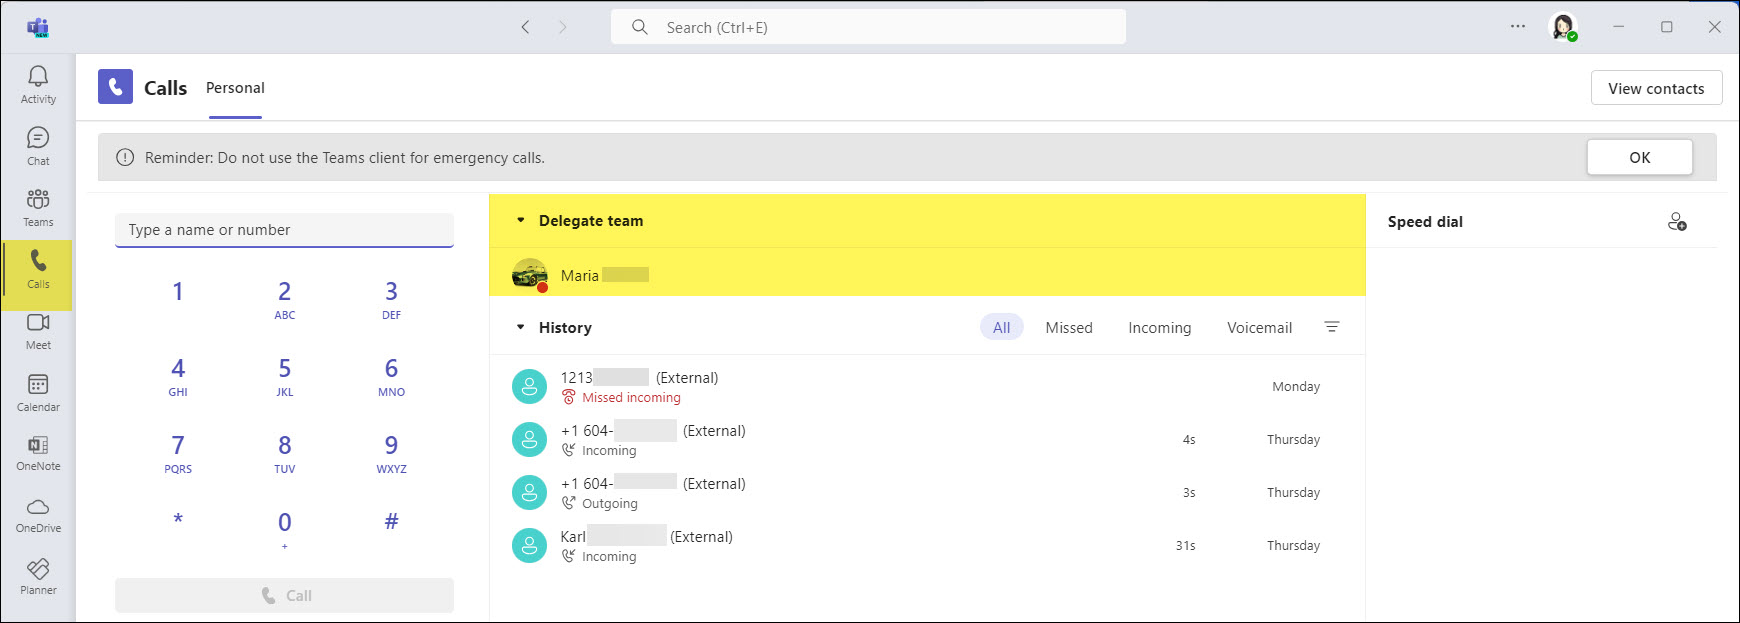
When you return to you Calls page, your assigned delegate will appear at the top.
Your delegate will receive a message in their Chat notifying them that you have assigned them as a delegate.

What you see as a delegate in Teams Phone
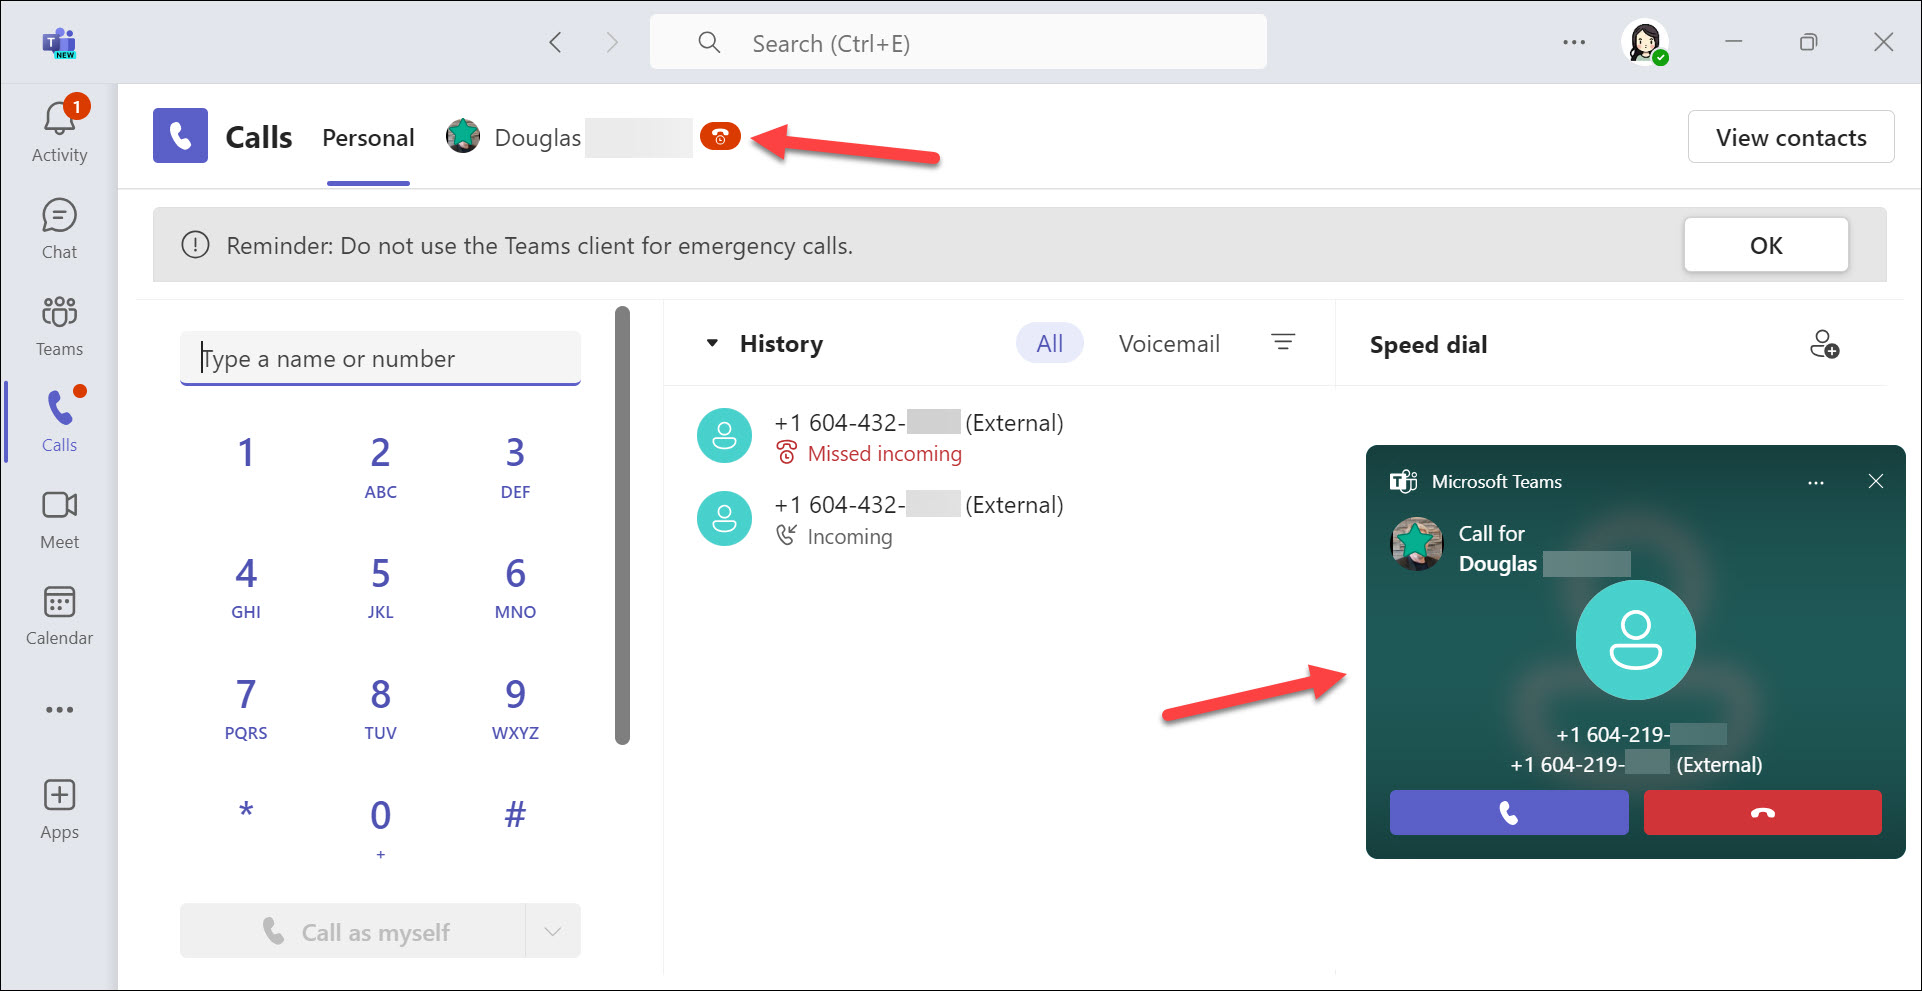
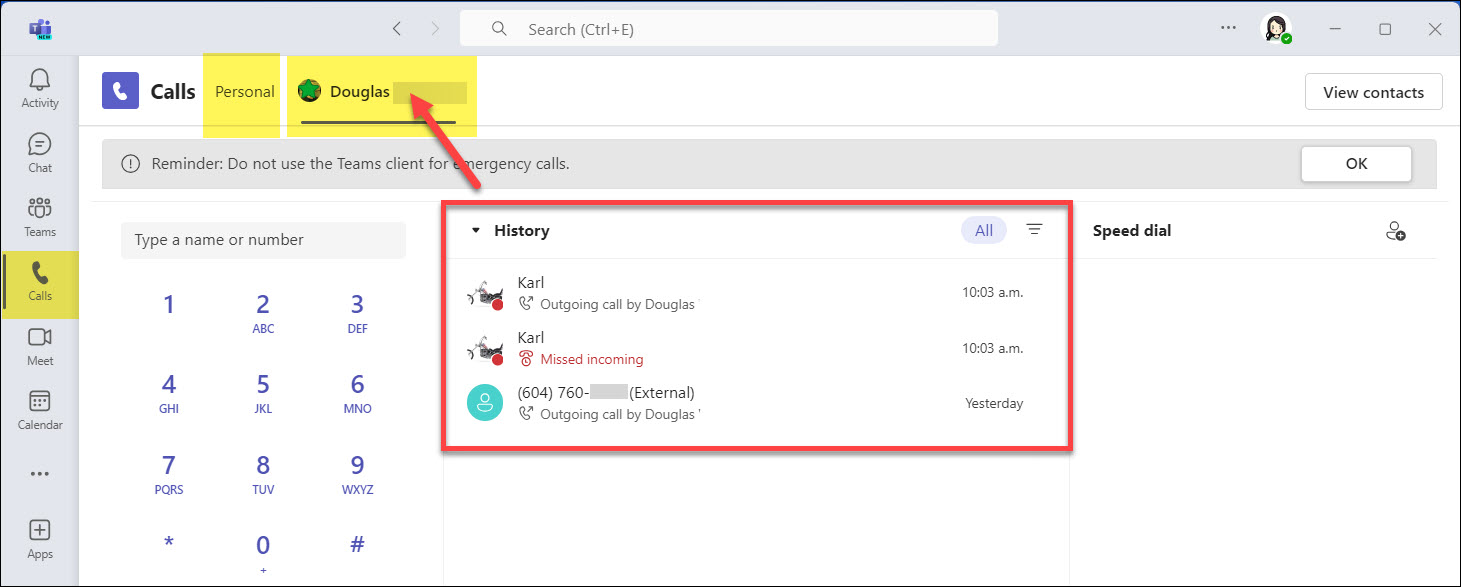
When you are assigned as a delegate for a coworker, their ID will appear on the top bar when you access the Calls menu. To view their information, simply click on their ID.
Actions you can perform as a delegate
- Handle calls – Answer and make calls on behalf of the assigned person. Joining active calls may depend on specific settings and permissions.
- Receive calls – Accept incoming calls directed to the assigned person.
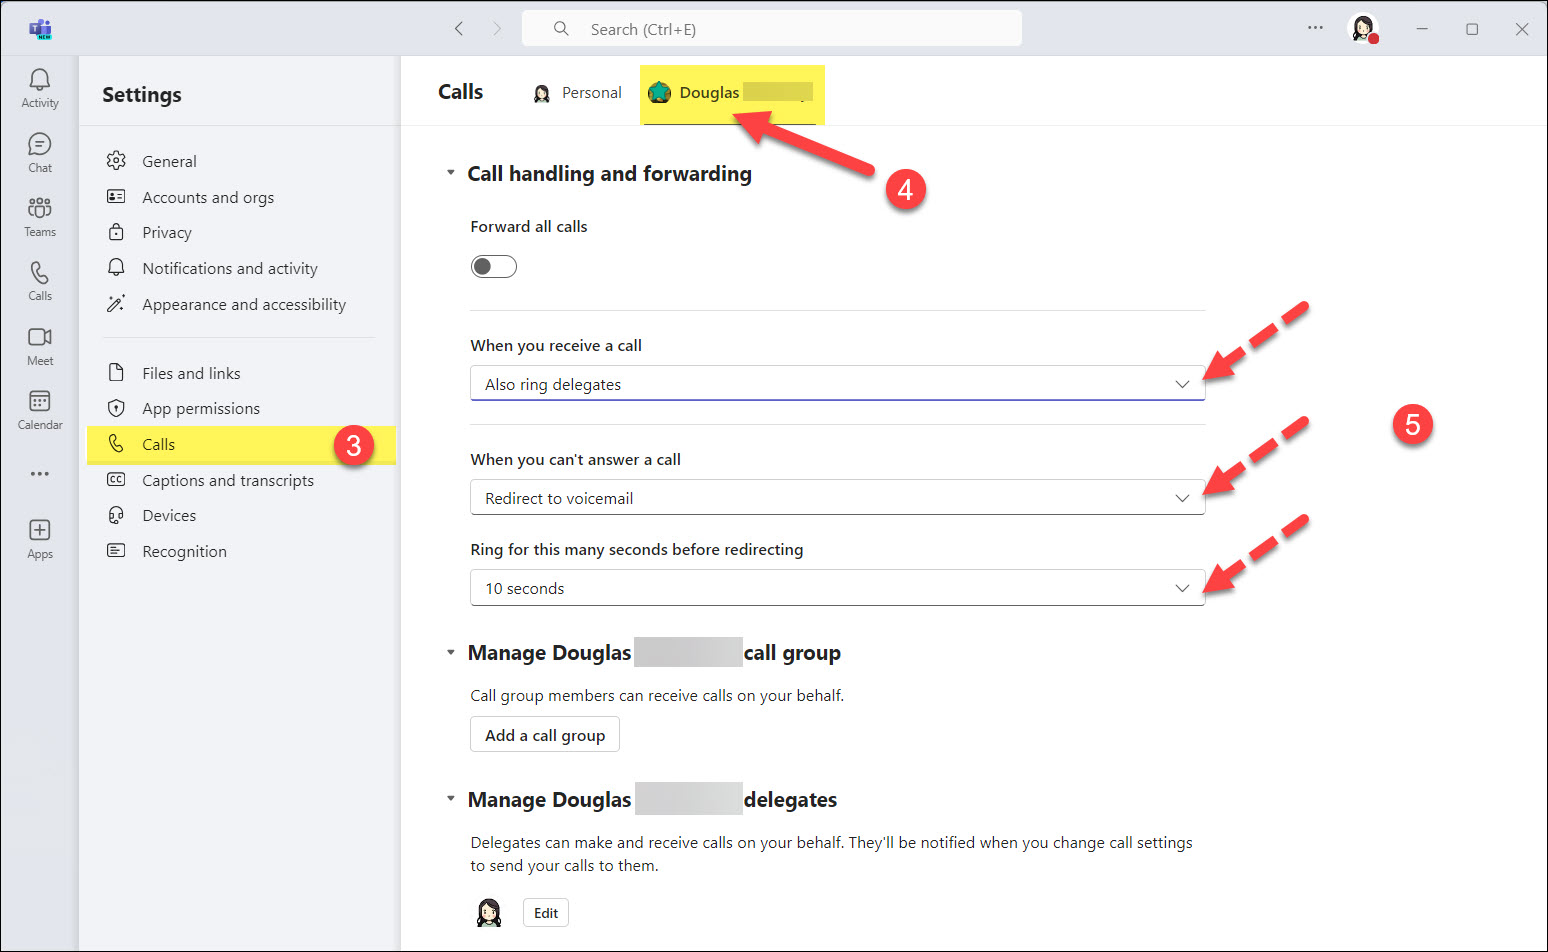
- Manage call forwarding – Configure call forwarding settings for the assigned person.
- View call history – Access and manage the call history for the assigned person.
Actions you cannot perform as a delegate
- Adjust voicemail settings – Modify voicemail settings for the assigned person.
- Access voicemail – Listen to voicemail messages of the assigned person.
Receiving calls as a delegateWhen a call comes in for the assigned person, a notification box will appear, along with a telephone icon next to their name. Note: Be cautious when answering calls as a delegate if the assigned person is in the office and working, as you might not need to answer their calls.
|
Managing the assigned person’s call forwarding settings
|
Contacts
Pinning the People app to your menu bar in Microsoft Teams Phones provides quick and easy access to your contacts, enabling you to manage and communicate with your network more efficiently. With the People app readily accessible, you can effortlessly search for, call, and message your contacts without navigating through multiple menus, saving time and enhancing your workflow.
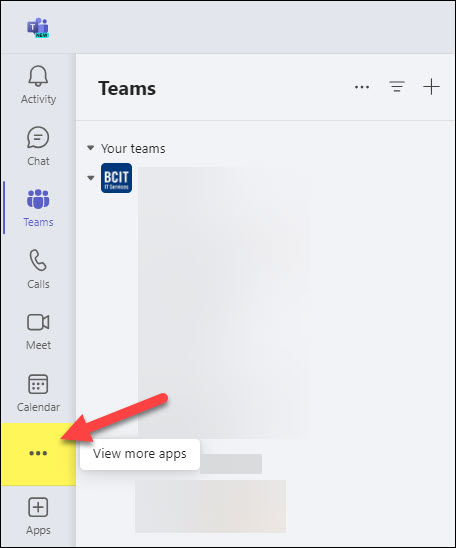
- In your menu bar, click on the ellipses (•••) to view more apps.
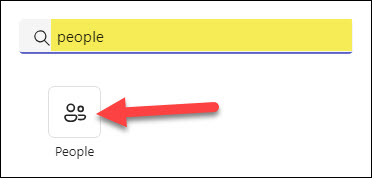
- Type “People” in the search box and select the app from the results.
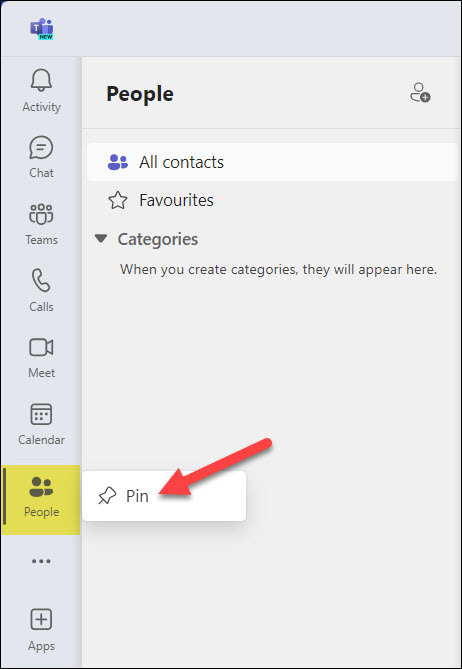
- The People app will now temporarily appear on your menu bar. Right-click on it, and select Pin to ensure it permanently displays on your menu bar.
Add contacts
Adding contacts in Microsoft Teams Phones is essential for efficiently managing your communication. By adding frequently contacted individuals or teams to your contact list, you streamline the process of making calls, sending messages, and organizing meetings, enhancing your overall productivity.
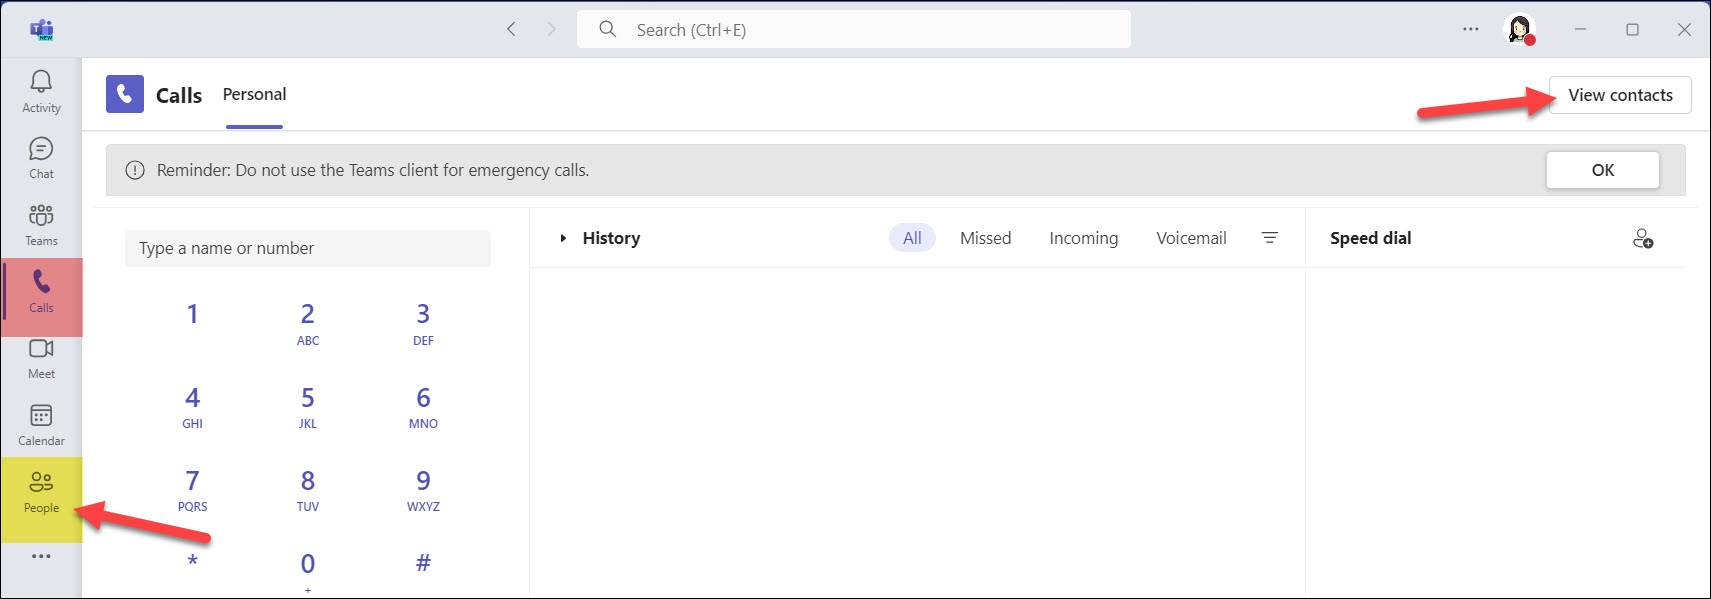
- In the Calls icon, click on View contacts to open the People app. If the People app is pinned to your menu bar, you can also click the People icon.
- Click the Add contact icon.

- Type the person’s name and select them from the drop-down menu. If your organization has a directory, you can search within it. You can also enter an external number.
- Click Add when finished.
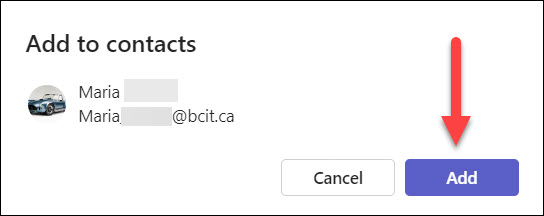
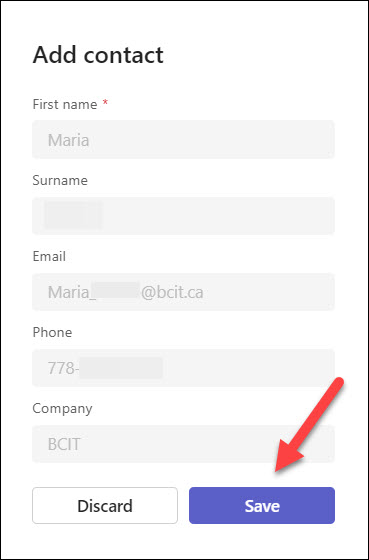
- If adding someone from your organization, their details will auto-fill. For external contacts, manually enter their information and click Save.
Edit contacts
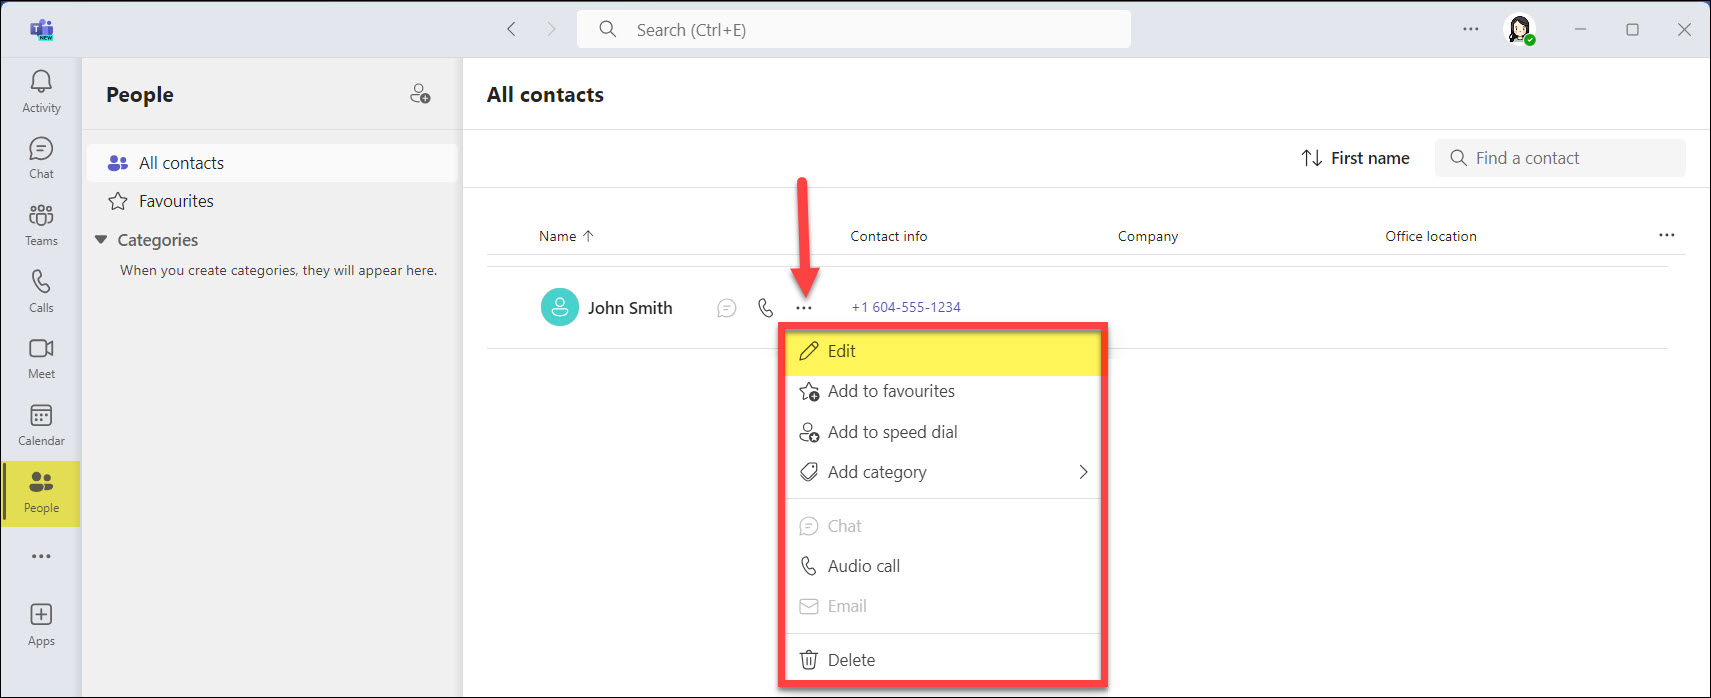
To edit a contact, hover over the person, click the ellipses (•••), and select Edit. This will open the contact editor for updating details.
Adding a contact to your Favourites allows for quick and easy access to frequently contacted individuals, ensuring you can reach them faster without having to search through your entire contact list.
You can add a contact to your Favourites in two ways:
- Hover over the person, click the ellipses (•••), and select Add to favourites.
- Click the star next to the person’s name.
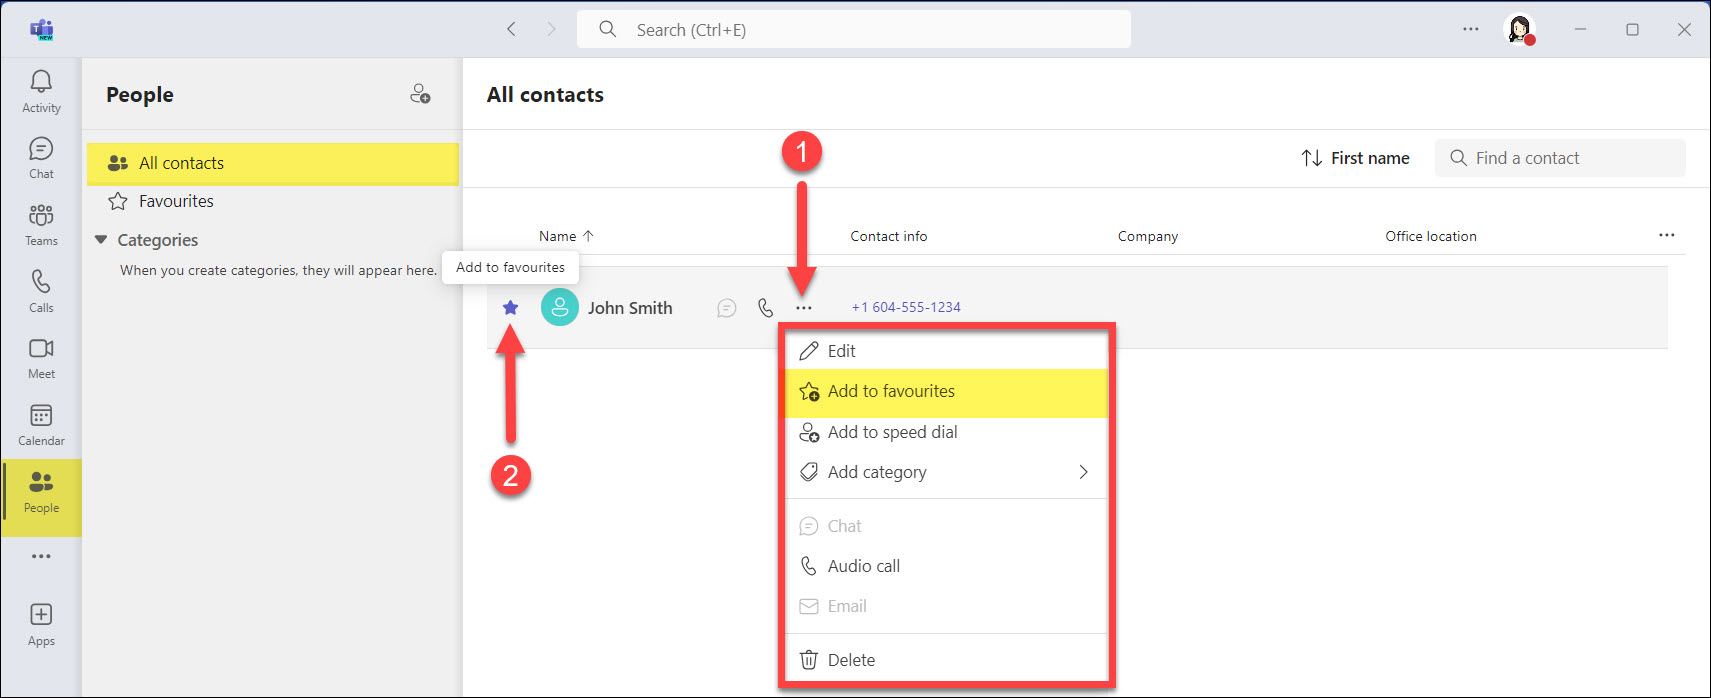
After adding a contact to your Favourites, they will appear in the Favourites list.

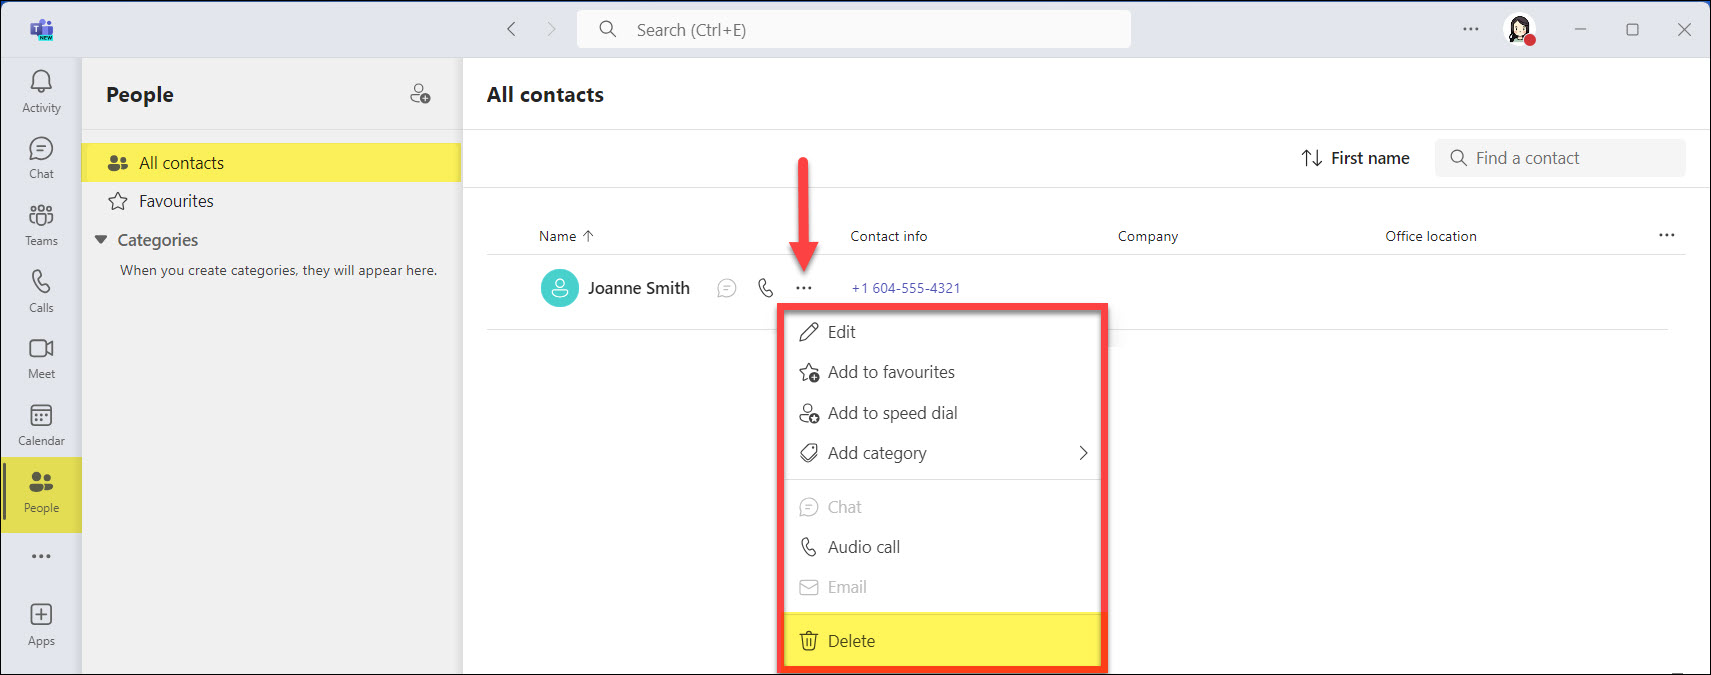
You may want to delete a contact to keep your contact list organized and up-to-date, especially if the person is no longer relevant to your work or communication needs.
To delete a contact, hover over the person, click the ellipses (•••), and select Delete.
Voicemail
Allows you to set up and customize your standard voicemail settings, including recording a personal greeting, setting text-to-speech greetings, and configuring call answering rules.
Note: If you manage multiple phone lines, ensure you are setting up the correct voicemail account. To set your personal voicemail, select Personal.

- Click the ellipses (•••) next to your profile picture at the top-right of the Teams app.
- Select Settings.

- Choose Calls from the left menu.
- Scroll down to Manage voicemail.
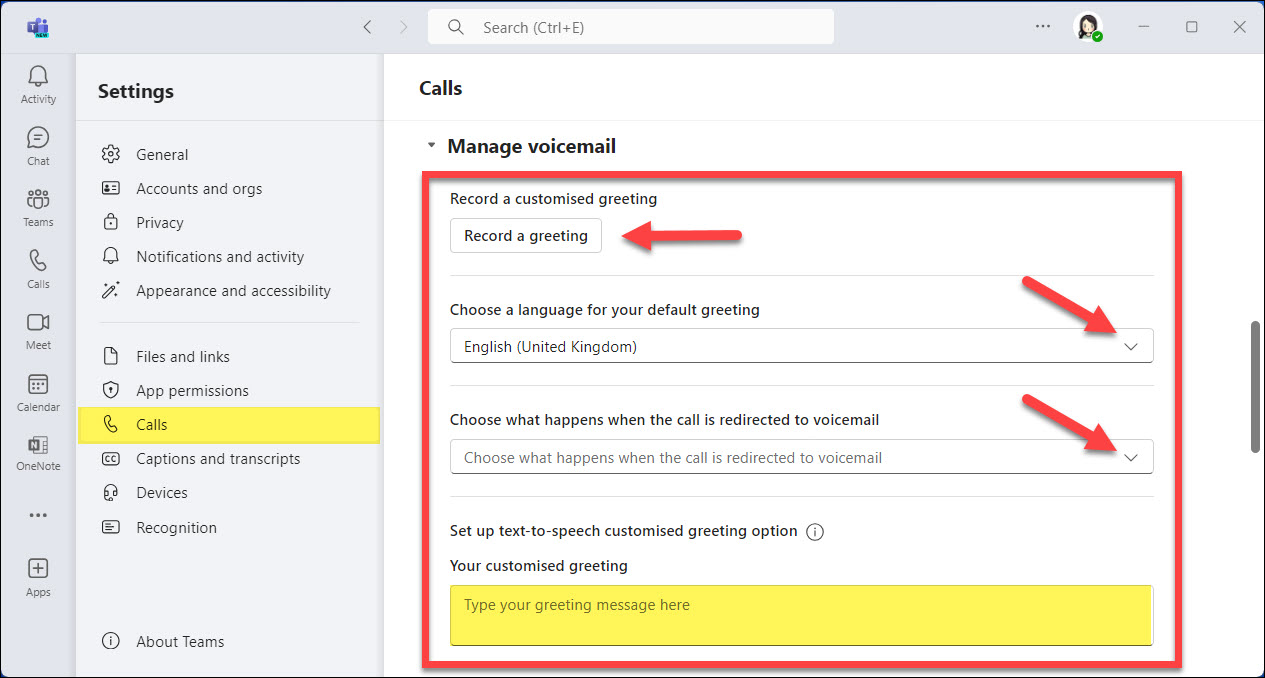
- Follow the prompts to customize your voicemail settings.
Record a personalized greeting
You can record a personal greeting for your voicemail in Microsoft Teams. Note that there is no indicator within the Teams app to show that a greeting has been recorded. To record your greeting:
- Click the Record a greeting button. A new window will open, providing instructions for making the recording.
- Follow the provided instructions and key combinations to complete and check your recording.
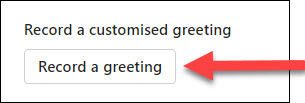
Note: To delete your personal recorded voicemail greeting and revert to the text-to-speech option, click on the Record a greeting button. Your current greeting will be played, and you will be provided with options to re-record or delete it. Press “3” to delete the recording.
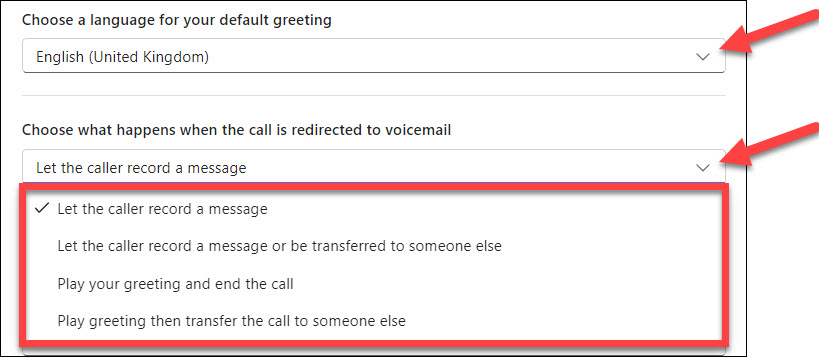
Language and choosing what happens when call is redirected to voicemail
Configure call answering rules, such as when to send calls to voicemail and what to do with calls during your busy hours.
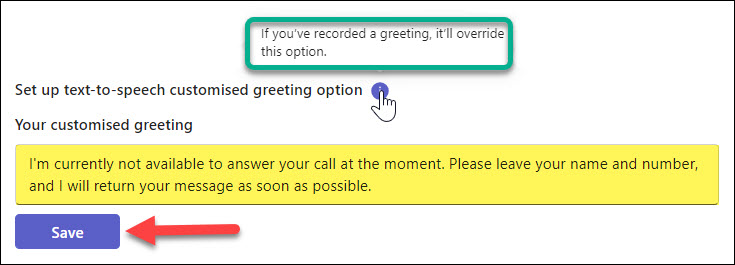
Set up text-to-speech greeting
Using the text-to-speech feature allows you to quickly set up a professional and clear voicemail greeting without the need to record your own voice. This can be particularly useful if you prefer a consistent and neutral tone or if you want to easily update your greeting text as needed.
Note: The text-to-speech voicemail option won’t work if you have recorded a personal greeting, as the personal greeting takes precedence.
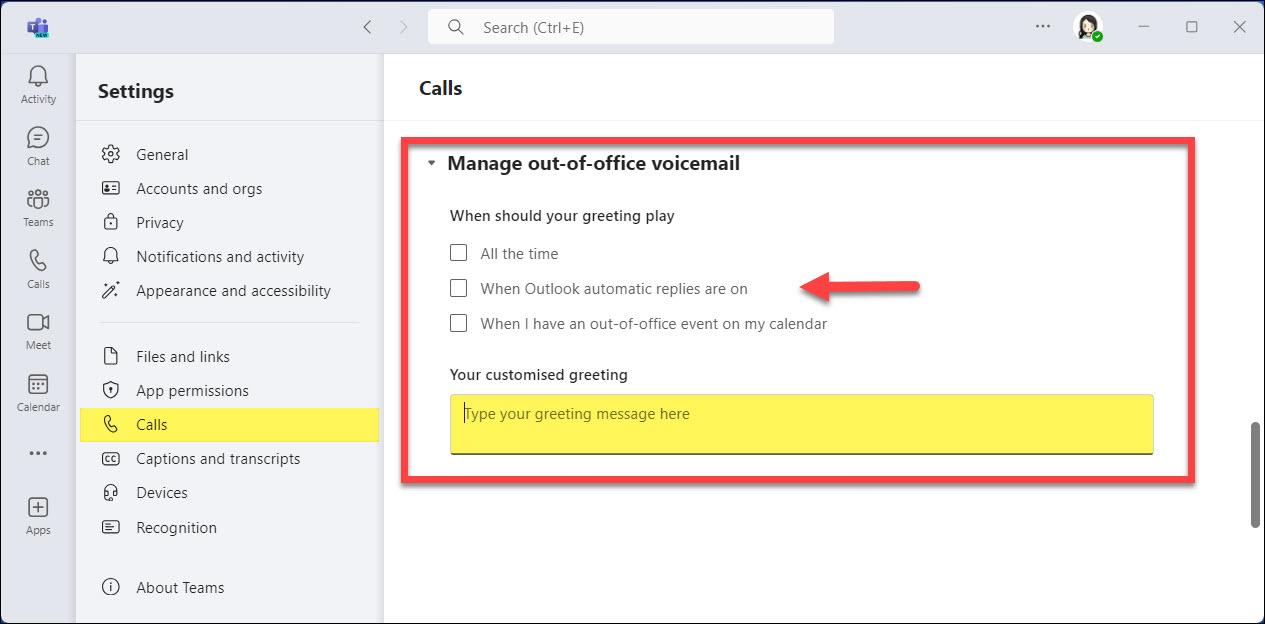
This feature allows you to create a specific voicemail greeting for when you’re out of the office and schedule its activation.
This setting syncs with your Outlook settings, activating based on your out-of-office auto-reply and if you mark your meetings or events as out-of-office.
- Click the ellipses (•••) next to your profile picture at the top-right of the Teams app.
- Select Settings.

- Choose Calls from the left menu.
- Scroll down to click Manage out-of-office voicemail.
- Follow the prompts to set up your out-of-office voicemail:
- Schedule when your out-of-office greeting should be active.
- Type your customized greeting message.
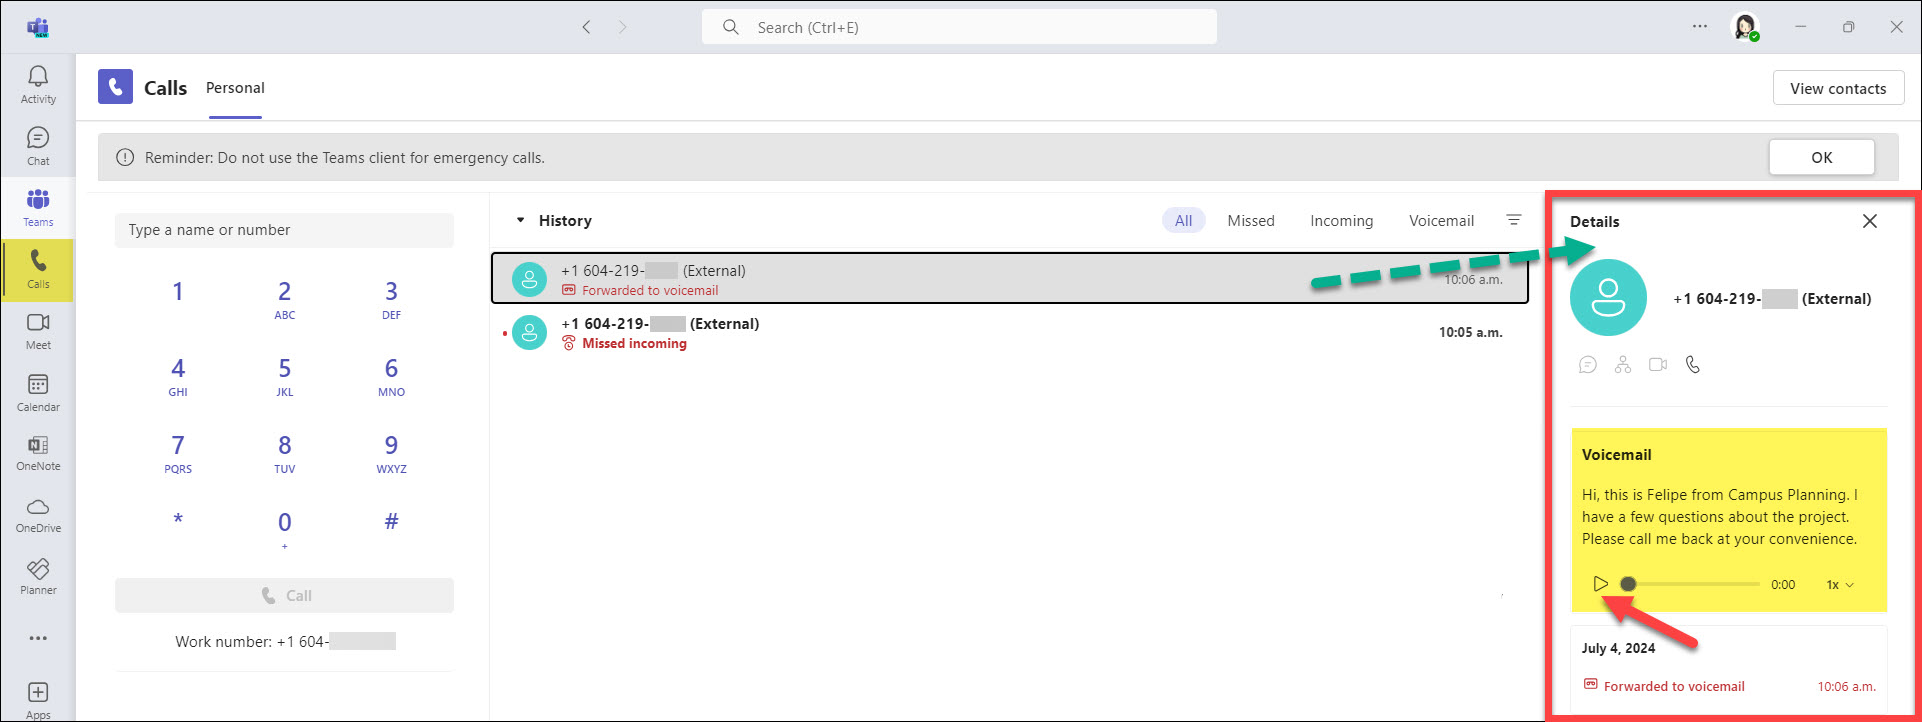
Access your voicemails directly through the Microsoft Teams app or via your email. The Teams app allows you to listen to, manage, and delete voicemails, while your email provides a transcription and audio file of each voicemail for convenient access.
From your Teams App
Navigate to the Calls tab in your Teams app. Voicemails will appear under the History section. Click on the voicemail notification to view details in the right-hand Details box. The voicemail transcription will display (note: accuracy may vary). Click the play button to listen to the message.
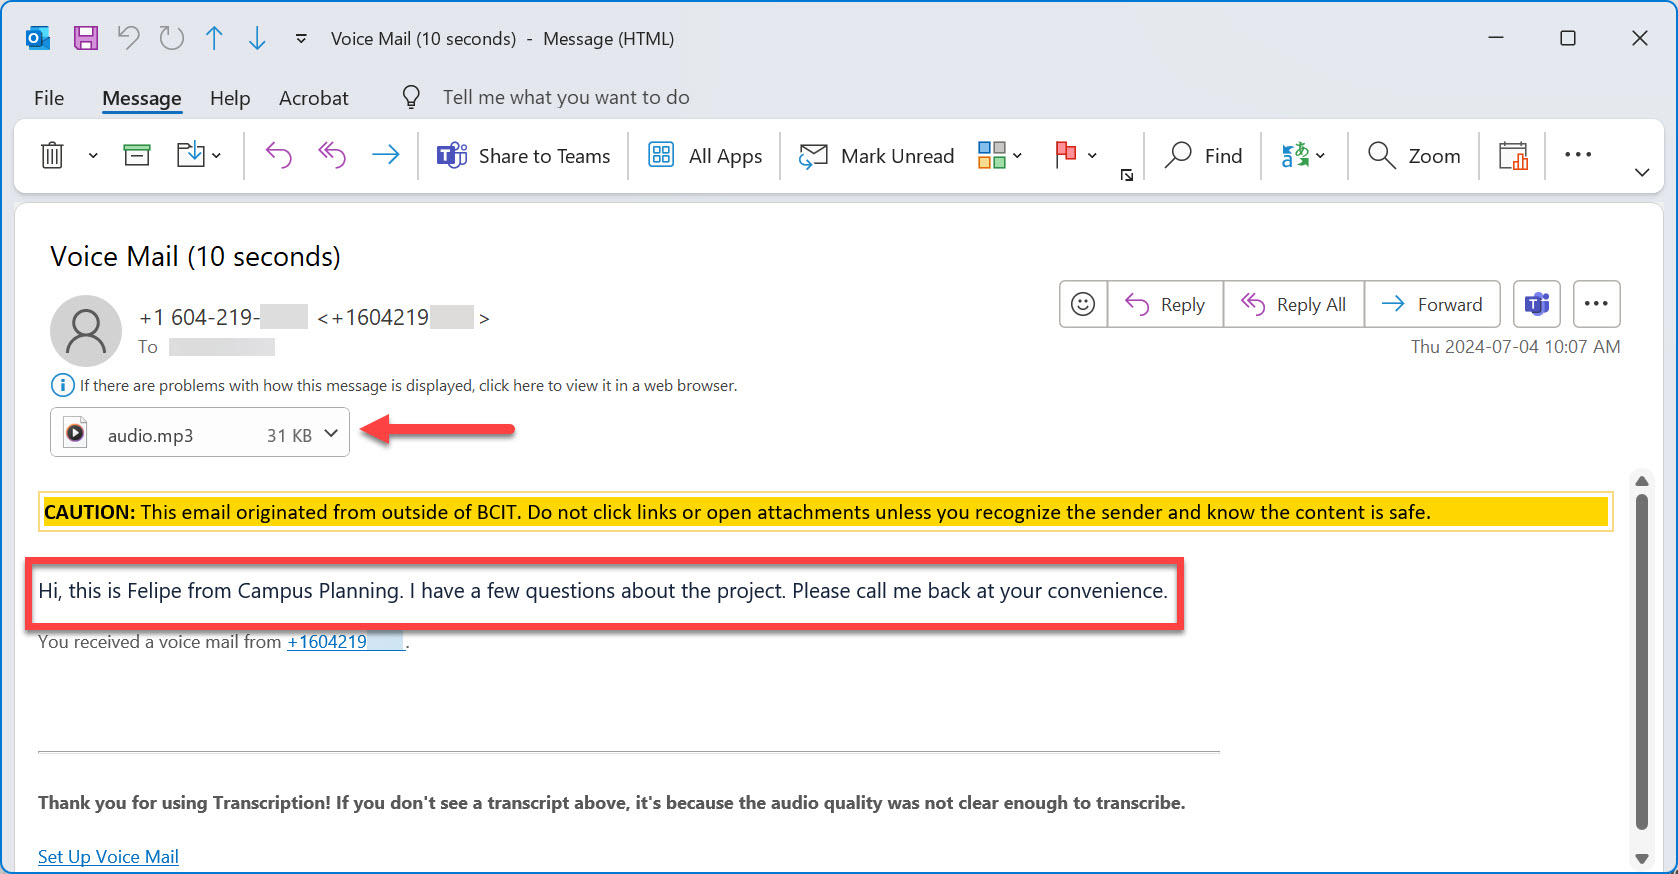
From your Email message
Voicemails received on Teams Phone are automatically sent to your email inbox. Each message includes both a transcription and an audio file for easy access and review directly from your email client.
Troubleshooting
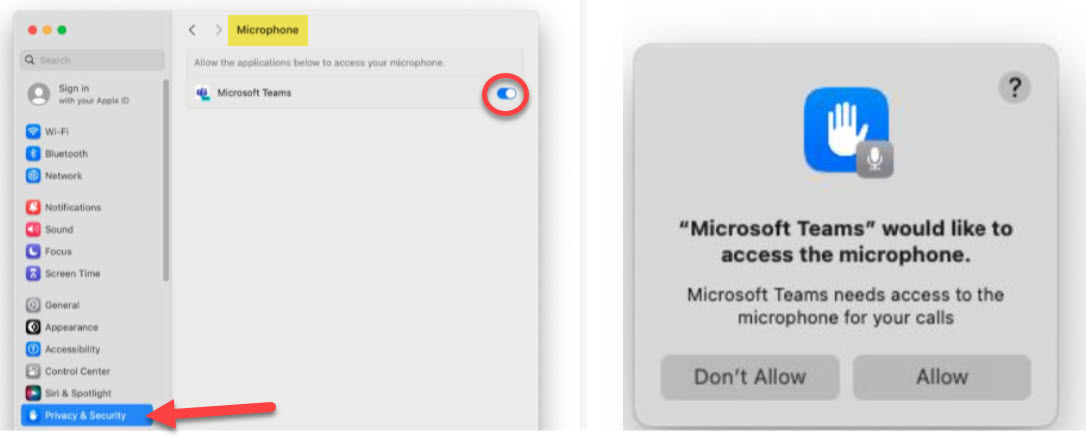
To enable Microsoft Teams Phone on a Mac, you’ll need to grant microphone access to the app. When Teams Phone is first launched on your computer, a message will appear saying, “Microsoft Teams would like to access the microphone” You must click Allow to enable the microphone, allowing you to make and receive calls through Teams Phone. Choosing Don’t allow will prevent the app from accessing the microphone, disabling its calling functionality.
Note: If you initially click “Don’t allow,” you can always re-enable microphone access for Microsoft Teams by going to the macOS System Preferences, selecting Privacy & Security, navigating to the Privacy tab, and then granting access under Microphone.
If you rely on a headset for Microsoft Teams calls, it can be easy to miss an incoming call if you’re not wearing the headset. Setting up a secondary ringer, such as your computer speakers, ensures you’ll hear calls even when the headset isn’t on. Here’s how to enable this setting in Teams:
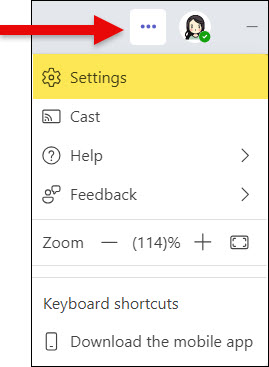
- Click the ellipses (•••) next to your profile picture at the top-right of the Teams app.
- Select Settings.
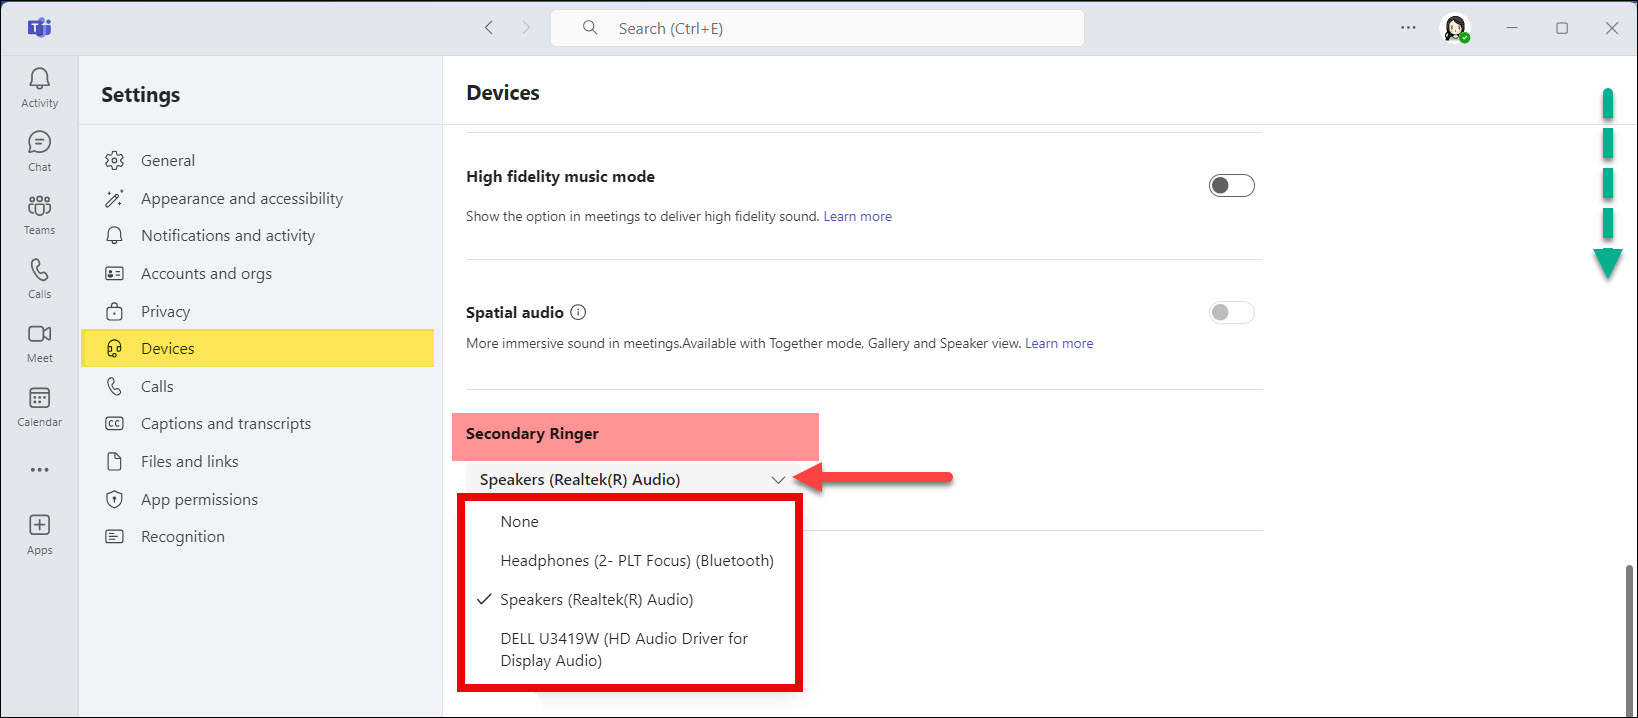
- In the left sidebar, choose Devices.
- Scroll down to the Secondary ringer section.
- From the drop-down, select the device you’d like to use as your secondary ringer (e.g., your computer speakers).
- Test the setting by making a test call to ensure the ringer plays through your selected device.
Now, when you receive a call, it will ring both on your headset and the secondary device.
Where to get further assistance or report an issue
If you have any further concerns, contact the ITS Service Desk or submit a ticket via the ITS Service Catalogue. When submitting a ticket, please include the word “MSTEAMSPHONE” and provide a detailed description to ensure proper assignment.
