You may need the ability to create and share distribution lists (groups) among your colleagues at BCIT. This is relatively simple to setup in Outlook 2013/2016. Group permissions can be granted from Full Access to Read-Only. This is a convenient approach to sharing personal contacts with others at BCIT.
Sharing group folders
If you have several contacts or groups to share, consider creating a Shared Folder. Once setup, all Distribution Lists and Contacts contained in that folder are automatically shared and synchronized with the colleagues you have shared it with. Here is how to create one:
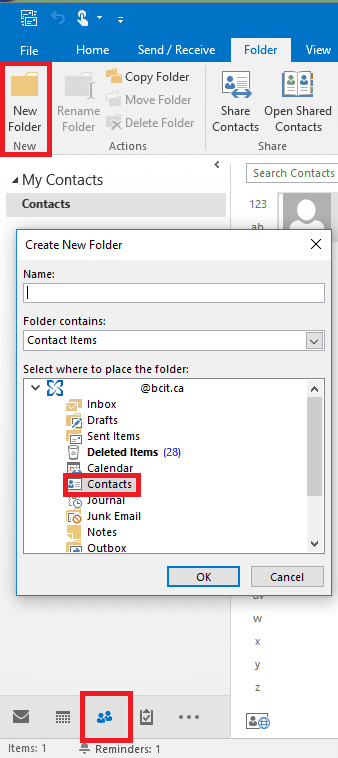
- From the People view, on the Folder tab, click on New Folder.
- Enter the folder name in the dialog box and make sure it gets created under “Contacts”.
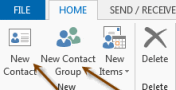
- The new group should appear under My Contacts. To add new items to it, make sure it is selected (click on the folder name) and from the Home tab, click on New Contact or New Contact Group. You can also Drag and Drop existing groups or contacts from other folders into it.
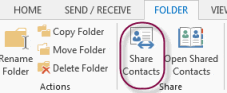
- To share this new Folder with colleagues, simply make sure it is selected (click on the folder name) and select Folder – Share Contacts.
- Enter the recipient’s name(s) and check “Recipients can add, edit,….” if you wish to grant Editor access to those groups. Without this option, colleagues would be able to view the Folder and send emails to recipients but wouldn’t be able to update the groups and contacts within it.
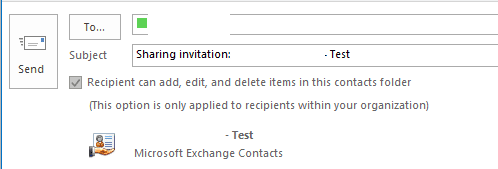
- Click Yes, when prompted to send the notice.

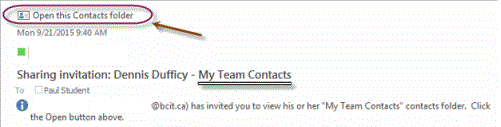
- The recipient(s) will receive an email indicating your intention to share the folder. They simply need to click on Open this Contacts Folder to add it to their contact list.
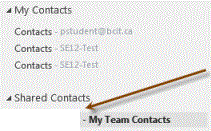
- The folder will then appear folders under the Shared Contacts folder as shown below.
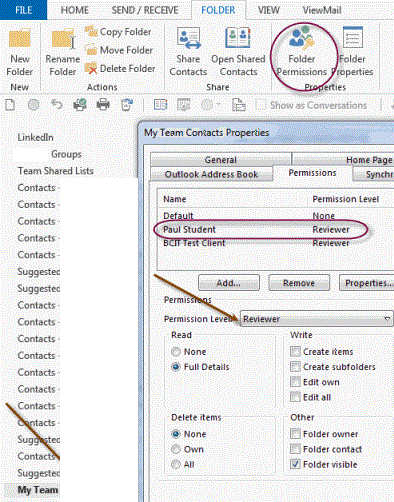
- You can subsequently change the permission levels for any delegates of that folder by clicking on the shared folder and selecting Folder – Folder Permissions.
Using shared groups
These Shared groups and contacts can be used to send messages or meetings to.
Since they are not part of your Personal contacts, you won’t be able to use the normal procedures you would usually do.
As the Owner of a Shared group, you can send emails and invitations to the shared contacts fairly simply:
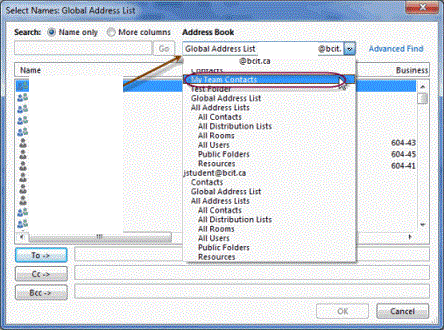
- When addressing the message, click on the To… and from The Address Book list.
- Select the Shared Folder you have created. You will then be able to select the appropriate contacts or group as recipients.
IMPORTANT: The colleagues you have shared the folder with, must address emails and invites differently. Please see the specific steps they need to follow below.
Sending to shared contacts
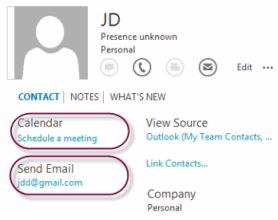
To send an email or a calendar invitation a single contact from the shared folder, simply select the Contact record and click on the desired action from the displayed profile.
Sending to shared groups

To send an email or a calendar invitation a Distribution Group from the shared folder, you need to open the Group in a new window first. Double-click the group name and select the desired action from the ribbon.
One-time sharing
If you need to send a contact or a group to a colleague without the need to share it on an ongoing basis, you can easily do that in Outlook.
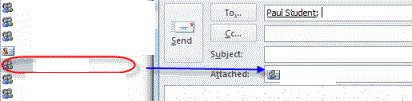
- Create a new message window.
- Open your Contacts folder.
- Drag & Drop the desired Distribution List or Contact record to the new message window.
The recipient will do the exact reverse to save it in their People view.
- Drag & Drop the attached List or Contact to the People icon.
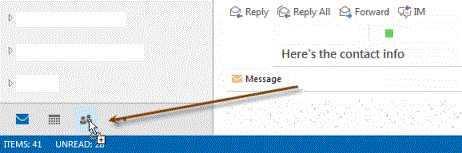
- It will be added to the default Contact folder. It can then be moved into a different folder if desired.
Note: This method doesn’t offer any synchronization options, i.e. updates will not be synced between the copies of these groups and contacts. It is really meant as a one-time exchange of information.
If you have any questions, please contact the Technology Service Desk (604-412-7444 – option 1).